Docker Networking | How does Docker Networking Works?
Mục Lục
Introduction to Docker Networking
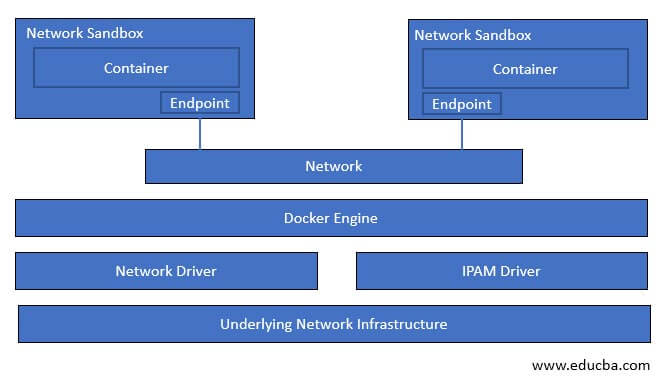
Docker networking allows communication between containers and also with the docker hosts; however, we can also implement docker networking to provide isolation for containers to provide security. Docker uses CNM, i.e., Container Networking Model, to manage networking for Docker containers. CNM uses a network driver and an IPAM driver, i.e., IP Address Management driver, to enable communication between containers. There are three default networks that get created: bridge, host, and none using the bridge, host, and null driver, respectively. Whenever we create a new container by default, it uses the bridge network to communicate with the other pods.
How does Docker Networking work?
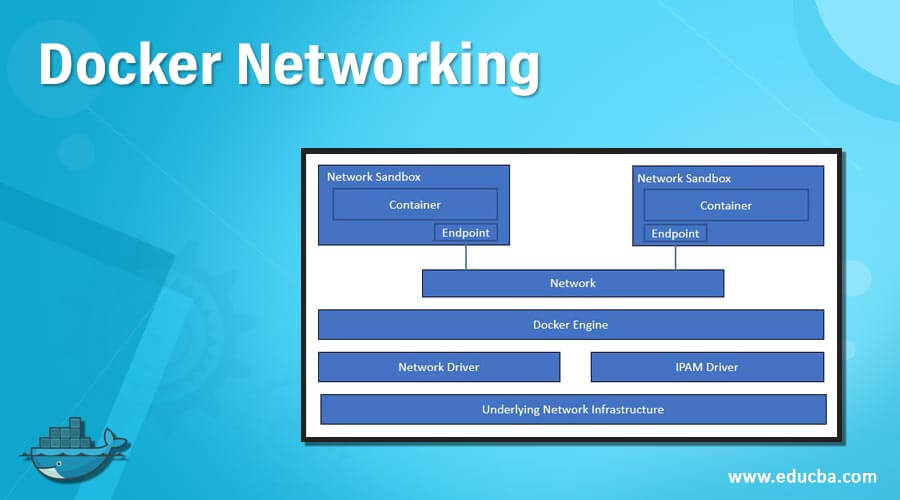
We have to understand CNM to understand Docker networking. CNM uses sandbox, endpoint, and network concepts. What is a sandbox? A sandbox is a single unit having all networking components associated with a single container. It has its own network namespace. Now, if the sandbox wants to communicate to the network, it needs endpoints. A sandbox can have more than one endpoint; however, each endpoint can only connect to one network. Multiple endpoints connected form a network. Now one container can communicate to other containers using that network. A container without any endpoint does not have any idea that there is another container running beside it, so network sandbox provides isolation to secure the container, and it totally depends upon the requirement. In the below example, we can see two containers running in different network sandboxes, and each sandbox has an endpoint, and endpoints are connected to the network so that containers can communicate with each other.
Start Your Free Software Development Course
Web development, programming languages, Software testing & others
Let’s understand about network driver that is the actual implementation of CNM concepts. There are two types of network drivers in Docker networking. The first one is Native Network Driver, and the second one is called Remote Network Drivers. Native Network Drivers are also called built-in drivers that come with the Docker engine, and it is provided by Docker, whereas Remote Network Drivers are third-party drivers created by the community or any vendors. We can create our own drivers to implement specific functionality. Here, we are going to talk about Native Network Drivers, and those are as below: –
- Host Network Driver
- Bridge Network Driver
- Overlay Network Driver
- MACVLAN Network Driver
- None Network Driver
1. Host Network Driver
Host Network Driver uses the host’s networking resources directly, which means the host network adapter is directly connected with container ethernet, as shown in the below image. There is no sandboxing, which means the same network namespace is shared. Unfortunately, it also means we cannot expose two containers with the same port.

2. Bridge Network Driver
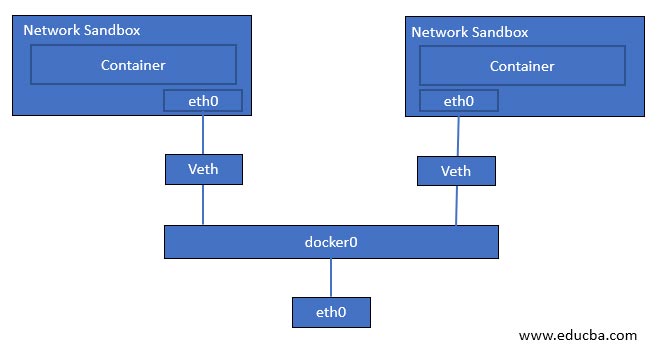
Bridge Network Driver is the default driver for containers running on a single host, not in the cluster. We get isolation in this network driver, which means we can expose the same port on containers, and it will work perfectly fine as each container has its own network namespace. In the below image, we can see the container is running as a sandbox, and its network adapter ‘eth0’ is connected to a ‘veth,’ i.e., virtual ethernet and the ‘veth’ is then connected to the bridge ‘docker0’ and bridge network is using host network adapter for outside communication.
3. Overlay Network Driver
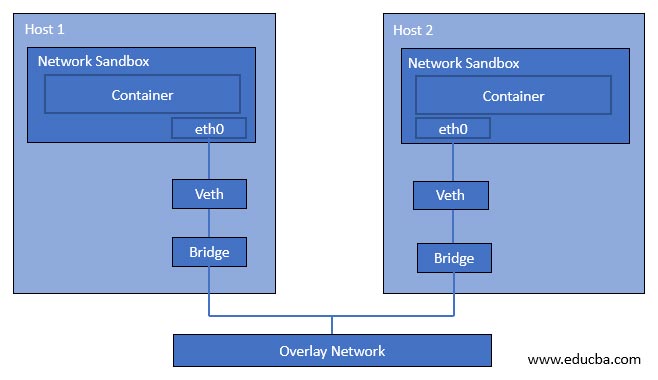
Overlay Network Driver is used in Docker Swarm, or we can say this is the default network driver for clustering. Overlay Network Driver automatically configured network interface, bridge, etc., on each host. If we create a new overlay network on the master node, the docker daemon will not create the newly created overlay network on worker nodes at the same time. It creates a new overlay network on worker nodes as soon as any pod is scheduled on that worker node that is connected to that overlay network.
In the above image, we can see that two containers are running on two different hosts. This is because both containers are connected to the bridge, and the bridge is connected to the overlay network to allow communication between containers running on two different hosts.
4. MACVLAN Network Driver
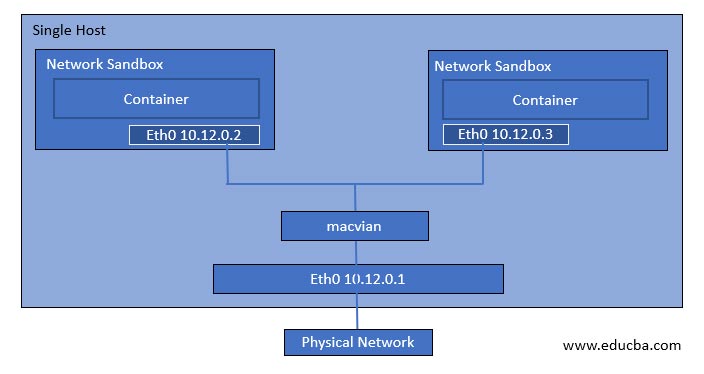
MACVLAN network driver is a lightweight driver and provides low latency as it does not use the bridge; instead container interface is directly connected to the host network interface. If we use this network driver, a single physical interface can have multiple mac addresses and IP addresses using the macvlan sub-interface. However, it is a complex network driver, so it is harder to implement. However, suppose we want the Docker cluster to communicate with our existing network setup, for example. In that case, a container hosting a web application needs to communicate with the hosted database a virtual machine.
In the below image, containers have assigned IP addresses from the same subnet of the existing network setup.
5. None Network Driver
The none network driver is used if we want to disable all networking for any container. It provides full isolation; however, it is not available while using Docker swarm mode.
Commands to Manage Docker Networking
Let’s learn some essential commands to manage Docker networking: –
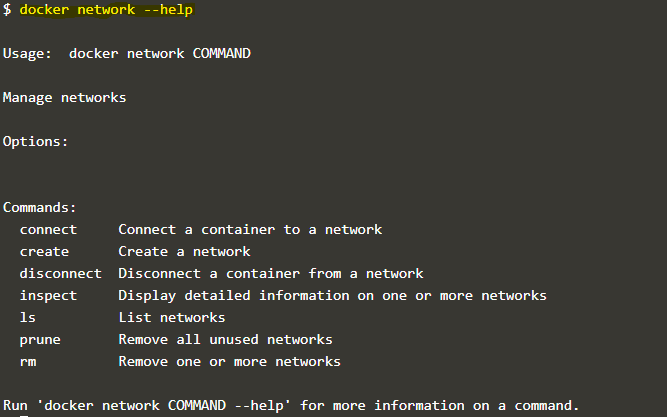
1. We use the ‘docker network’ command to manage Docker networking. Below is the command to know all operations that we can perform using this command: –
docker network --help
2. If we want to know all available networks, we use the ‘ls’ command as below: –
docker network ls

Explanation: In the above snapshot, it shows the default networks created while installing Docker. Each network has a network ID, name, the driver used, and scope. Here, all network has a local scope which means these networks can be used only on this host. In the below snapshot, we can see an overlay network named ‘ingress,’ and its scope is ‘swarm’ which means this network will be available on other hosts in that Docker swarm.
docker network ls

3. If we have to create a new network, we use the ‘create’ command as below: –
Syntax:
docker network create [OPTIONS] NETWORK
Example:
docker network create -d bridge my_br_net

Explanation: In the above example, a network named ‘my_br_net’ has been created using a bridge network driver.
4. If we want to attach a specific network while container creation, we use the ‘–net’ option as below: –
docker run -d --net=my_br_net --name my_container alpine sleep 3600
![]()
5. If we want to know all about any existing network, we use the ‘inspect’ command as below: –
Syntax:
docker network inspect <network_name>
Example:
docker network inspect my_br_net
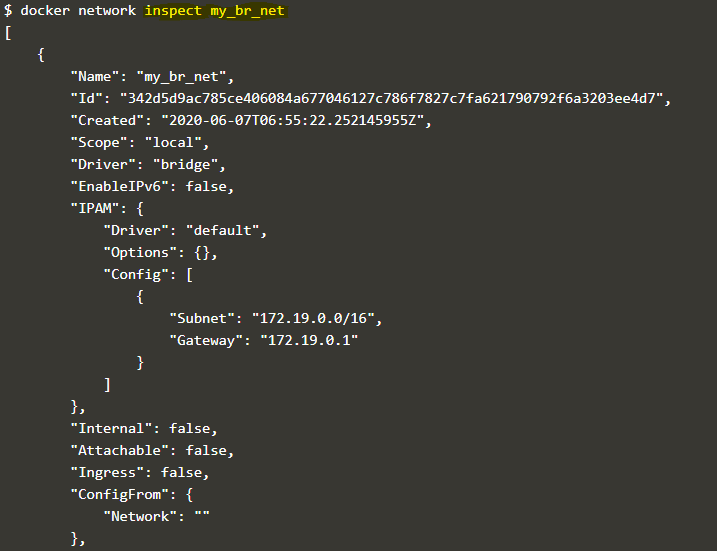
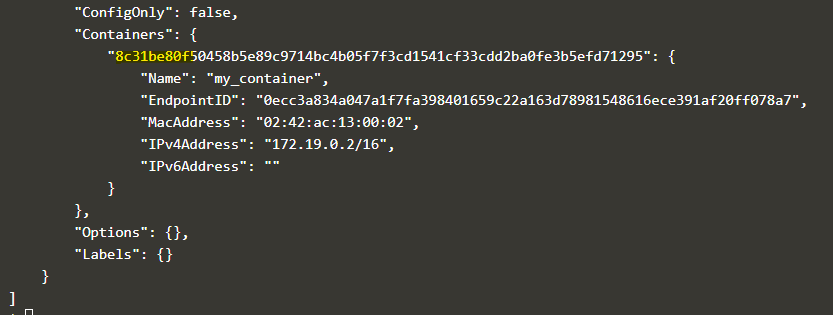
Explanation: In the above snapshot, we can see the containers which are currently connected to this network. It is the same container that we have created in the 4th example.
6. If we want to disconnect the container from any network, we use the ‘disconnect’ command as below: –
Syntax:
docker network disconnect <network_name><container_name>
Example:
docker network disconnect my_br_net my_container

docker network inspect my_br_net
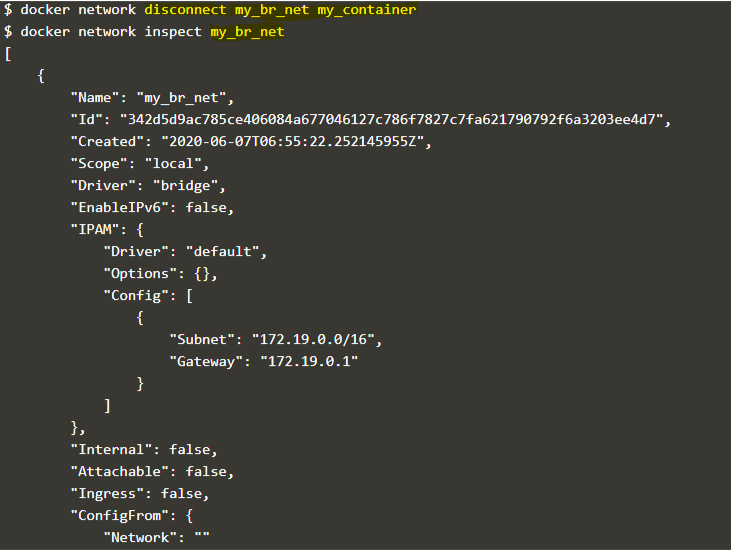

Explanation: In the above example, we disconnected the network ‘my_br_net’ from the container ‘my_container,’ and when we inspect the network ‘my_br_net’ after disconnecting the container, we can see there are no containers available.
7. If we want to connect any network to an existing container, we use the ‘connect’ command as below: –
Syntax:
docker network connect <network_name><container_name>
Example:
docker network connect my_br_net my_container2 alpine sleep 3600
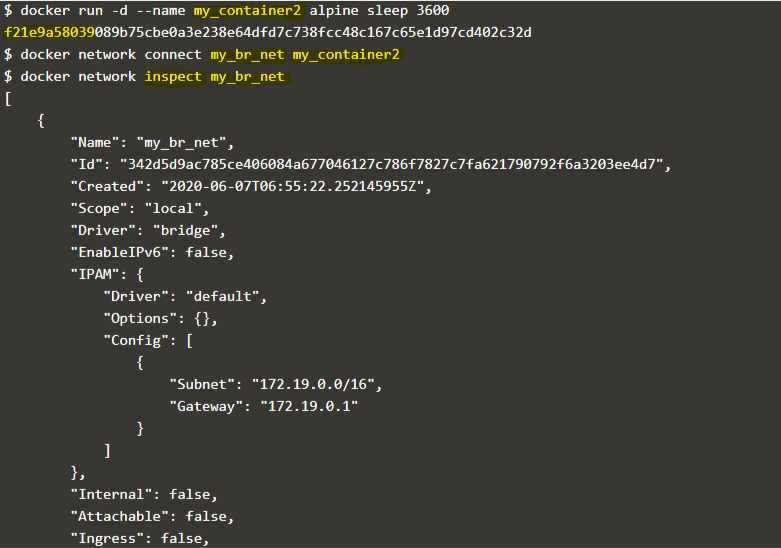
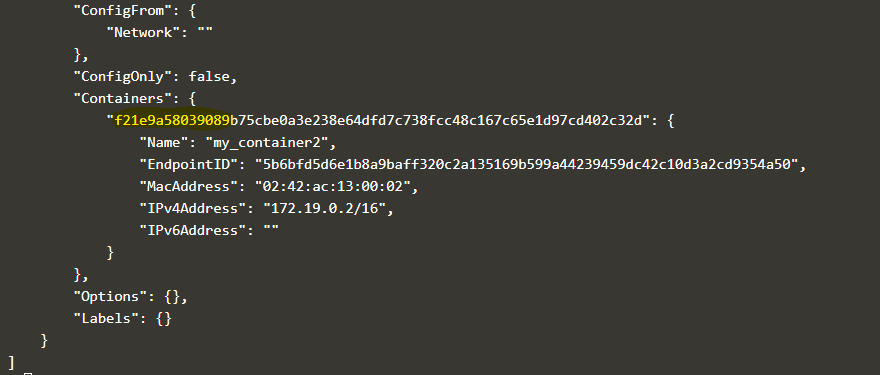
Explanation: In the above example, we created a new container named ‘my_container2,’ and connected the ‘my_br_net’ network to it, and if we inspect the network once again, we can see the attached container to this network which is the same container.
8. We can remove any existing network or more than one network at the same time if no longer in use or created by mistake using the ‘rm’ command as below: –
Syntax:
docker network rm <network1_name><network2_name>
Example:
docker network rm my_br_net my_container2

docker network rm my_br_net

Explanation: In the above example, we tried to remove the ‘my_br_net’ bridge network however got an error as there is one container connected to it, so first we need to disconnect the container, and then only we can remove the network that is good to avoid network disruption.
9. We can remove all unused networks using the ‘prune’ command as below: –
docker network prune

docker network ls
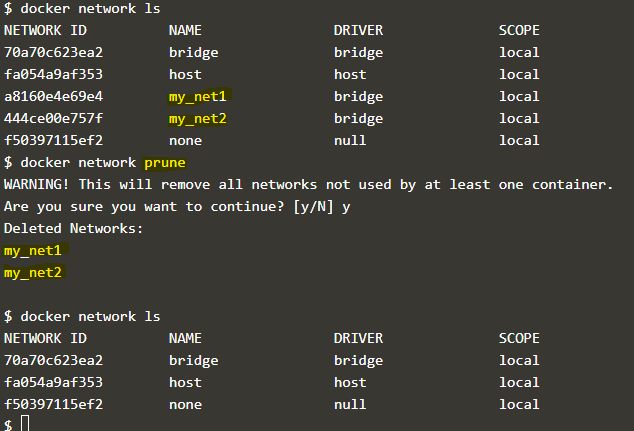
Explanation: In the above snapshot, we created two new networks, ‘my_net1’ and ‘my_net2’, which are not connected to any of the containers. We use the ‘prune’ command to delete those networks at once; however, we can see default networks is still exist. This command does not affect default networks.
There are options available like -f and –filter to forcefully delete the networks without confirmation and to delete the networks after filtering it based on value like ‘until=<timestamp>’ respectively.
Conclusion
Docker networking was very complex in earlier days, but now it has become very straightforward. Almost all essential commands have been covered; however, you can use ‘–help’ with each network command to know more about that specific command, such as all available options.
Recommended Articles
This is a guide to Docker Networking. Here we discuss How does Docker Networking works along with the Commands and its syntax with examples and explanations. You may also have a look at the following articles to learn more –
0
Shares
Share


![Toni Kroos là ai? [ sự thật về tiểu sử đầy đủ Toni Kroos ]](https://evbn.org/wp-content/uploads/New-Project-6635-1671934592.jpg)


