Denon Professional – Professional-grade Audio/Video Recording, Playback and Signal Distribution
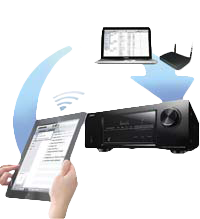 Denon Professional offers a number of network recorders, and media players. In this guide we will show you how to connect your computer directly to your Denon hardware for network functionality testing. If you are having trouble connecting your Denon Professional gear over your home/work network this guide will help determine whether it’s a network or hardware issue.
Mục Lục
Items Required for Testing:
- Denon Professional Network Recorder or Media Player
- Computer:Windows or Mac OS with Ethernet Connection Port
- Ethernet Cross Over Cable
Network Settings: Windows
The settings below are shown on Windows 7. Depending on your OS version these settings may appear different than the images below.
-
From the Start Menu choose Control Panel. In the upper right corner of the window that appears, set View By: to Category.
-
Under Network and Internet, click View network status and tasks.

-
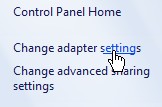
On the left sidebar click Change adapter settings.
-
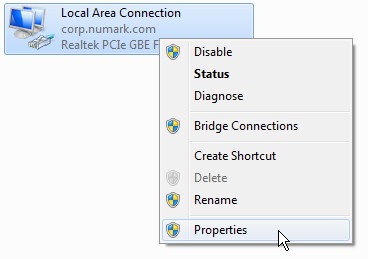
Right click Local Area Connection, and choose Properties.
-
Select and highlight Internet Protocol Version 4 (TCP/IPv4), then click Properties.

- Click the Use the following IP address: radio button. This will allow us to assign a static IP address to the computer. Click here for more info on Dynamic vs. Static IP Addresses.
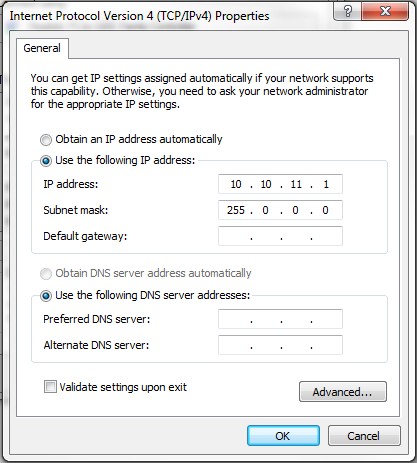
- For this example I am using an IP address of 10.10.11.1. You can set this to whatever you like as long as the first three “octets” or groups of number are the same on both the computer, and the Denon Professional networking hardware. The last octet is used to assign a specific address to each device. In the example above I have set the computer to have the address of 1, and I will set my Denon hardware to 2. This is outlined more in detail in the the Denon Professional Hardware Setup section below.
Network Settings: Mac
The settings below are shown on Mac OS X 10.8.5. Depending on you OS version these settings may appear differently then the images shown below.
- If available disable or turn off your Wi-Fi.
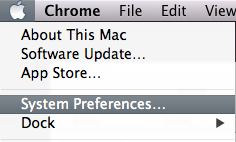
- From the top left corner open your System Preferences.
- From the Internet & Wireless section click on the Network icon.

- On the left sidebar click the Ethernet tab. Configure your settings as they are shown below. For this example I am using an IP address of 10.10.11.1. You can set this to whatever you like as long as the first three “octets” or groups of number are the same on both the computer, and the Denon Professional networking hardware. The last octet is used to assign a specific address to each device. In the example above I have set the computer to have the address of 1, and I will set my Denon hardware to 2. This is outlined more in detail in the the Denon Professional Hardware Setup section below.
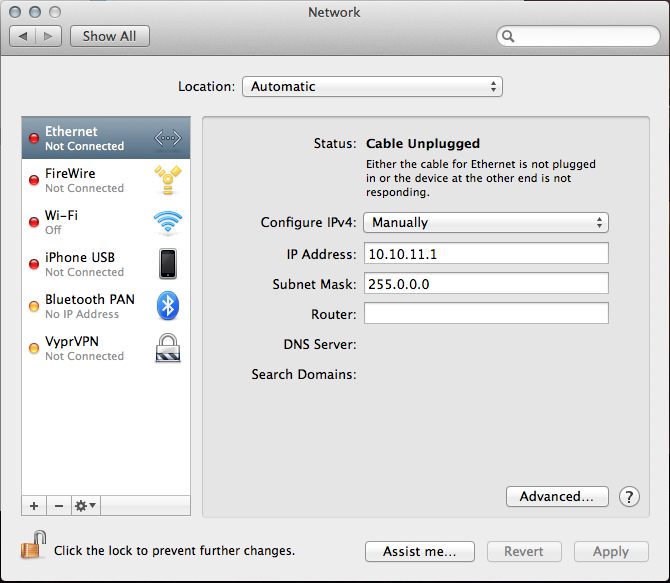
- Click Apply to save the settings.
Denon Professional Hardware Setup
The following generalized steps are the standard process for most Denon Professional products. Refer to your product’s user manual for specific steps if necessary.
- Connect one end of the cross over ethernet cable to your computer, and the other to the LAN port on your Denon Professional Networking hardware.
- On the front of your Denon hardware press the Menu or Utility button.
- Scroll to the IP Address setting in the menu.
- Turn off Auto IP (Dynamic) so that you can manually (Static) set the IP address of your Denon hardware.
Click here for more info on Dynamic vs. Static IP Addresses.
- Set the IP address to 10.10.11.2. Push the encoder or press Store depending on your hardware to save this setting.
- Power cycle the device to ensure the new IP address has been assigned.
Remote Access
- With both devices connected, powered on, and on the same closed network – open a web browser such as Chrome, Firefox, or Internet Explorer.
- In the address bar at the top, type in the IP address you assigned to your Denon Hardware.

- Hit Enter or Return to connect.
- Once connected you will see the Web Remote or interface of your Denon device. Successful connection with a crossover cable confirms that the Denon hardware is functioning as expected. If you are not able to connect to the Web Remote through your home or work network you will want to contact your network administrator for further assistance.

Further Technical Support
Whether you are a customer or dealer, if you already own a Denon DJ product, or if you just have pre-sales questions, the Denon DJ technical support team is available to help!
Visit the link below to connect with any of the following support options: phone support, email support.


![Toni Kroos là ai? [ sự thật về tiểu sử đầy đủ Toni Kroos ]](https://evbn.org/wp-content/uploads/New-Project-6635-1671934592.jpg)


