Could Not Connect To Steam Network [SOLVED]
There’s no doubting the non-pareil presence of Steam in the PC gaming industry today. Valve’s very own online video game platform is a force to be reckoned with, boasting an exhaustive array of titles in its immense catalog and a bevy of in-built launcher features to keep things running smoothly. However, certain scenarios will lead you to experience your fair share of hiccups with the software, such as the could not connect to Steam network error.
Key Highlights
-
The “
Could not connect to Steam network
” issue can happen
randomly
when you try to
log into
your
Steam account
.
-
To fix the error, you should first check the
status
of the
Steam servers
and confirm that they are
not down
.
-
If the Steam Servers are working properly,
restart
the
Steam client bootstrapper service
using the
task manager
.
-
Additionally, try
changing
the
target address
of the Steam app, along with running it with
admin privileges
.
-
Temporarily
disable
your
Antivirus software
to make sure that it is not causing the error.
-
Try
resetting
your
IP address
using command prompt. You can also
update
your
network driver
and then see if that
fixes
the error.
-
Use a different
DNS server
than the one you are currently using.
-
In case you are using
Windows 11
, try performing a
network reset
.
-
If the error still seems to persist, you should try
reinstalling
the
desktop Steam launcher
.
Without any further ado, let’s check out all the different measures you can take to resolve the vexing Steam error and get back to playing almost immediately.
- Similar Read: How to Fix Steam Confirmation Error
Mục Lục
What Is The “Steam Could Not Connect To Steam Network”
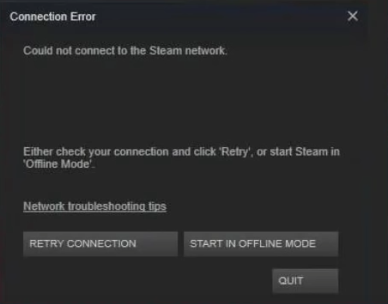
The “could not connect to the Steam network” issue surfaces abruptly without any prior notice. It’s definitely a huge pain to deal with when you cannot even log into Steam’s servers and play all those games sitting in your library. It’s just annoyingly surprising to discover the next time you launch the well-reputed launcher on your end, especially considering how the problem leaves you utterly helpless.
The image that you can see right below the headline of the subtitle is a clear illustration of the issue at hand. An error prompt manifests on the screen, instructing you to, “Either check your connection and click ‘Retry,’ or start Steam in Offline Mode.” No matter whether you keep going at the “Retry” button incessantly, things still aren’t going to improve on their own unless you do something real about them.
Also Check Out: Minecraft Realms Internal Server Error
Best Ways To Fix Steam Network Issue
The following is our cherry-picked collection of all the different ways the Steam network error can be resolved for good. Be sure to follow the instructions diligently for the best results.
Check Steam Server Status
It’s not set in stone that we’re the ones at fault here when the “could not connect to the Steam network” pops up. Chances are that Steam might be suffering from an issue from the back-end, which happens to be the side of the people up high in control of moderating the diverse services of the Steam software. Given its online-only nature, the launcher heavily depends on its servers running optimally.
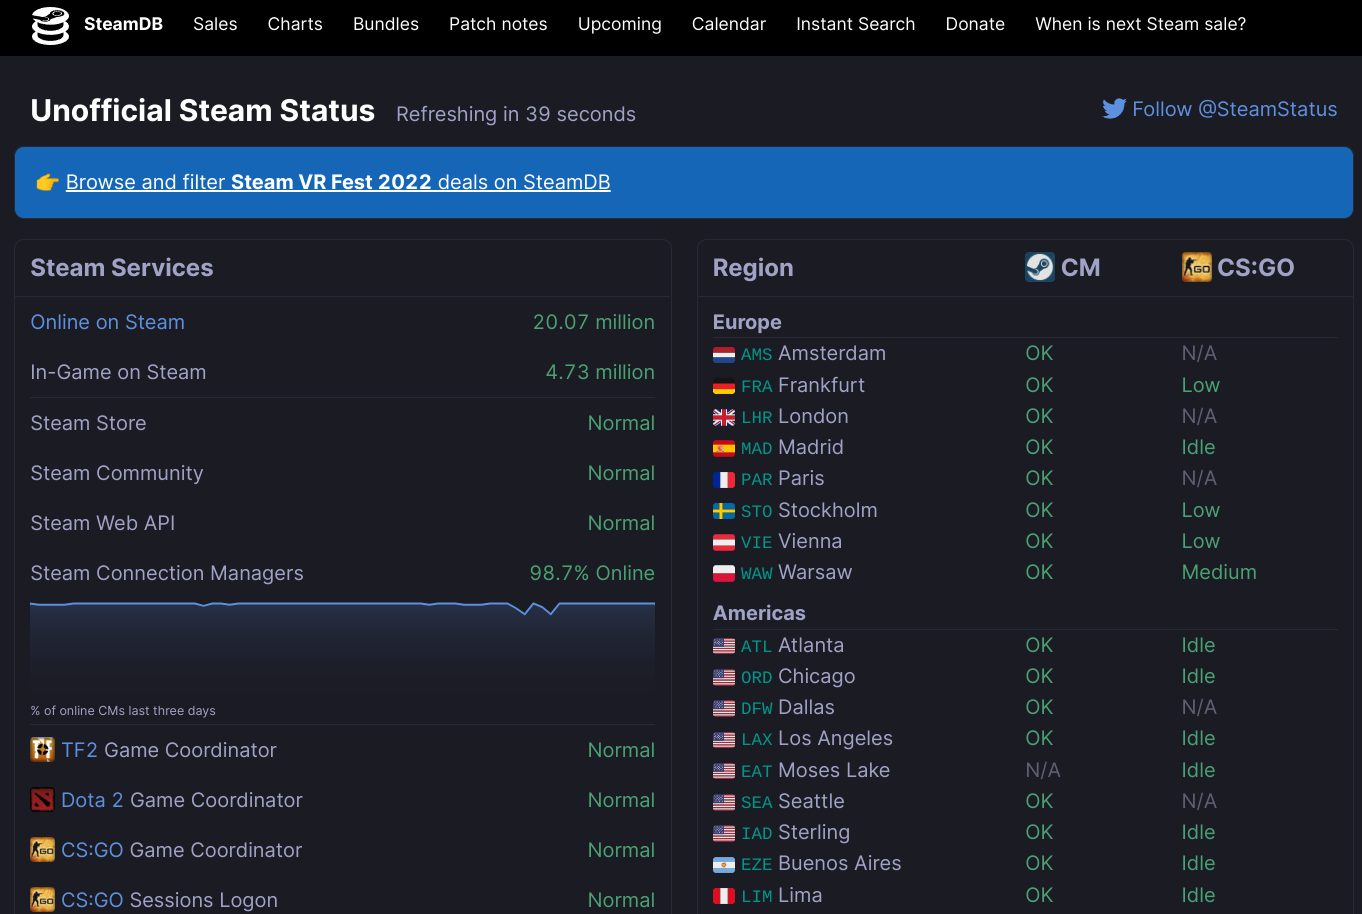
In the case where that isn’t a possibility at a specific time, you’ll definitely face problems with running Steam, such as not being able to connect right from the get-go. The quickest way to ensure that your device or internet connection isn’t the culprit to blame is to authenticate Steam’s server status. A fan-curated website called Steam Status is your best bet regarding the matter at hand.
The site promptly pulls up data and verifies whether Steam is running perfectly or if there’s something barring optimal usability at the moment. Check out the following screenshot of Steam Status. As you can comprehend, everything’s tip-top normal at the time of writing.
Restart The Steam Client Bootstrapper Service
A working method that has prevailed for a ton of players pertains to restarting the Steam Client Bootstrapper process on your Windows PC. This is a part of the mainline Steam app that’s running in the background on the device you have.
Several people have gone forth with the restart only to discover that it finally got the application working again. Therefore, in the case that there’s a chance that the method has potential, you have to go for it without a second opinion.
We’re going to follow a step-by-step process and carry out a working fix to the issue in question. Shouldn’t be too hard to follow.
- The first step is to completely shut down the Steam Launcher. Make sure you top it off from the Task Manager as well.
- Secondly, restart the Steam Client Bootstrapper process. This will also be done from the Task Manager as you can comprehend from the screenshot below.

- Launch Steam and see whether you can finally start it up.
Modify The Target Address Of The Steam App
There’s one more trick that has been working like a charm for those who cannot get the Steam launcher to work on their end. It pertains to modifying the “Target” address of the Steam application. By incorporating another protocol in the mix, it is very much possible to get through this annoying error code that we’re up against.
All you have to do, therefore, is fire up the “Properties” of the Steam application, locate the “Target” section and add another entry at its far end. In case you’re not well-versed with processes such as these, the following steps are going to take it from here.
- Get started by right-clicking on the Steam shortcut icon on your desktop and then clicking on “Properties.”
- Right after that, a small-scale window will surface on your screen. Select the “Shortcut” tab to continue from here.
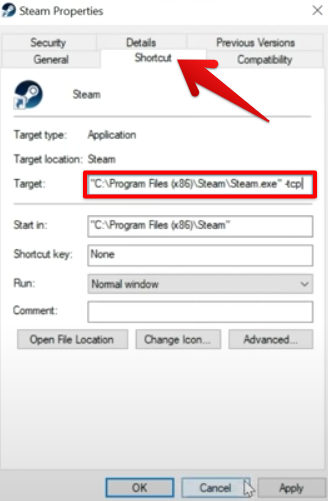
- Once done, click on the box beside “Target,” move the cursor to the end of the text, press the space bar once, and add “-tcp” to it, similar to how it is shown in the screenshot below.
- Finally, click on “Apply” and press the “OK” button. You should be done in a moment’s time.
That’s all about it for modifying the “Target” address of the Steam app. Try starting the launcher now and see whether it starts up. You should be able to get going with the program now but if things still do not go your way, try what we’ve curated for you ahead.
Run Steam With Administrator Privileges
Providing Steam administrator privileges is the way to go if you want limitless access to the famed desktop launcher. Sometimes, when you’re not running the app as an admin, a bevy of issues are bound to surface inadvertently, thereby making the ordeal an unmitigated disaster. This is a direct jab at the “could not connect to Steam network” issue.
That is why it’s preferred to run Steam with the power of an administrator to get the literal best out of it no matter what. Now, there are a couple of ways you can achieve the task at hand, but let us go over the easy one for your understanding. Simply type in “Steam” in the Windows Search bar to make the application pop up on the screen.
Right after that, click on the “Run as administrator” button to finalize the process. That’s one way of launching Steam with admin privileges, but if you’re after a more permanent solution, there’s another thing to try.
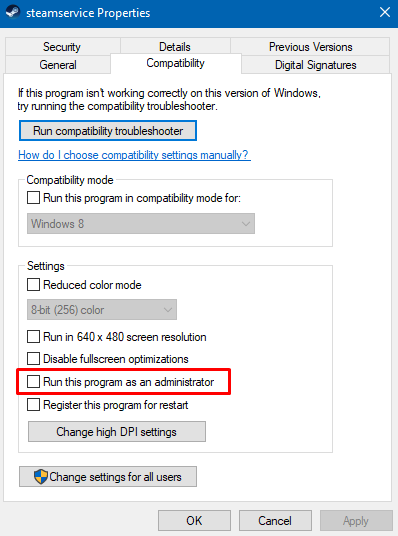
Look for the executable Steam file application in the File Explorer region of your PC. Once you locate it, double-click on the entry, and select “Properties.” Doing so should open up a new window on your end, allowing you to click on “Compatibility” without breaking a sweat.
At last, toggle on the box beside “Run this program as an administrator,” apply the changes, and click on “OK.” That’s all there is to it!
This is your green signal to launch Steam again and see if the issue at hand still exists.
Disable Your Antivirus Temporarily
Some users across community forums seem to claim that the antivirus software of their Windows PC is hindering Steam’s ability to run.
This, of course, is definitely not set in stone, so we have to test the theory out and confirm its genuineness ourselves. If you’ve got the Windows Defender Firewall software up and running, toggle it off for a moment to potentially resolve the “could not connect to the Steam network” error.
The following steps are going to clarify the exact process you can use to disable Windows Defender temporarily. That way, you’ll be able to launch Steam to see whether it works normally now.
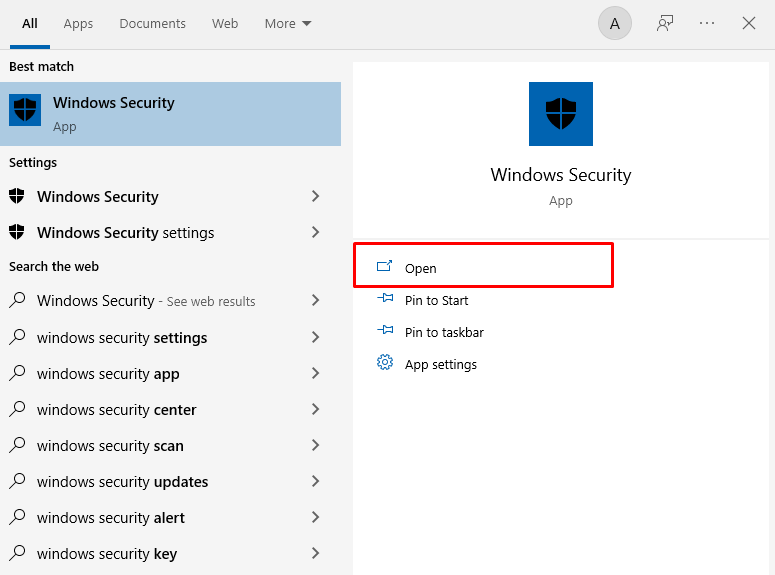
- Get started by searching for “Windows Security” in the Windows Search bar. Click on the application when it pops up to get to the next step.
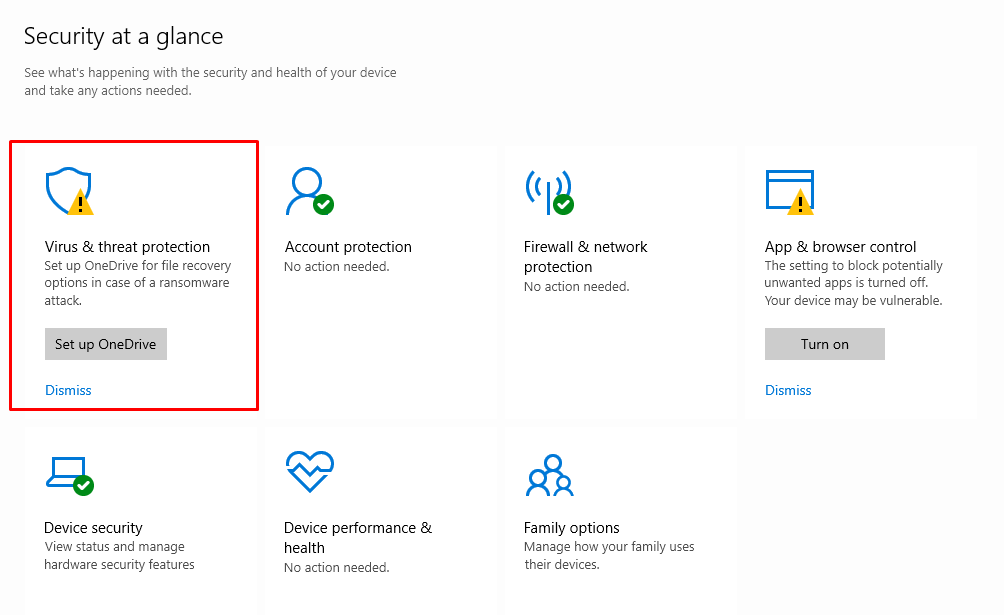
- Right after that, select the “Virus and threat protection” section to move forward. In the final step, you should be able to disable your Windows antivirus software.
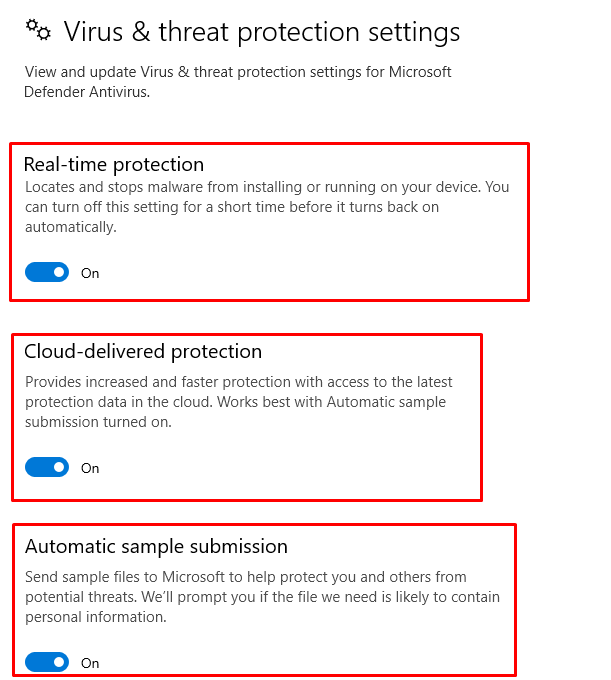
- In the final step, simply turn off the following features in the “Virus and threat protection settings” section. All you have to do is click on the respective toggle underneath each setting to disable it. This should be fairly simple to complete.
Great going so far! You’ve now properly disabled your operating system’s in-built antivirus. Try whether Steam can benefit from it or not. Try firing up the launcher to confirm the culprit of the issue in question. If you still haven’t been able to alleviate the situation, keep on reading to try a bevy of other fixes.
- Similar Read: Skyrim SE Won’t Launch.
Use The Command Prompt To Reset Your IP
Next up, we’ll be utilizing the Command Prompt to tweak some of our IP-related settings on the Windows PC. It appears that renewing your IP address through this high-end system utility potentially resolves Steam’s network-centric issue.
Many players were able to get the app working by implementing a series of commands in the Command Prompt and rendering their internet connection more profound.
All you have to do to employ the potential solution to the issue at hand is follow the steps given below. Make sure to replicate the provided guidelines verbatim for the best results.
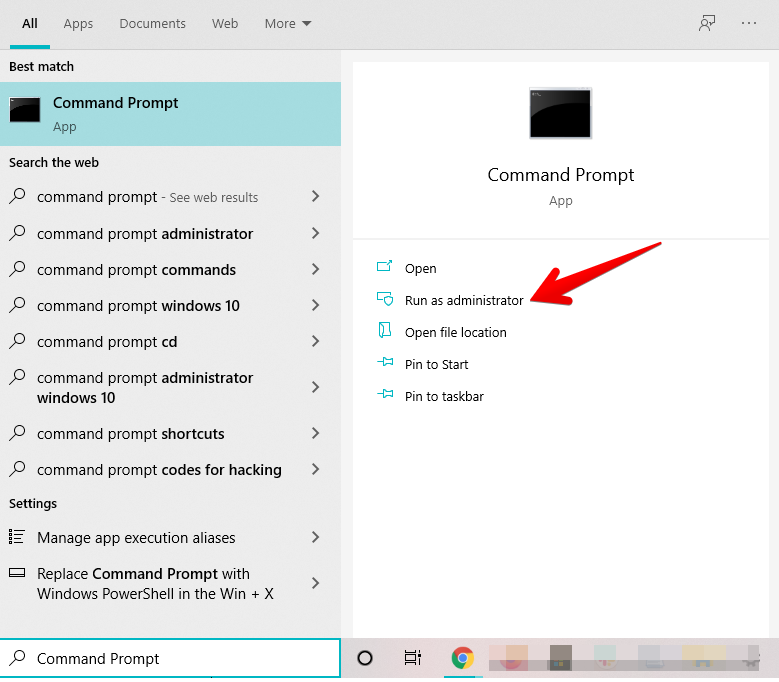
- The first step is to open the Command Prompt on your Windows PC. This can be done effortlessly from the Windows Start menu or from the Taskbar area if you have the app pinned there. Lastly, make sure you run the app as an administrator to avoid any potential hassles.
- As soon as the Command Prompt is up and running, use the “ipconfig /flushdns” command and press the “Enter” key. This will help us flush our DNS, meaning that it’ll clear away any left-over IP addresses that might possibly be affecting our entanglement with Blizzard’s servers.

- Right after that, we’re going to input another command. This time, we’ll be registering a new DNS instead of clearing it. Use “ipconfig /registerdns” and enter it into your Command Prompt. The process can take a while, so do sit tight. We’ll also be creating a perceivable report and it’ll pop up in the “Event Viewer” menu after 15 minutes or so.

- The next step is to renew your DNS. Use the “ipconfig /renew” command to go through with it painlessly.

That’s basically about it! You’ve successfully managed to renew your IP address and refresh it as well, meaning that there’s a nice chance of getting back to using Steam properly.
Try launching the app to see whether you can get into your account smoothly now. If you finally can, congratulations! However, keep on reading and try the fixes outlined ahead in the case that the program is still giving you issues.
Update Your Network Driver
We’ve all been through the pangs of not having up-to-date graphics drivers, but it’s high time that we shed some light on your device’s network drivers as well. It is possible that an outdated version of the latter might be preventing you to run the Steam launcher appropriately, causing a girth of network issues. Authenticate by going into the “Device Manager” system app and taking a look at your “Network adapters.”
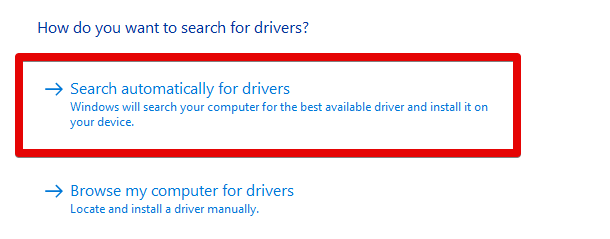
As soon as you click on the drop-down menu, all of the installed “Network drivers” will appear in a list form. From there, right-click on the relevant driver and select “Update driver.” Lastly, you will be prompted to look for drivers either manually or automatically. Choose the latter as shown in the screenshot below to get the job done.
Oh, and do consider something like Avast Driver Updater that takes care of your driver updating needs on the fly. Software such as the latter automate the whole drive updating procedure, so you don’t have to indulge into this laborious endeavor yourself.
Even in the case that you have fully updated network drivers and the Steam launcher still isn’t budging from its position, try what we have prepared for you ahead.
Use An Alternative DNS
One of the most helpful things to try is changing your DNS settings to different ones on your Windows PC. DNS is short for Doman Name System and is an integral component of computing devices that house the capability of using an internet connection. It makes access to different IP addresses possible and makes communication with web servers a reality. More colloquially, DNS is also referred to as the phonebook of the internet.
There is a high probability that the solution to the bothersome Warzone issue rests within changing your DNS settings. It is what we’re going to basically do here in the fix at hand. Let’s get right down to it with the following steps.
- The first step is to open the “Settings” of your device. This can be done through the Windows Start menu or through the Taskbar if you have the app pinned there.
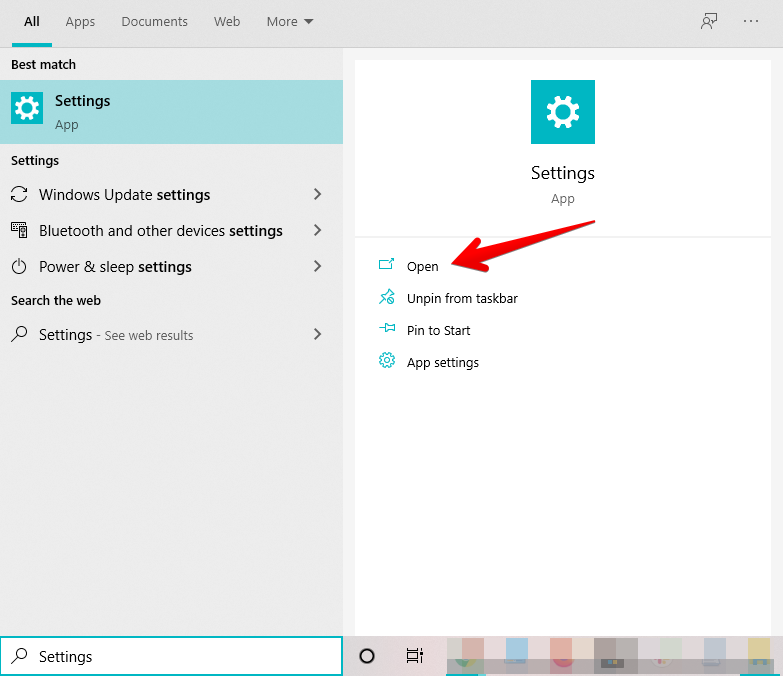
- The next step after having the “Settings” application opened is to select the “Network and Internet” option. The following screenshot describes where to click.

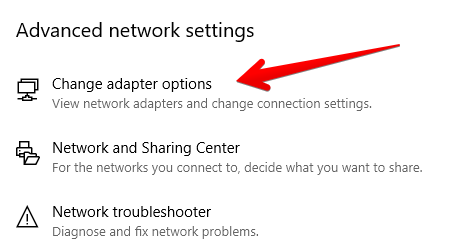
- Doing so will take you to all the internet-related settings of your Windows PC. You now have to select the “Change adapter options” button under the “Status” page of the whole section. Check out the following screenshot for more information.
- A new window will open now called “Network Connections.” You’ll be met with four different types of connections here. The way forward is choosing the right connection that you’re actually using on your PC. If you’re using a wired Ethernet connection, you’ll have to go with that one to move further, so do evaluate this crucial point right now. We’re going to go with Wi-Fi as an example here. Double-click on the correct connection type and then click on “Properties” to get to the next step.

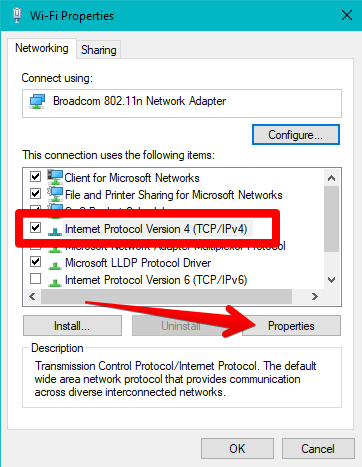
- You’ll now be seeing another small-scale window on your screen. This is where you’ll be able to adjust your DNS settings, but not quite right now. Scroll down the list of the items on show and select “Internet Protocol Version 4 (IPv4).” Then, click on “Properties” to get to the next step.
- The final step is where you’ll have to deal with another window that will pop up on the screen after clicking on the “Properties” button. This is where you’ll finally be putting in the DNS settings and switching them to alternate ones. To get started, toggle the “Use the following DNS server addresses” as specified in the screenshot below and enter “8.8.8.8” in the “Preferred DNS server” bar.
- You’ll subsequently have to enter “8.8.4.4” in the blanks for “Alternate DNS server” as well. As soon as you’re done with all that, don’t forget to check the box beside “Validate settings upon exit” before finalizing the process by clicking on “OK.”
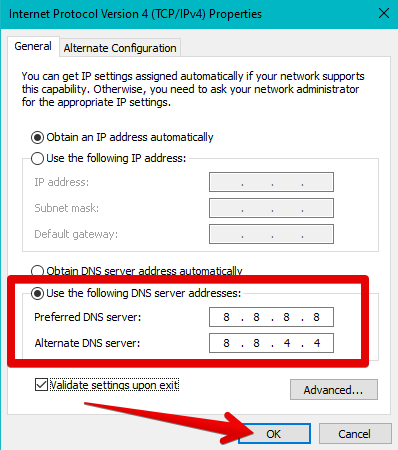
That’s all about changing your DNS settings to alternative ones for fixing the could not connect to the Steam network error. We suggest restarting your PC afterward to properly apply the changes to your system.
After the device boots back on, check whether the Steam app runs without getting interrupted by the error prompt in question. You should be able to use the app perfectly now, but if the problem still continues to exist, then keep on reading and don’t lose hope just yet.
Perform A Network Reset
A “Network Reset” is an exclusive Windows 11 feature that can help you refresh your device’s connectivity. Let’s cut to the chase and talk about how to perform one without any further delay.
- The first step is to fire up the “Settings” system app on your Windows PC. Feel free to use the Windows Search bar to get that done.
- As soon as you’re in, click on “Network and internet” on the panel to the left. Doing so should switch up the contents of the screen for you. The next task in line is to click on “Advanced network settings” as you can see in the screenshot below.
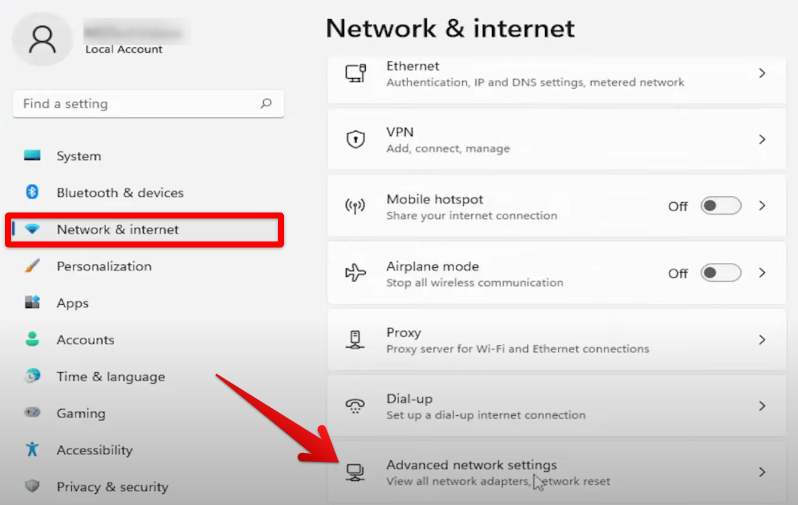
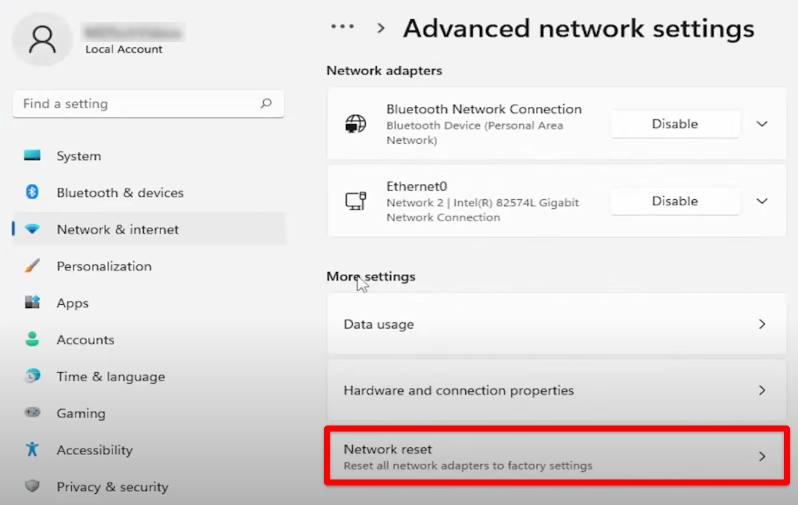
- You now have to select “Network reset” under the “More settings” subsection.
- The final step is to click on the “Reset” button right beside “Network reset.” Once you click on the button, things should roll into motion for you.
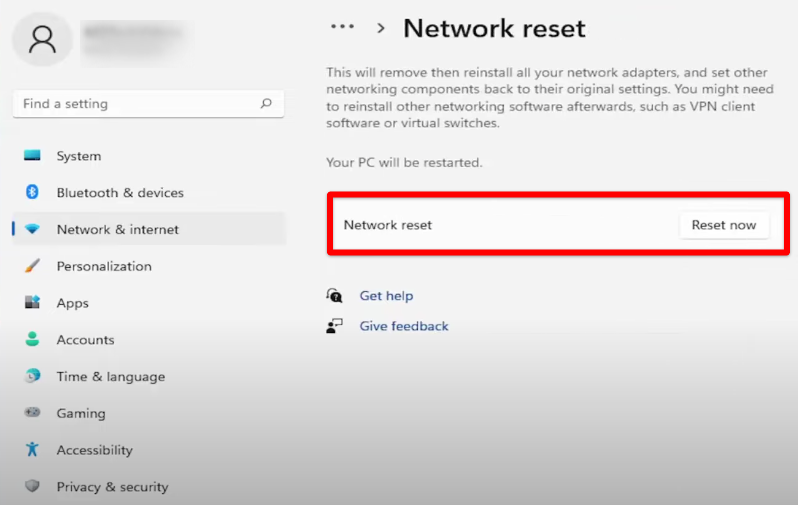
That’s about it! Restart your PC and launch Steam as soon as it boots back on. There’s a high chance you’ll be able to play your games swimmingly from here on out. In the case that you still can’t, we’re afraid there’s only one more potential fix left to shoot your shot at.
Reinstall The Desktop Steam Launcher
The possibility of restoring the Steam app’s proper functioning does seem low when you’ve tried everything there is to shoot for but nothing is seemingly working still. However, there is one more measure left taking that is proving itself to be the most definitive fix to the could not connect to the Steam network after performing a network reset.
The latter is all about uninstalling the app first and then getting it back on your Windows PC again. From what we can collect, this happens to resolve the problem almost immediately.
The Steam app doesn’t truly sport an exorbitantly huge file size, so you should be able to download it on your system again in due time. The file size of the launcher is somewhere around 1 GB, which isn’t too exorbitant for the most part.
You can uninstall the app natively on your Windows PC. Simply hover over to the “Add or remove programs” area on Windows 10, scroll down in the “Apps” section to find “Steam,” and uninstall it from there painlessly. With some spell of luck and fortune, the game should be up and running once you have it back on your PC now.
Once you finally manage to delete the app, proceed toward installing it one more time. Wait until the installation finishes and then launch the famous Valve launcher to confirm whether you can log in comfortably now.
There’s a great possibility that the issue at hand will cease to exist in the wake of applying this potential solution. Do let us know whether the reinstallation bears fruit for you or not, so other users can draw benefit from your feedback.
With that said, we’ve gone ahead and talked about the most robust options available for you to try and get the scenario sorted promptly. It appears that tweaking your DNS settings along with running Steam as an administrator mostly gets the job done. However, if those two measures don’t do the trick, do implement the rest of the fixes for the best results.
Do let us know in the comments section whether you were able to get Steam up and running again or not. As always, eXputer wishes you good luck!
- Before You Leave: Cities Skylines Too Few Services error fix
Was this article helpful?
Thanks! Do share your feedback with us. ⚡
How could we improve this post? Please Help us. ✍


![Toni Kroos là ai? [ sự thật về tiểu sử đầy đủ Toni Kroos ]](https://evbn.org/wp-content/uploads/New-Project-6635-1671934592.jpg)


