
Chapter 7. Configuring a network bridge Red Hat Enterprise Linux 9 | Red Hat Customer Portal
Mục Lục
Chapter 7. Configuring a network bridge
A network bridge is a link-layer device which forwards traffic between networks based on a table of MAC addresses. The bridge builds the MAC addresses table by listening to network traffic and thereby learning what hosts are connected to each network. For example, you can use a software bridge on a Red Hat Enterprise Linux host to emulate a hardware bridge or in virtualization environments, to integrate virtual machines (VM) to the same network as the host.
A bridge requires a network device in each network the bridge should connect. When you configure a bridge, the bridge is called controller and the devices it uses ports.
You can create bridges on different types of devices, such as:
- Physical and virtual Ethernet devices
- Network bonds
- Network teams
- VLAN devices
Due to the IEEE 802.11 standard which specifies the use of 3-address frames in Wi-Fi for the efficient use of airtime, you cannot configure a bridge over Wi-Fi networks operating in Ad-Hoc or Infrastructure modes.
7.1. Configuring a network bridge using nmcli commands
To configure a network bridge on the command line, use the nmcli utility.
Prerequisites
- Two or more physical or virtual network devices are installed on the server.
- To use Ethernet devices as ports of the bridge, the physical or virtual Ethernet devices must be installed on the server.
-
To use team, bond, or VLAN devices as ports of the bridge, you can either create these devices while you create the bridge or you can create them in advance as described in:
- Configuring a network team using nmcli commands
- Configuring a network bond using nmcli commands
- Configuring VLAN tagging using nmcli commands
Procedure
-
Create a bridge interface:
#
nmcli connection add type bridge con-name
bridge0
ifnamebridge0
This command creates a bridge named
bridge0, enter: -
Display the network interfaces, and note the names of the interfaces you want to add to the bridge:
# nmcli device status
DEVICE  TYPE      STATE         CONNECTION
enp7s0  ethernet  disconnected  --
enp8s0  ethernet  disconnected  --
bond0   bond      connected     bond0
bond1   bond      connected     bond1
...
In this example:
-
enp7s0andenp8s0are not configured. To use these devices as ports, add connection profiles in the next step. -
bond0andbond1have existing connection profiles. To use these devices as ports, modify their profiles in the next step.
-
-
Assign the interfaces to the bridge.
-
If the interfaces you want to assign to the bridge are not configured, create new connection profiles for them:
#
nmcli connection add type ethernet slave-type bridge con-name
#bridge0-port1
ifname enp7s0 master bridge0nmcli connection add type ethernet slave-type bridge con-name
bridge0-port2
ifname enp8s0 master bridge0These commands create profiles for
enp7s0andenp8s0, and add them to thebridge0connection. -
If you want to assign an existing connection profile to the bridge:
-
Set the
masterparameter of these connections tobridge0:#
nmcli connection modify
#bond0
master bridge0nmcli connection modify
bond1
master bridge0These commands assign the existing connection profiles named
bond0andbond1to thebridge0connection. -
Reactivate the connections:
#
nmcli connection up
#bond0
nmcli connection up
bond1
-
-
-
Configure the IPv4 settings:
-
To use this bridge device as a port of other devices, enter:
#
nmcli connection modify bridge0 ipv4.method disabled
- To use DHCP, no action is required.
-
To set a static IPv4 address, network mask, default gateway, and DNS server to the
bridge0connection, enter:#
nmcli connection modify bridge0 ipv4.addresses '
#192.0.2.1/24
'nmcli connection modify bridge0 ipv4.gateway '
#192.0.2.254
'nmcli connection modify bridge0 ipv4.dns '
#192.0.2.253
'nmcli connection modify bridge0 ipv4.dns-search '
#example.com
'nmcli connection modify bridge0 ipv4.method manual
-
-
Configure the IPv6 settings:
-
To use this bridge device as a port of other devices, enter:
#
nmcli connection modify bridge0 ipv6.method disabled
- To use DHCP, no action is required.
-
To set a static IPv6 address, network mask, default gateway, and DNS server to the
bridge0connection, enter:#
nmcli connection modify bridge0 ipv6.addresses '
#2001:db8:1::1/64
'nmcli connection modify bridge0 ipv6.gateway '
#2001:db8:1::fffe
'nmcli connection modify bridge0 ipv6.dns '
#2001:db8:1::fffd
'nmcli connection modify bridge0 ipv6.dns-search '
#example.com
'nmcli connection modify bridge0 ipv6.method manual
-
-
Optional: Configure further properties of the bridge. For example, to set the Spanning Tree Protocol (STP) priority of
bridge0to16384, enter:#
nmcli connection modify bridge0 bridge.priority '16384'
By default, STP is enabled.
-
Activate the connection:
#
nmcli connection up bridge0
-
Verify that the ports are connected, and the
CONNECTIONcolumn displays the port’s connection name:#
nmcli device
DEVICE TYPE STATE CONNECTION ... enp7s0 ethernet connected bridge0-port1 enp8s0 ethernet connected bridge0-port2When you activate any port of the connection, NetworkManager also activates the bridge, but not the other ports of it. You can configure that Red Hat Enterprise Linux enables all ports automatically when the bridge is enabled:
-
Enable the
connection.autoconnect-slavesparameter of the bridge connection:#
nmcli connection modify bridge0 connection.autoconnect-slaves 1
-
Reactivate the bridge:
#
nmcli connection up bridge0
-
Verification steps
-
Use the
iputility to display the link status of Ethernet devices that are ports of a specific bridge:#
ip link show master
3: enp7s0: <BROADCAST,MULTICAST,UP,LOWER_UP> mtu 1500 qdisc fq_codel master bridge0 state UP mode DEFAULT group default qlen 1000 link/ether 52:54:00:62:61:0e brd ff:ff:ff:ff:ff:ff 4: enp8s0: <BROADCAST,MULTICAST,UP,LOWER_UP> mtu 1500 qdisc fq_codel master bridge0 state UP mode DEFAULT group default qlen 1000 link/ether 52:54:00:9e:f1:ce brd ff:ff:ff:ff:ff:ffbridge0
-
Use the
bridgeutility to display the status of Ethernet devices that are ports of any bridge device:#
bridge link show
3: enp7s0: <BROADCAST,MULTICAST,UP,LOWER_UP> mtu 1500 master bridge0 state forwarding priority 32 cost 100 4: enp8s0: <BROADCAST,MULTICAST,UP,LOWER_UP> mtu 1500 master bridge0 state listening priority 32 cost 100 5: enp9s0: <BROADCAST,MULTICAST,UP,LOWER_UP> mtu 1500 master bridge1 state forwarding priority 32 cost 100 6: enp11s0: <BROADCAST,MULTICAST,UP,LOWER_UP> mtu 1500 master bridge1 state blocking priority 32 cost 100 ...To display the status for a specific Ethernet device, use the
bridge link show dev ethernet_device_namecommand.
Additional resources
- Configuring NetworkManager to avoid using a specific profile to provide a default gateway
-
nm-settings(5)man page -
bridge(8)man page - NetworkManager duplicates a connection after restart of NetworkManager service
- How to configure bridge with vlan information?
7.2. Configuring a network bridge using the RHEL web console
Use the RHEL web console to configure a network bridge if you prefer to manage network settings using a web browser-based interface.
Prerequisites
- Two or more physical or virtual network devices are installed on the server.
- To use Ethernet devices as ports of the bridge, the physical or virtual Ethernet devices must be installed on the server.
-
To use team, bond, or VLAN devices as ports of the bridge, you can either create these devices while you create the bridge or you can create them in advance as described in:
- Configuring a network team using the RHEL web console
- Configuring a network bond using the RHEL web console
- Configuring VLAN tagging using the RHEL web console
Procedure
-
Select the
Networkingtab in the navigation on the left side of the screen. -
Click
in the
Interfacessection. - Enter the name of the bridge device you want to create.
- Select the interfaces that should be ports of the bridge.
-
Optional: Enable the
Spanning tree protocol (STP)feature to avoid bridge loops and broadcast radiation.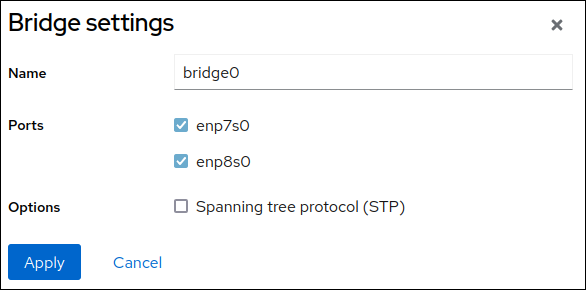
-
Click
.
-
By default, the bridge uses a dynamic IP address. If you want to set a static IP address:
-
Click the name of the bridge in the
Interfacessection. -
Click
Editnext to the protocol you want to configure. -
Select
Manualnext toAddresses, and enter the IP address, prefix, and default gateway. -
In the
DNSsection, click thebutton, and enter the IP address of the DNS server. Repeat this step to set multiple DNS servers.
-
In the
DNS search domainssection, click thebutton, and enter the search domain.
-
If the interface requires static routes, configure them in the
Routessection.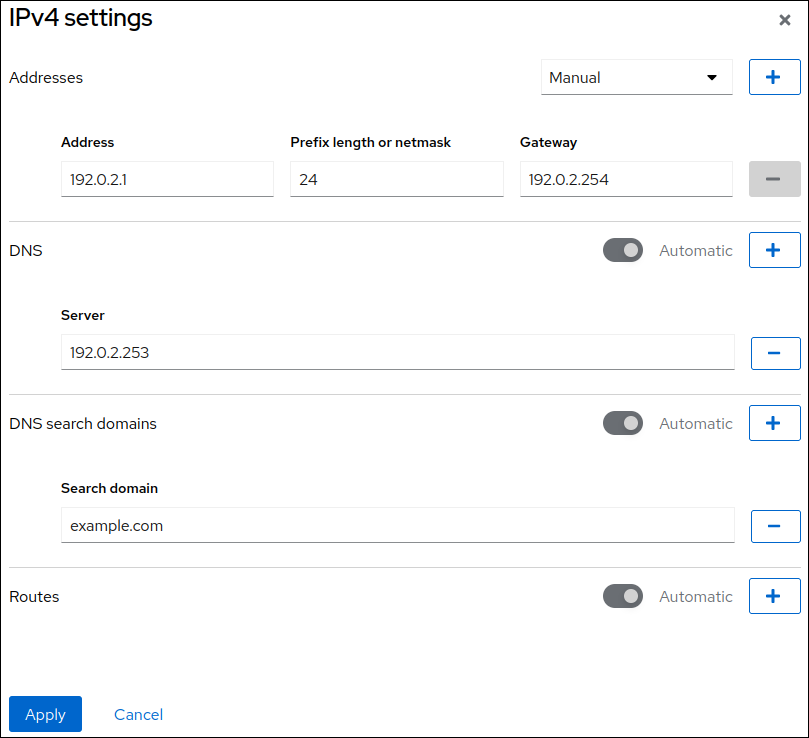
- Click
-
Click the name of the bridge in the
Verification
-
Select the
Networkingtab in the navigation on the left side of the screen, and check if there is incoming and outgoing traffic on the interface: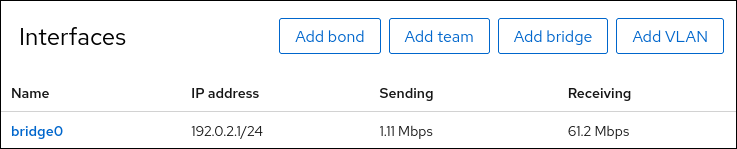
7.3. Configuring a network bridge using nmtui
The nmtui application provides a text-based user interface for NetworkManager. You can use nmtui to configure a network bridge on a host without a graphical interface.
Note
In nmtui:
- Navigate by using the cursor keys.
-
Press a button by selecting it and hitting
Enter
.
-
Select and deselect checkboxes by using
Space
.
Prerequisites
- Two or more physical or virtual network devices are installed on the server.
- To use Ethernet devices as ports of the bridge, the physical or virtual Ethernet devices must be installed on the server.
Procedure
-
If you do not know the network device names on which you want configure a network bridge, display the available devices:
#
nmcli device status
DEVICE TYPE STATE CONNECTIONenp7s0
ethernet unavailable --enp8s0
ethernet unavailable -- ... -
Start
nmtui:#
nmtui
-
Select
Edit a connection, and pressEnter
.
-
Press the
Addbutton. -
Select
Bridgefrom the list of network types, and pressEnter
.
- Optional: Enter a name for the NetworkManager profile to be created.
-
Enter the bridge device name to be created into the
Devicefield. -
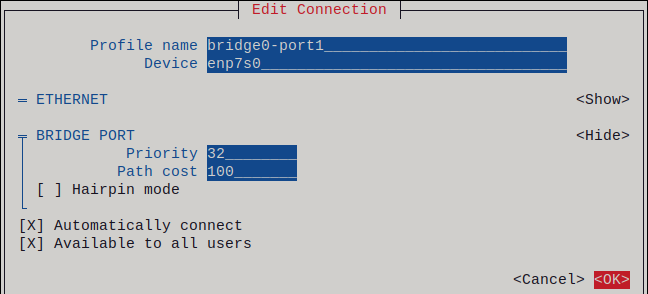
Add ports to the bridge to be created:
-
Press the
Addbutton next to theSlaveslist. -
Select the type of the interface you want to add as port to the bridge, for example,
Ethernet. - Optional: Enter a name for the NetworkManager profile to be created for this bridge port.
-
Enter the port’s device name into the
Devicefield. -
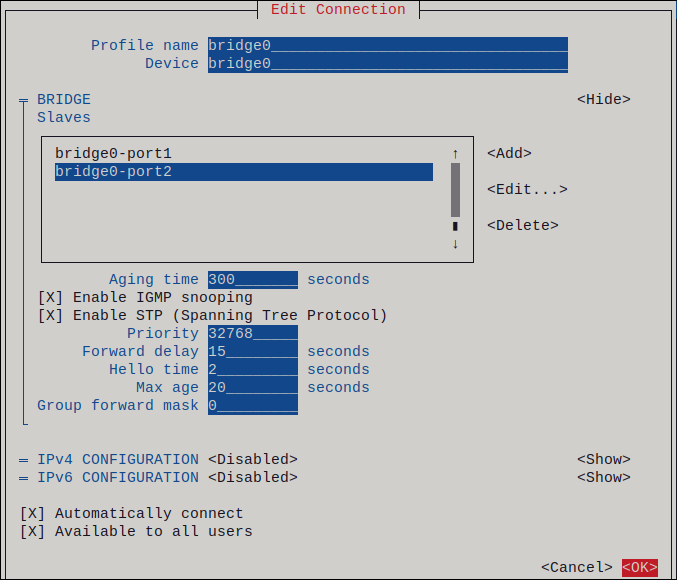
Press the
OKbutton to return to the window with the bridge settings.Figure 7.1. Adding an Ethernet device as port to a bridge
- Repeat these steps to add more ports to the bridge.
-
Press the
-
Depending on your environment, configure the IP address settings in the
IPv4 configurationandIPv6 configurationareas accordingly. For this, press theAutomaticbutton, and select:-
Disabled, if the bridge does not require an IP address. -
Automatic, if a DHCP server dynamically assigns an IP address to the bridge. -
Manual, if the network requires static IP address settings. In this case, you must fill further fields:-
Press the
Showbutton next to the protocol you want to configure to display additional fields. -
Press the
Addbutton next toAddresses, and enter the IP address and the subnet mask in Classless Inter-Domain Routing (CIDR) format.If you do not specify a subnet mask, NetworkManager sets a
/32subnet mask for IPv4 addresses and/64for IPv6 addresses. - Enter the address of the default gateway.
-
Press the
Addbutton next toDNS servers, and enter the DNS server address. -
Press the
Addbutton next toSearch domains, and enter the DNS search domain.
-
Press the
Figure 7.2. Example of a bridge connection without IP address settings
-
-
Press the
OKbutton to create and automatically activate the new connection. -
Press the
Backbutton to return to the main menu. -
Select
Quit, and pressEnter
to close the
nmtuiapplication.
Verification
-
Use the
iputility to display the link status of Ethernet devices that are ports of a specific bridge:#
ip link show master
3: enp7s0: <BROADCAST,MULTICAST,UP,LOWER_UP> mtu 1500 qdisc fq_codel master bridge0 state UP mode DEFAULT group default qlen 1000 link/ether 52:54:00:62:61:0e brd ff:ff:ff:ff:ff:ff 4: enp8s0: <BROADCAST,MULTICAST,UP,LOWER_UP> mtu 1500 qdisc fq_codel master bridge0 state UP mode DEFAULT group default qlen 1000 link/ether 52:54:00:9e:f1:ce brd ff:ff:ff:ff:ff:ffbridge0
-
Use the
bridgeutility to display the status of Ethernet devices that are ports of any bridge device:#
bridge link show
3: enp7s0: <BROADCAST,MULTICAST,UP,LOWER_UP> mtu 1500 master bridge0 state forwarding priority 32 cost 100 4: enp8s0: <BROADCAST,MULTICAST,UP,LOWER_UP> mtu 1500 master bridge0 state listening priority 32 cost 100 ...To display the status for a specific Ethernet device, use the
bridge link show dev ethernet_device_namecommand.
7.4. Configuring a network bridge using nm-connection-editor
If you use Red Hat Enterprise Linux with a graphical interface, you can configure network bridges using the nm-connection-editor application.
Note that nm-connection-editor can add only new ports to a bridge. To use an existing connection profile as a port, create the bridge using the nmcli utility as described in Configuring a network bridge using nmcli commands.
Prerequisites
- Two or more physical or virtual network devices are installed on the server.
- To use Ethernet devices as ports of the bridge, the physical or virtual Ethernet devices must be installed on the server.
- To use team, bond, or VLAN devices as ports of the bridge, ensure that these devices are not already configured.
Procedure
-
Open a terminal, and enter
nm-connection-editor:$
nm-connection-editor -
Click the
button to add a new connection.
-
Select the
Bridgeconnection type, and click.
-
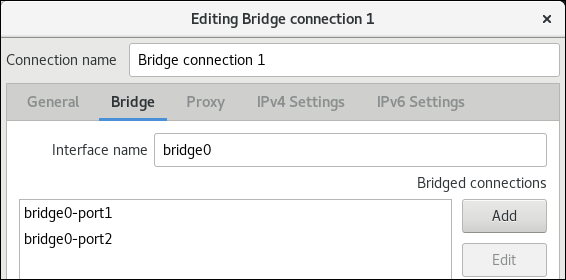
In the
Bridgetab:-
Optional: Set the name of the bridge interface in the
Interface namefield. -
Click the Add button to create a new connection profile for a network interface and adding the profile as a port to the bridge.
-
Select the connection type of the interface. For example, select
Ethernetfor a wired connection. - Optionally, set a connection name for the port device.
-
If you create a connection profile for an Ethernet device, open the
Ethernettab, and select in theDevicefield the network interface you want to add as a port to the bridge. If you selected a different device type, configure it accordingly. -
Click
.
-
Select the connection type of the interface. For example, select
-
Repeat the previous step for each interface you want to add to the bridge.
-
Optional: Set the name of the bridge interface in the
- Optional: Configure further bridge settings, such as Spanning Tree Protocol (STP) options.
-
Configure the IP settings of the bridge. Skip this step if you want to use this bridge as a port of other devices.
-
In the
IPv4 Settingstab, configure the IPv4 settings. For example, set a static IPv4 address, network mask, default gateway, DNS server, and DNS search domain: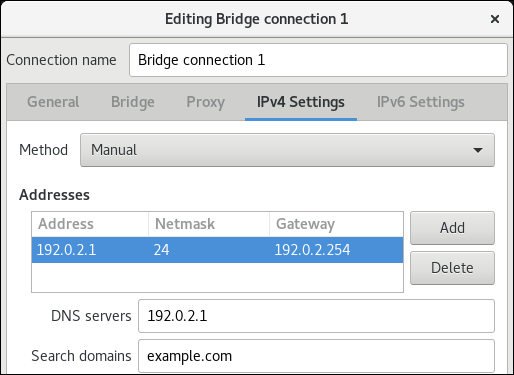
-
In the
IPv6 Settingstab, configure the IPv6 settings. For example, set a static IPv6 address, network mask, default gateway, DNS server, and DNS search domain:
-
- Save the bridge connection.
-
Close
nm-connection-editor.
Verification steps
-
Use the
iputility to display the link status of Ethernet devices that are ports of a specific bridge.#
ip link show master
3: enp7s0: <BROADCAST,MULTICAST,UP,LOWER_UP> mtu 1500 qdisc fq_codel master bridge0 state UP mode DEFAULT group default qlen 1000 link/ether 52:54:00:62:61:0e brd ff:ff:ff:ff:ff:ff 4: enp8s0: <BROADCAST,MULTICAST,UP,LOWER_UP> mtu 1500 qdisc fq_codel master bridge0 state UP mode DEFAULT group default qlen 1000 link/ether 52:54:00:9e:f1:ce brd ff:ff:ff:ff:ff:ffbridge0
-
Use the
bridgeutility to display the status of Ethernet devices that are ports in any bridge device:#
bridge link show
3: enp7s0: <BROADCAST,MULTICAST,UP,LOWER_UP> mtu 1500 master bridge0 state forwarding priority 32 cost 100 4: enp8s0: <BROADCAST,MULTICAST,UP,LOWER_UP> mtu 1500 master bridge0 state listening priority 32 cost 100 5: enp9s0: <BROADCAST,MULTICAST,UP,LOWER_UP> mtu 1500 master bridge1 state forwarding priority 32 cost 100 6: enp11s0: <BROADCAST,MULTICAST,UP,LOWER_UP> mtu 1500 master bridge1 state blocking priority 32 cost 100 ...To display the status for a specific Ethernet device, use the
bridge link show dev ethernet_device_namecommand.
Additional resources
- Configuring a network bond using nm-connection-editor
- Configuring a network team using nm-connection-editor
- Configuring VLAN tagging using nm-connection-editor
- Configuring NetworkManager to avoid using a specific profile to provide a default gateway
- How to configure bridge with vlan information?
7.5. Configuring a network bridge using nmstatectl
To configure a network bridge using the Nmstate API, use the nmstatectl utility.
For example, the procedure below creates a bridge in NetworkManager with the following settings:
-
Network interfaces in the bridge:
enp1s0andenp7s0 - Spanning Tree Protocol (STP): Enabled
-
Static IPv4 address:
192.0.2.1with the/24subnet mask -
Static IPv6 address:
2001:db8:1::1with the/64subnet mask -
IPv4 default gateway:
192.0.2.254 -
IPv6 default gateway:
2001:db8:1::fffe -
IPv4 DNS server:
192.0.2.200 -
IPv6 DNS server:
2001:db8:1::ffbb -
DNS search domain:
example.com
Prerequisites
- Two or more physical or virtual network devices are installed on the server.
- To use Ethernet devices as ports in the bridge, the physical or virtual Ethernet devices must be installed on the server.
-
To use team, bond, or VLAN devices as ports in the bridge, set the interface name in the
portlist, and define the corresponding interfaces. -
The
nmstatepackage is installed.
Procedure
-
Create a YAML file, for example
~/create-bridge.yml, with the following contents:--- interfaces: - name: bridge0 type: linux-bridge state: up ipv4: enabled: true address: - ip: 192.0.2.1 prefix-length: 24 dhcp: false ipv6: enabled: true address: - ip: 2001:db8:1::1 prefix-length: 64 autoconf: false dhcp: false bridge: options: stp: enabled: true port: - name: enp1s0 - name: enp7s0 - name: enp1s0 type: ethernet state: up - name: enp7s0 type: ethernet state: up routes: config: - destination: 0.0.0.0/0 next-hop-address: 192.0.2.254 next-hop-interface: bridge0 - destination: ::/0 next-hop-address: 2001:db8:1::fffe next-hop-interface: bridge0 dns-resolver: config: search: - example.com server: - 192.0.2.200 - 2001:db8:1::ffbb -
Apply the settings to the system:
#
nmstatectl apply ~/create-bridge.yml
Verification steps
-
Display the status of the devices and connections:
#
nmcli device status
DEVICE TYPE STATE CONNECTIONbridge0
bridgeconnected
bridge0
-
Display all settings of the connection profile:
#
nmcli connection show
connection.id:bridge0
bridge0
connection.uuid:e2cc9206-75a2-4622-89cf-1252926060a9
connection.stable-id: -- connection.type: bridge connection.interface-name:bridge0
... -
Display the connection settings in YAML format:
#
nmstatectl show
bridge0
Additional resources
-
nmstatectl(8)man page -
/usr/share/doc/nmstate/examples/directory - How to configure bridge with vlan information?
7.6. Configuring a network bridge using RHEL System Roles
You can use the network RHEL System Role to configure a Linux bridge. For example, use it to configure a network bridge that uses two Ethernet devices, and sets IPv4 and IPv6 addresses, default gateways, and DNS configuration.
Note
Set the IP configuration on the bridge and not on the ports of the Linux bridge.
Perform this procedure on the Ansible control node.
Prerequisites
- You have prepared the control node and the managed nodes
- You are logged in to the control node as a user who can run playbooks on the managed nodes.
-
The account you use to connect to the managed nodes has
sudopermissions on them. - The hosts or host groups on which you want to run this playbook are listed in the Ansible inventory file.
- Two or more physical or virtual network devices are installed on the server.
Procedure
-
Create a playbook file, for example
~/bridge-ethernet.yml, with the following content:--- - name: Configure the network hosts:
managed-node-01.example.com
tasks: - name: Configure a network bridge that uses two Ethernet ports include_role: name: rhel-system-roles.network vars: network_connections: # Define the bridge profile - name: bridge0 type: bridge interface_name: bridge0 ip: address: - "192.0.2.1/24" - "2001:db8:1::1/64" gateway4: 192.0.2.254 gateway6: 2001:db8:1::fffe dns: - 192.0.2.200 - 2001:db8:1::ffbb dns_search: - example.com state: up # Add an Ethernet profile to the bridge - name: bridge0-port1 interface_name: enp7s0 type: ethernet controller: bridge0 port_type: bridge state: up # Add a second Ethernet profile to the bridge - name: bridge0-port2 interface_name: enp8s0 type: ethernet controller: bridge0 port_type: bridge state: up -
Run the playbook:
#
ansible-playbook
~/bridge-ethernet.yml
Additional resources
-
/usr/share/ansible/roles/rhel-system-roles.network/README.mdfile


![Toni Kroos là ai? [ sự thật về tiểu sử đầy đủ Toni Kroos ]](https://evbn.org/wp-content/uploads/New-Project-6635-1671934592.jpg)


