CentOS 7 Network Configuration Using nmtui Tool
After completing CentOS 7 fresh installation, the first task to a system administrator is to configure its network so that it can communicate to other network devices. In my previous article, I discussed how to install CentOS 7.5 GUI (GNOME Desktop) step by step. If you are a new CentOS 7 user and yet you have not installed CentOS 7.5 on your server machine, feel free to study my previous article and install CentOS 7.5 GNOME Desktop according to that article. After completing installation, it is time to configure CentOS 7 network. In this article, I will show you how to easily configure your CentOS 7 network with Network Manager Text User Interface (nmtui) tool.
How to Configure CentOS 7 Network
In CentOS 7 Linux, the default networking service is provided by a dynamic network control and configuration daemon named NetworkManager. The NetworkManager tries to keep network devices and connections up and active when they are available. Although NetworkManager is a new and active service for controlling network in CentOS 7 Linux, the traditional ifcfg type configuration files are still supported.
There are four methods to configure network in CentOS 7 Linux using NetworkManager.
- Network configuration using Text User Interface (nmtui)
- Network configuration using Command Line Interface (nmcli)
- Network configuration using Sysconfig Files and
- Network configuration using Graphical User Interface (nm-connection-editor or control network)
Among these four methods, today in this article I will show how to configure CentOS 7 network using Network Manager Text User Interface (nmtui) tool.
CentOS 7 Network Configuration Using Text User Interface Tool
The NetworkManager Text User Interface (nmtui) tool provides a text interface to configure CentOS 7 network by controlling NetworkManager. As nmtui tool works by controlling NetworkManager, we have to first check the NetworkManager service is installed or not in our CentOS 7 Linux. The following command will show whether the NetworkManager package is installed or not in your CentOS 7 Linux.
[root@localhost ~]# rpm -qa | grep NetworkManager
NetworkManager-wwan-1.10.2-13.el7.x86_64
NetworkManager-adsl-1.10.2-13.el7.x86_64
NetworkManager-libreswan-1.2.4-2.el7.x86_64
NetworkManager-glib-1.10.2-13.el7.x86_64
NetworkManager-libreswan-gnome-1.2.4-2.el7.x86_64
NetworkManager-wifi-1.10.2-13.el7.x86_64
NetworkManager-bluetooth-1.10.2-13.el7.x86_64
NetworkManager-tui-1.10.2-13.el7.x86_64
NetworkManager-1.10.2-13.el7.x86_64
NetworkManager-team-1.10.2-13.el7.x86_64
NetworkManager-ppp-1.10.2-13.el7.x86_64
NetworkManager-libnm-1.10.2-13.el7.x86_64
[root@localhost ~]#
As NetworkManager daemon is installed by default in CentOS 7.5, you will find the above result by running the rpm command in your command prompt. Now we need to check whether the NetworkManager service is running or not. The following command will show the current status of NetworkManager service.
[root@localhost ~]# systemctl status NetworkManager
NetworkManager.service – Network Manager
Loaded: loaded (/usr/lib/systemd/system/NetworkManager.service; enabled; vendor preset: enabled)
Active: active (running) since Sun 2018-08-19 01:17:12 EDT; 9min ago
Docs: man:NetworkManager(8)
Main PID: 678 (NetworkManager)
Tasks: 3
CGroup: /system.slice/NetworkManager.service
+-678 /usr/sbin/NetworkManager –no-daemon
If the NetworkManager service is up and running, you will find the above result in your command prompt. If NetworkManager service shows inactive message, run the following commands to keep it up and running.
[root@localhost ~]# systemctl start NetworkManager
Or
[root@localhost ~]# systemctl restart NetworkManager
[root@localhost ~]# systemctl enable NetworkManager
The Text User Interface (nmtui) tool is contained in the NetworkManager-tui package. By default this package is installed in CentOS 7.5 Linux. So, no need to install this package manually. However, if you find that NetworkManager-tui package is not installed in your CentOS Linux, run the following command to install this package.
[root@localhost ~]# yum install NetworkManager-tui
Now run the following instruction in your command prompt to open NetworkManager Text User Interface tool.
[root@localhost ~]# nmtui
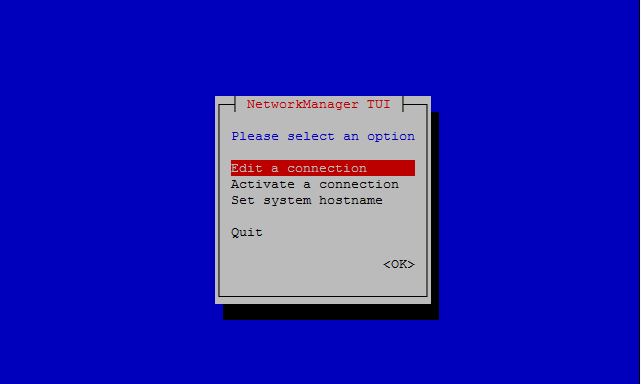
You will find NetworkManager Text User Interface tool like below image.
 CentOS Network Configuration with nmtui
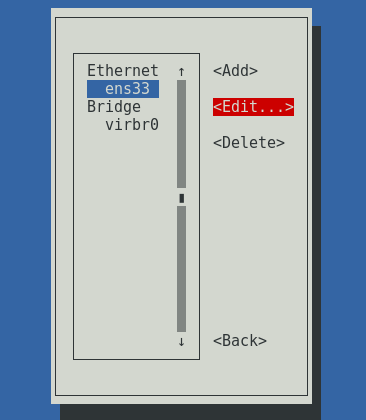
Use Tab key or up, down, left and right arrow key for option selection in nmtui tool window. Now select Edit a connection option and hit Enter key. You will find available Ethernet devices such as ens33, ens34 and so on under Ethernet list. Select your Ethernet device where you want to set static IP address and go to Edit… option and then hit Enter key. You will now find Edit Connection window.
 Ethernet Device List
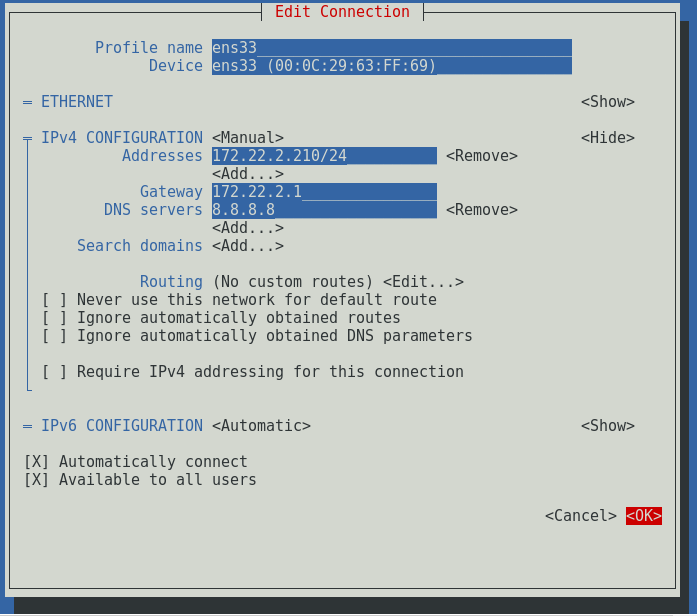
Within Edit Connection window, do the following steps carefully.
- Select IPv4 CONFIGURATION and hit Enter key and choose Manual option from popup window and then select Show option and hit enter key.
- Go to Addresses option and select <Add…> option and hit Enter key. Put IP address (172.22.2.210/24) in Addresses input field. You can put more IP addresses with <Add…> option or you can remove your desired IP address with <Remove> option.
- Go to Gateway input field and put Gateway address (172.22.2.1) in this filed.
- Now go to DNS servers option and select <Add…> option and hit Enter key. Put DNS server IP address (8.8.8.8) in DNS servers input field. You can put more IP addresses with <Add…> option or you can remove your desired IP address with <Remove> option.
- Scroll down to bottom with Tab key and select Automatically connect option pressing Space key and then go to <OK> option and hit Enter key.
- Now select <Back> option and hit Enter key.
- Again select Quit option to close nmtui tool window.
 Edit Connection Window
Static IP address assigning has been completed. Now ping Gateway, DNS server or visit any public website with Firefox browser. If everything is OK, you will be able to get internet and public access now.
If you face any confusion to follow above steps properly, watch the below video about CentOS 7 Network Configuration using nmtui tool. I hope it will reduce your any confusion.
How to configure CentOS 7.5 network with NetworkManager Text User Interface has been discussed in this article. I hope, you will now able to configure your CentOS 7 network with nmtui tool successfully. However, if you face any confusion, feel free to discuss in comment or contact with me from Contact page. I will try my best to stay with you.


![Toni Kroos là ai? [ sự thật về tiểu sử đầy đủ Toni Kroos ]](https://evbn.org/wp-content/uploads/New-Project-6635-1671934592.jpg)


