
Building image pairs for siamese networks with Python – PyImageSearch
In this tutorial, you will learn how to build image pairs for training siamese networks. We’ll implement our image pair generator using Python so that you can use the same code, regardless of whether you’re using TensorFlow, Keras, PyTorch, etc.

This tutorial is part one in an introduction to siamese networks:
- Part #1: Building image pairs for siamese networks with Python (today’s post)
- Part #2: Training siamese networks with Keras, TensorFlow, and Deep Learning (next week’s tutorial)
- Part #3: Comparing images using siamese networks (tutorial two weeks from now)
Siamese networks are incredibly powerful networks, responsible for significant increases in face recognition, signature verification, and prescription pill identification applications (just to name a few).
In fact, if you’ve followed my tutorial on OpenCV Face Recognition or Face recognition with OpenCV, Python and deep learning, you will see that the deep learning models used in these posts were siamese networks!
Deep learning models such as FaceNet, VGGFace, and dlib’s ResNet face recognition model are all examples of siamese networks.
And furthermore, siamese networks make more advanced training procedures like one-shot learning and few-shot learning possible — in comparison to other deep learning architectures, siamese networks require very few training examples, to be effective.
Today we’re going to:
- Review the basics of siamese networks
- Discuss the concept of image pairs
- See how we use image pairs to train a siamese network
- Implement Python code to generate image pairs for siamese networks
Next week I’ll show you how to implement and train your own siamese network. Eventually, we’ll build up to the concept of image triplets and how we can use triplet loss and contrastive loss to train better, more accurate siamese networks.
But for now, let’s understand image pairs, a fundamental requirement when implementing basic siamese networks.
To learn how to build image pairs for siamese networks, just keep reading.
![]()
Mục Lục
Looking for the source code to this post?
Jump Right To The Downloads Section
Building image pairs for siamese networks with Python
In the first part of this tutorial, I’ll provide a high-level overview of siamese networks, including:
- What they are
- Why we use them
- When to use them
- How they are trained
We’ll then discuss the concept of “image pairs” in siamese networks, including why constructing image pairs is a requirement when training siamese networks.
From there we’ll review our project directory structure and then implement a Python script to generate image pairs. You can use this image pair generation function in your own siamese network training procedures, regardless of whether you are using Keras, TensorFlow, PyTorch, etc.
Finally, we’ll wrap up this tutorial with a review of our results.
A high-level overview of siamese networks
The term “siamese twins,” also known as “conjoined twins,” is two identical twins joined in utero. These twins are physically connected to each other (i.e., unable to separate), often sharing the same organs, predominately the lower intestinal tract, liver, and urinary tract.
 Figure 1: Siamese networks have similarities in siamese twins/conjoined twins where two people are conjoined and share some of the same organs (image source).
Just as siamese twins are connected, so are siamese networks.
Paraphrasing Sean Benhur, siamese networks are a special class of neural network:
- Siamese networks contain two (or more) identical subnetworks.
- These subnetworks have the same architecture, parameters, and weights.
- Any parameter updates are mirrored across both subnetworks, meaning if you update the weights on one, then the weights in the other are updated as well.
We use siamese networks when performing verification, identification, or recognition tasks, the most popular examples being face recognition and signature verification.
For example, let’s suppose we are tasked with detecting signature forgeries. Instead of training a classification model to correctly classify signatures for each unique individual in our dataset (which would require significant training data), what if we instead took two images from our training set and asked the neural network if the signatures were from the same person or not?
- If the two signatures are the same, then siamese network reports “Yes”.
- Otherwise, if the two signatures are not the same, thereby implying a potential forgery, the siamese network reports “No”.
This is an example of a verification task (versus classification, regression, etc.), and while it may sound like a harder problem, it actually becomes far easier in practice — we need significantly less training data, and our accuracy actually improves by using siamese networks rather than classification networks.
Another added benefit is that we no longer need a “catch-all” class for when our classification model needs to select “none of the above” when making a classification (which in practice is quite error prone). Instead, our siamese network handles this problem gracefully by reporting that the two signatures are not the same.
Keep in mind that the siamese network architecture doesn’t have to concern itself with classification in the traditional sense of having to select 1 of N possible classes. Rather, the siamese network just needs to be able to report “same” (belongs to the same class) or “different” (belongs to different classes).
Below is a visualization of the siamese network architecture used in Dey et al.’s 2017 publication, SigNet: Convolutional Siamese Network for Writer Independent Offline Signature Verification:
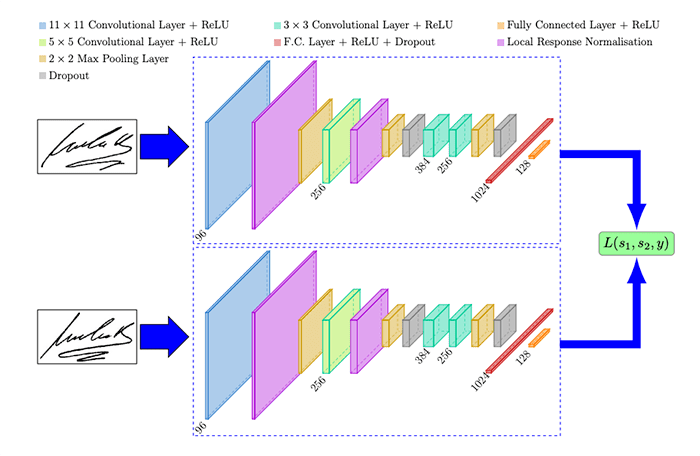 Figure 2: An example of a siamese network, SigNet, used for signature verification (image source: Figure 1 of Dey et al.)
On the left we present two signatures to the SigNet model. Our goal is to determine if these signatures belong to the same person or not.
The middle shows the siamese network itself. These two subnetworks have the same architecture and parameters and mirror each other — if the weights in one subnetwork are updated, then the weights in the other subnetwork(s) are updated as well.
The final layers in these subnetworks are typically (but not always) embedding layers where we can compute the Euclidean distance between the outputs and adjust the weights of the subnetworks such that they output the correct decision (belong to the same class or not).
The right then shows our loss function, which combines the outputs of the subnetworks and then checks to see if the siamese network made the correct decision.
Popular loss functions when training siamese networks include:
- Binary cross-entropy
- Triplet loss
- Contrastive loss
You might be surprised to see binary cross-entropy listed as a loss function to train siamese networks.
Think of it this way:
Each image pair is either the “same” (1), meaning they belong to the same class or “different” (0), meaning they belong to different classes. That lends itself naturally to binary cross-entropy, since there are only two possible outputs (although triplet loss and contrastive loss tend to significantly outperform standard binary cross-entropy).
Now that we have a high-level overview of siamese networks, let’s now discuss the concept of image pairs.
The concept of “image pairs” in siamese networks
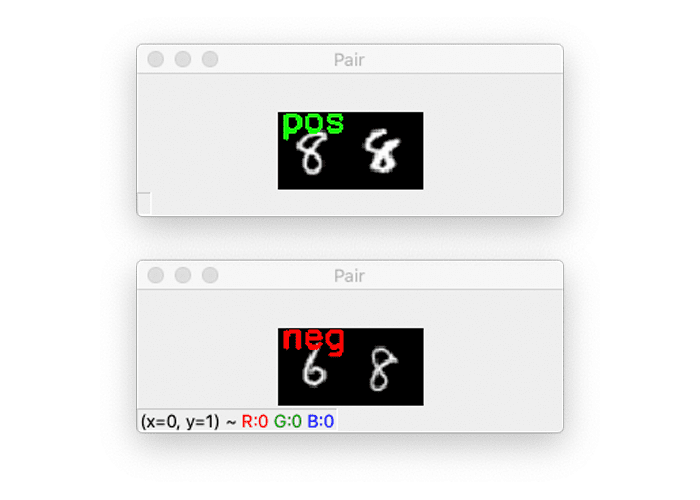 Figure 3: Top: An example of a “positive” image pair (since both images are an example of an “8”). Bottom: A “negative” image pair (since one image is a “6”, and the other is an “8”).
After reviewing the previous section, you should understand that a siamese network consists of two subnetworks that mirror each other (i.e., when the weights update in one network, the same weights are updated in the other network).
Since there are two subnetworks, we must have two inputs to the siamese model (as you saw in Figure 2 at the top of the previous section).
When training siamese networks we need to have positive pairs and negative pairs:
- Positive pairs: Two images that belong to the same class (ex., two images of the same person, two examples of the same signature, etc.)
- Negative pairs: Two images that belong to different classes (ex., two images of different people, two examples of different signatures, etc.)
When training our siamese network, we randomly sample examples of positive and negative pairs. These pairs serve as our training data such that the siamese network can learn similarity.
In the remainder of this tutorial, you will learn how to generate such image pairs. In next week’s tutorial, you will learn how to define the siamese network architecture and then train the siamese model on our dataset of pairs.
Configuring your development environment
We’ll be using Keras and TensorFlow throughout this series of tutorials on siamese networks, so I suggest you take the time to configure your deep learning development environment now.
I recommend you follow either of these two guides to install TensorFlow and Keras on your system:
Either tutorial will help you configure your system with all the necessary software for this blog post in a convenient Python virtual environment.
Having problems configuring your development environment?
 Figure 4: Having trouble configuring your dev environment? Want access to pre-configured Jupyter Notebooks running on Google Colab? Be sure to join PyImageSearch Plus —- you’ll be up and running with this tutorial in a matter of minutes.
All that said, are you:
- Short on time?
- Learning on your employer’s administratively locked system?
- Wanting to skip the hassle of fighting with the command line, package managers, and virtual environments?
- Ready to run the code right now on your Windows, macOS, or Linux system?
Then join PyImageSearch Plus today!
Gain access to Jupyter Notebooks for this tutorial and other PyImageSearch guides that are pre-configured to run on Google Colab’s ecosystem right in your web browser! No installation required.
And best of all, these Jupyter Notebooks will run on Windows, macOS, and Linux!
Project structure
Make sure you used the “Downloads” section of this tutorial to download the source code. From there, let’s inspect the project directory structure:
$ tree . --dirsfirst
.
└── build_siamese_pairs.py

0 directories, 1 file
We only have a single Python file to review today, build_siamese_pairs.py.
This script includes a helper function named make_pairs. As the name suggests, this function accepts an input set of images and labels and then constructs positive and negative pairs from it.
We’ll be reviewing this function in its entirety today. Then, next week, we’ll learn how to use the make_pairs function to train your own siamese network.
Implementing our image pair generator for siamese networks
Let’s get started implementing image pair generation for siamese networks.
Open up the build_siamese_pairs.py file, and insert the following code:
# import the necessary packages
from tensorflow.keras.datasets import mnist
from imutils import build_montages
import numpy as np
import cv2
Lines 2-5 import our required Python packages.
We’ll be using the MNIST digits dataset as our sample dataset (for convenience purposes). That said, our make_pairs function will work with any image dataset, provided you supply two separate image and labels arrays (which you’ll learn how to do in the next code block).
To visually validate that our pair generation process is working correctly, we import the build_montages function (Line 3). This function generates a montage of images, which is super helpful when needing to visualize multiple images at once. You can learn more about image montages in my Montages with OpenCV guide.
Let’s now start defining our make_pairs function:
def make_pairs(images, labels):
	# initialize two empty lists to hold the (image, image) pairs and
	# labels to indicate if a pair is positive or negative
	pairImages = []
	pairLabels = []
Our make_pairs method requires we pass in two parameters:
imageslabels
In the case of the MNIST dataset, our images are the digits themselves, while the labels are the class label (0-9) for each image in the images array.
The next step is to compute the total number of unique class labels in our dataset:
	# calculate the total number of classes present in the dataset
	# and then build a list of indexes for each class label that
	# provides the indexes for all examples with a given label
	numClasses = len(np.unique(labels))
	idx = [np.where(labels == i)[0] for i in range(0, numClasses)]
Line 16 uses the np.unique function to find all unique class labels in our labels list. Taking the len of the np.unique output yields the total number of unique class labels in the dataset. In the case of the MNIST dataset, there are 10 unique class labels, corresponding to the digits 0-9.
Line 17 then builds a list of indexes for each class label using Python array comprehension. We use Python list comprehensions here for performance; however, this code can be a bit tricky to understand, so let’s break it down by writing it out in a dedicated for loop, along with a few print statements:
>>> for i in range(0, numClasses):
>>>	idxs = np.where(labels == i)[0]
>>>	print("{}: {} {}".format(i, len(idxs), idxs))
0: 5923 [    1    21    34 ... 59952 59972 59987]
1: 6742 [    3     6     8 ... 59979 59984 59994]
2: 5958 [    5    16    25 ... 59983 59985 59991]
3: 6131 [    7    10    12 ... 59978 59980 59996]
4: 5842 [    2     9    20 ... 59943 59951 59975]
5: 5421 [    0    11    35 ... 59968 59993 59997]
6: 5918 [   13    18    32 ... 59982 59986 59998]
7: 6265 [   15    29    38 ... 59963 59977 59988]
8: 5851 [   17    31    41 ... 59989 59995 59999]
9: 5949 [    4    19    22 ... 59973 59990 59992]
>>>
What this code is doing here is looping over all unique class labels in our labels list. For each unique label, we compute idxs, which is a list of all indexes that belong to the current class label, i.
The output of our print statement consists of three values:
- The current class label,
i - The total number of data points that belong to the current label,
i - The indexes of each of these data points
Line 17 builds this list of indexes, but in a super compact, efficient manner.
Given our idx loopup list, let’s now start generating our positive and negative pairs:
	# loop over all images
	for idxA in range(len(images)):
		# grab the current image and label belonging to the current
		# iteration
		currentImage = images[idxA]
		label = labels[idxA]

		# randomly pick an image that belongs to the *same* class
		# label
		idxB = np.random.choice(idx[label])
		posImage = images[idxB]

		# prepare a positive pair and update the images and labels
		# lists, respectively
		pairImages.append([currentImage, posImage])
		pairLabels.append([1])
On Line 20 we loop over all images in our dataset.
Line 23 grabs the currentImage associated with idxA. Line 24 obtains the label associated with currentImage.
Next, we randomly pick an image that belongs to the same class as the label (Lines 28 and 29). This posImage is the same class as label.
Taken together, currentImage and posImage serve as our positive pair. We update our pairImages list with a 2-tuple of the currentImage and posImage (Line 33).
We also update pairLabels with a value of 1, indicating that this is a positive pair (Line 34).
Next, let’s generate our negative pair:
		# grab the indices for each of the class labels *not* equal to
		# the current label and randomly pick an image corresponding
		# to a label *not* equal to the current label
		negIdx = np.where(labels != label)[0]
		negImage = images[np.random.choice(negIdx)]

		# prepare a negative pair of images and update our lists
		pairImages.append([currentImage, negImage])
		pairLabels.append([0])

	# return a 2-tuple of our image pairs and labels
	return (np.array(pairImages), np.array(pairLabels))
Line 39 grabs all indices of labels not equal to the current label. We then randomly select one of these indexes as our negative image, negImage (Line 40).
Again, we update our pairImages, this time supplying the currentImage and the negImage as our negative pair (Line 43).
The pairLabels list is again updated, this time with a value of 0 to indicate that this is a negative pair example.
Finally, we return our pairImages and pairLabels to the calling function on Line 47.
With our make_pairs function defined, let’s move on to loading our MNIST dataset and generating image pairs from them:
# load MNIST dataset and scale the pixel values to the range of [0, 1]
print("[INFO] loading MNIST dataset...")
(trainX, trainY), (testX, testY) = mnist.load_data()

# build the positive and negative image pairs
print("[INFO] preparing positive and negative pairs...")
(pairTrain, labelTrain) = make_pairs(trainX, trainY)
(pairTest, labelTest) = make_pairs(testX, testY)

# initialize the list of images that will be used when building our
# montage
images = []
Line 51 loads the MNIST training and testing split from disk.
We then generate training and testing pairs on Lines 55 and 56.
Line 60 initializes an images, a list that will be populated with example pairs and then visualized as a montage on our screen. We’ll be constructing this montage to visually validate that our make_pairs function is working properly.
Let’s go ahead and populate the images list now:
# loop over a sample of our training pairs
for i in np.random.choice(np.arange(0, len(pairTrain)), size=(49,)):
	# grab the current image pair and label
	imageA = pairTrain[i][0]
	imageB = pairTrain[i][1]
	label = labelTrain[i]

	# to make it easier to visualize the pairs and their positive or
	# negative annotations, we're going to "pad" the pair with four
	# pixels along the top, bottom, and right borders, respectively
	output = np.zeros((36, 60), dtype="uint8")
	pair = np.hstack([imageA, imageB])
	output[4:32, 0:56] = pair

	# set the text label for the pair along with what color we are
	# going to draw the pair in (green for a "positive" pair and
	# red for a "negative" pair)
	text = "neg" if label[0] == 0 else "pos"
	color = (0, 0, 255) if label[0] == 0 else (0, 255, 0)

	# create a 3-channel RGB image from the grayscale pair, resize
	# it from 60x36 to 96x51 (so we can better see it), and then
	# draw what type of pair it is on the image
	vis = cv2.merge([output] * 3)
	vis = cv2.resize(vis, (96, 51), interpolation=cv2.INTER_LINEAR)
	cv2.putText(vis, text, (2, 12), cv2.FONT_HERSHEY_SIMPLEX, 0.75,
		color, 2)

	# add the pair visualization to our list of output images
	images.append(vis)
On Line 63 we loop over a sample of 49 randomly selected pairTrain images.
Lines 65 and 66 grab the two images in the pair, while Line 67 accesses the corresponding label (1 for “same”, 0 for “different”).
Lines 72-74 allocate a NumPy array for the side-by-side visualization, horizontally stack the two images, and then add the pair to the output array.
If we are examining a negative pair, we’ll annotate the output image with the text neg drawn in “red”; otherwise, we’ll draw the text pos in “green” (Lines 79 and 80).
MNIST example images are grayscale by default, so we construct vis, a three channel RGB image on Line 85. We then increase the resolution of the vis image from 36×60 to 96×51 (so we can better see it on our screen) and then draw the text on the image (Lines 86-88).
The vis image is then added to our images list.
The last step here is to construct our montage and display it to our screen:
# construct the montage for the images
montage = build_montages(images, (96, 51), (7, 7))[0]

# show the output montage
cv2.imshow("Siamese Image Pairs", montage)
cv2.waitKey(0)
Line 94 constructs a 7×7 montage where each image in the montage is 96×51 pixels.
The output siamese image pairs visualization is displayed to our screen on Lines 97 and 98.
Siamese network image pair generation results
We are now ready to run our siamese network image pair generation script. Make sure you use the “Downloads” section of this tutorial to download the source code.
From there, open up a terminal, and execute the following command:
$ python build_siamese_pairs.py
[INFO] loading MNIST dataset...
[INFO] preparing positive and negative pairs...
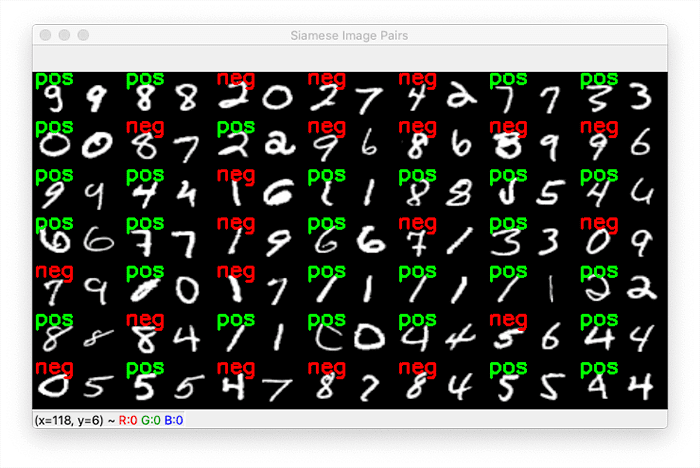 Figure 5: Generating image pairs for siamese networks with deep learning and Python.
Figure 5 displays the output of our image pair generation script. For every pair of images, our script has marked them as being a positive pair (green) or a negative pair (red).
For example, the pair located at row one, column one is a positive pair, since both digits are 9’s.
However, the digit pair located at row one, column three is a negative pair because one digit is a “2”, and the other is a “0”.
During the training process our siamese network will learn how to tell the difference between these two digits.
And once you understand how to train siamese networks in this manner, you can swap out the MNIST digits dataset and include any dataset of your own where verification is important, including:
- Face recognition: Given two separate images containing a face, determine if it’s the same person in both photos.
- Signature verification: When presented with two signatures, determine if one is a forgery or not.
- Prescription pill identification: Given two prescription pills, determine if they are the same medication or different medications.
Siamese networks make all of these applications possible — and I’ll show you how to train your very first siamese network next week!
What’s next? I recommend PyImageSearch University.
Course information:
69 total classes • 73 hours of on-demand code walkthrough videos • Last updated: February 2023
★★★★★
4.84 (128 Ratings) • 15,800+ Students Enrolled
I strongly believe that if you had the right teacher you could master computer vision and deep learning.
Do you think learning computer vision and deep learning has to be time-consuming, overwhelming, and complicated? Or has to involve complex mathematics and equations? Or requires a degree in computer science?
That’s not the case.
All you need to master computer vision and deep learning is for someone to explain things to you in simple, intuitive terms. And that’s exactly what I do. My mission is to change education and how complex Artificial Intelligence topics are taught.
If you’re serious about learning computer vision, your next stop should be PyImageSearch University, the most comprehensive computer vision, deep learning, and OpenCV course online today. Here you’ll learn how to successfully and confidently apply computer vision to your work, research, and projects. Join me in computer vision mastery.
Inside PyImageSearch University you’ll find:
- ✓ 69 courses on essential computer vision, deep learning, and OpenCV topics
- ✓ 69 Certificates of Completion
- ✓ 73 hours of on-demand video
- ✓ Brand new courses released regularly, ensuring you can keep up with state-of-the-art techniques
- ✓ Pre-configured Jupyter Notebooks in Google Colab
- ✓ Run all code examples in your web browser — works on Windows, macOS, and Linux (no dev environment configuration required!)
- ✓ Access to centralized code repos for all 500+ tutorials on PyImageSearch
- ✓ Easy one-click downloads for code, datasets, pre-trained models, etc.
- ✓ Access on mobile, laptop, desktop, etc.
Click here to join PyImageSearch University
Summary
In this tutorial you learned how to build image pairs for siamese networks using the Python programming language.
Our implementation of image pair generation is library agnostic, meaning you can use this code regardless of whether your underlying deep learning library is Keras, TensorFlow, PyTorch, etc.
Image pair generation is a fundamental aspect of siamese networks. A siamese network needs to understand the difference between two images of the same class (positive pairs) and two images from different classes (negative pairs).
During the training process we can then update the weights of our network such that it can tell the difference between two images of the same class versus two images of a different class.
It may sound like a complicated training procedure, but as we’ll see next week, it’s actually quite straightforward (once you have someone explain it to you, of course!).
Stay tuned for next week’s tutorial on training siamese networks, you won’t want to miss it.
To download the source code to this post (and be notified when future tutorials are published here on PyImageSearch), simply enter your email address in the form below!

Download the Source Code and FREE 17-page Resource Guide
Enter your email address below to get a .zip of the code and a FREE 17-page Resource Guide on Computer Vision, OpenCV, and Deep Learning. Inside you’ll find my hand-picked tutorials, books, courses, and libraries to help you master CV and DL!


![Toni Kroos là ai? [ sự thật về tiểu sử đầy đủ Toni Kroos ]](https://evbn.org/wp-content/uploads/New-Project-6635-1671934592.jpg)


