Breaking up with Facebook when you’re an App developer
July 03, 2013
I have recently decided to break up with Facebook – which is pretty strange considering that I am developing software which integrates with Facebook. So why get rid of it? Because to me it adds very little value to my life. For the most part it steals my time and it is to easy to go there and procrastinate while you really could be doing something productive. It is obviously an issue of self control which is lacking, so rather than trying to struggle with the self control, I decided to get rid of Facebook for once and for all.
If you are only testing the waters to see whether you can really do without Facebook you can start off with deactivating your Facebook account by going to the Account Settings menu, then click on the Security tab and click on ”Deactivate your account”. It will ask you for a reason as to why you don’t love Facebook anymore and then you can click on a Confirm button.
The second option is to delete your Facebook account altogether. They have hidden this option a bit more carefully, but you can get there by clicking this link. Once again you will need to give final confirmation that it really is what you want, and even then they give you 14 days to reconsider before they finally delete all your data.
If you have any Facebook pages or applications, either of the two above options are problematic if you are the sole administrator of aforementioned page or application. My first reaction was to rather just try and clear my entire Facebook history, unfriend everyone and keep my existing account solely for the purpose of administering these properties, but trying to wipe your Facebook history is next to impossible. The only options seem to be either deleting each and every interaction you have ever had manually, or actually deleting the account as a whole.
In my case the latter seemed more doable, so I decided to register a second account and transfer the page and application to the new account. This new account is well hidden from anyone and I have no friends or any other interaction on that account, so there is little danger of me wasting time on Facebook going forward. I would much prefer having no Facebook account at all, but seeing as I need to maintain the Page and Application, that is not an option for me.
Here is a quick guide on how to create a new account and transfer ownership of you page(s) and application(s).
Mục Lục
Create a new account
Your first step is to create a new account. This is fairly straight forward as all you need to do is make sure that you are logged out of Facebook, navigate to the Facebook home page and sign up for a new account with a different email address than the one you are currently using. Once you have signed up for the new account you will need to add your old Facebook profile as a friend as this will make transferring the properties easier.
If you intend transferring an application to the new account, there are two more steps you will need to complete. The first is to verify your account. This is basically as simple as adding a phone number and clicking on the verify link next to the phone number which will take you through the process of verifying that the number belongs to you. More detail on this can be found in the Facebook Help under the title ”I just signed up. How do I verify my account?“.
If you have previously verified another account with that phone number my may run into difficulty verifying the phone number against the new account. The best bet would be just to “borrow” someone else’s phone number who are not on Facebook (do people like that still exist?) or doesn’t have a verified phone number. Alternatively just go and buy a prepaid SIM for this purpose and save yourself a whole lot of hassle.
The second step for an application is to create a Facebook Developer account. The Facebook documentation contains a step-by-step guide on how to do this. If you don’t already have a verified phone number, the process of signing up for a Developer account will guide you through that as well.
Please note that maintaining 2 separate Facebook accounts is a violation of Facebook’s Terms and Conditions, so this should really only be for transferring ownership and then ensuring that you delete the old account.
Transfer ownership of a Facebook Page
Ensure you are logged into Facebook with your original Facebook profile. To transfer ownership of the Facebook page, navigate to the relevant page. Open the Edit Page menu at the top of the page and click on Manage Admin Roles.

You will see a list of existing page admins with a space to add the new administrator.

Start typing in the name or email address of the new administrator. In order for Facebook to recognise the name of the new administrator that person must either already like the page, or be one of your Facebook friends. Alternatively, to add the person by their email address, that person’s email address must be visible to you on Facebook to search on. The easiest way therefore is, like I suggested above, to just make sure that you are Facebook friends with the new profile you created.
You will be prompted for your password to confirm the changes. If Facebook cannot recognise the name or email address of the person you have entered, Facebook will give display a message informing you of this, so make sure that the new page admin has been added successfully.

For more information you can visit the Facebook help centre topic on Admin Roles. Here is a nice video from Hub N’Spoke Media which takes you through the process as well.
Transfer ownership of a Facebook Application
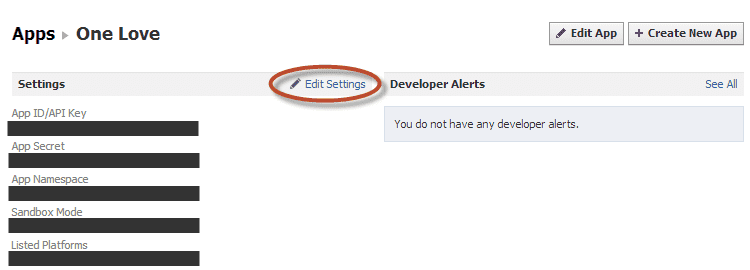
The process to add a new administrator for a Facebook App is pretty similar to the process for adding a new page administrator. Ensure you are logged into Facebook with your original Facebook profile. Go to you app and click on Edit Settings.

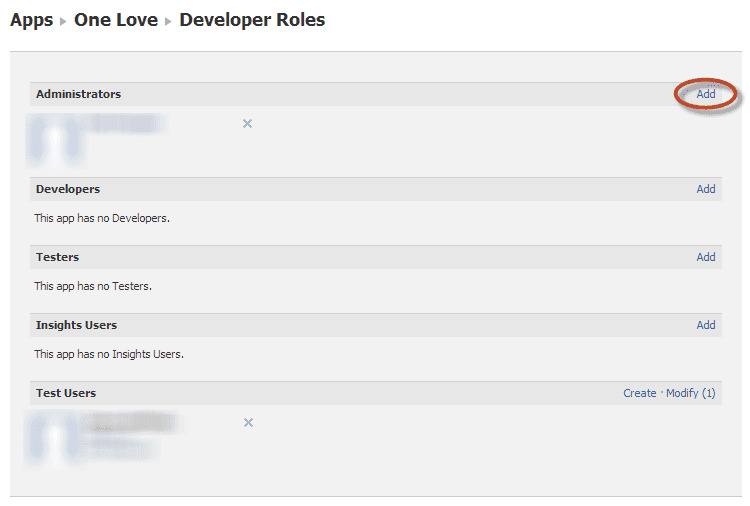
Of the left hand side, under the Settings menu, click on Developer Roles, and then click on the Add link under the list of Administrators.

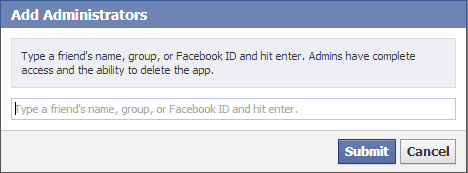
You will once again be prompted for the name of the person you want to add as an administrator.

As with the section on pages above, ensure beforehand that the new profile you created is friends with you on Facebook. Type in their name and click on submit. The new profile you created will now be added as an administrator for the application, pending their confirmation. At this stage it is important to log into Facebook with the new profile and accept the request to be added as an administrator for the application.
Conclusion
At this stage you have successfully transferred your Facebook page and application to the new profile you created. You can log into Facebook with the new profile and delete your original profile as administrator of the page and application – although just deleting your original profile should take care of that in any case. After that you can delete your original Facebook profile and continue to live your life in obscurity. Enjoy!


![Toni Kroos là ai? [ sự thật về tiểu sử đầy đủ Toni Kroos ]](https://evbn.org/wp-content/uploads/New-Project-6635-1671934592.jpg)


