
Azure Virtual Network (vNet) Peering
In this blog, I have covered everything you must know about VNet Peering in Azure which is an important topic for the [AZ 104] Microsoft Azure Administrator Certification exam. VNet Peering connects two virtual networks for resource sharing in one region or across regions in Microsoft Azure. This helps to share virtual machine resources, backups and maintaining disaster recovery.
The following section covered in this blog:
Mục Lục
What Is Azure VNet Peering?
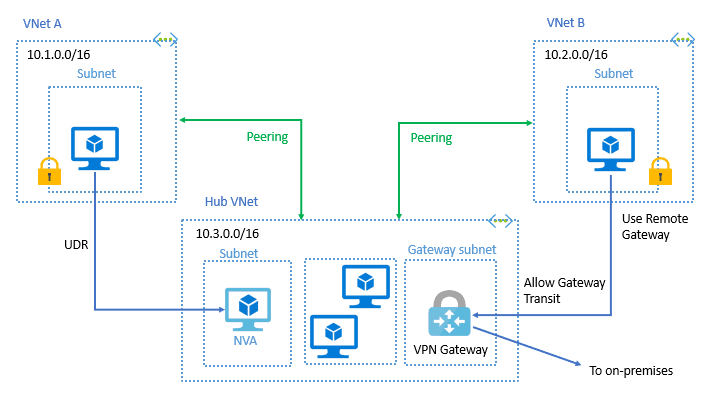
Azure Virtual Network is used for the Virtual Network Peering empowers users to flawlessly communicate with virtual networks in Azure. VNet Peering in Azure allows the traffic of one virtual network to communicate to another virtual network. This is basically used for database failover, disaster recovery, or cross-region data replication.VPN gateways are used in an encrypted connection in the region but VNet Peering provides connection sharing in different regions.
Read about: What is the difference between Data Science vs Data Analytics.
Importance Of VNet Peering
- VNet peering is similar to an inter-VLAN Routing in VLAN of On-premise networks so it works similarly to inter-VLAN connect to one VLAN to another VLAN for communication.
- In Azure infrastructure, need to connect to virtual networks to each other for sharing traffic which can be applications, backup, replication, recovery, or information sharing.
- The virtual machines of virtual network connections to other virtual machines of different Virtual network via connection of VNet Peering in the same region or across the region
Types Of VNet Peering
- Default VNet Peering: it empowers the connectivity between various VNets within the same Azure region.
- Global VNet Peering: it allows Virtual networks to connect across different Azure regions. It provides private peering with low latency and high bandwidth in Azure backbone infrastructure.
Read more: Basics of the Convolutional Neural Network (CNN) and how we train our CNN’s model on Azure ML service without knowing to code.
Pre-checks Of VNet Peering
- VNet Peering only establishes between Two virtual networks, it’s not transitive. for example, VNet P and VNet Q having VNet peering, VNet Q and VNet R having peering than VNet P and VNet R are not having VNet peering.
- Before Peering at virtual networks check for the non-overlapping IP addresses.
- The virtual network’s resource cannot set connections with the front-end IP address’s basic load balancer in Global VNet Peering in Azure.
- Once a virtual network peered with another virtual network then adding or deleting the address range is auto-disabled.
Also Read: Our blog post on Microsoft Azure Kubernetes Service AKS. Click here
Benefits
- Network traffic of peered Virtual networks become private.
- Virtual network peering in Azure allows transferring data across Azure deployment models, subscriptions, and other regions.
- No downtime issues in global Azure virtual network peering.
- It configures the connection with high bandwidth Low latency in the VNet region.
- Global VNet peering has erased the need for VNet to VNet peering Azure configuration. It disabled the use of VPN encryption, public internet, or any gateways.
- This is a very cost-effective and Time-saving process that controlling the backup, traffic, sharing from different regions
Check Out: How To Create Azure Custom Roles? Click here
Step-by-Step Configuration
- Log in to the Azure portal at https://portal.azure.com.
- Create two Virtual networks in the same or Different regions like Vnet1, Vnet2, etc.
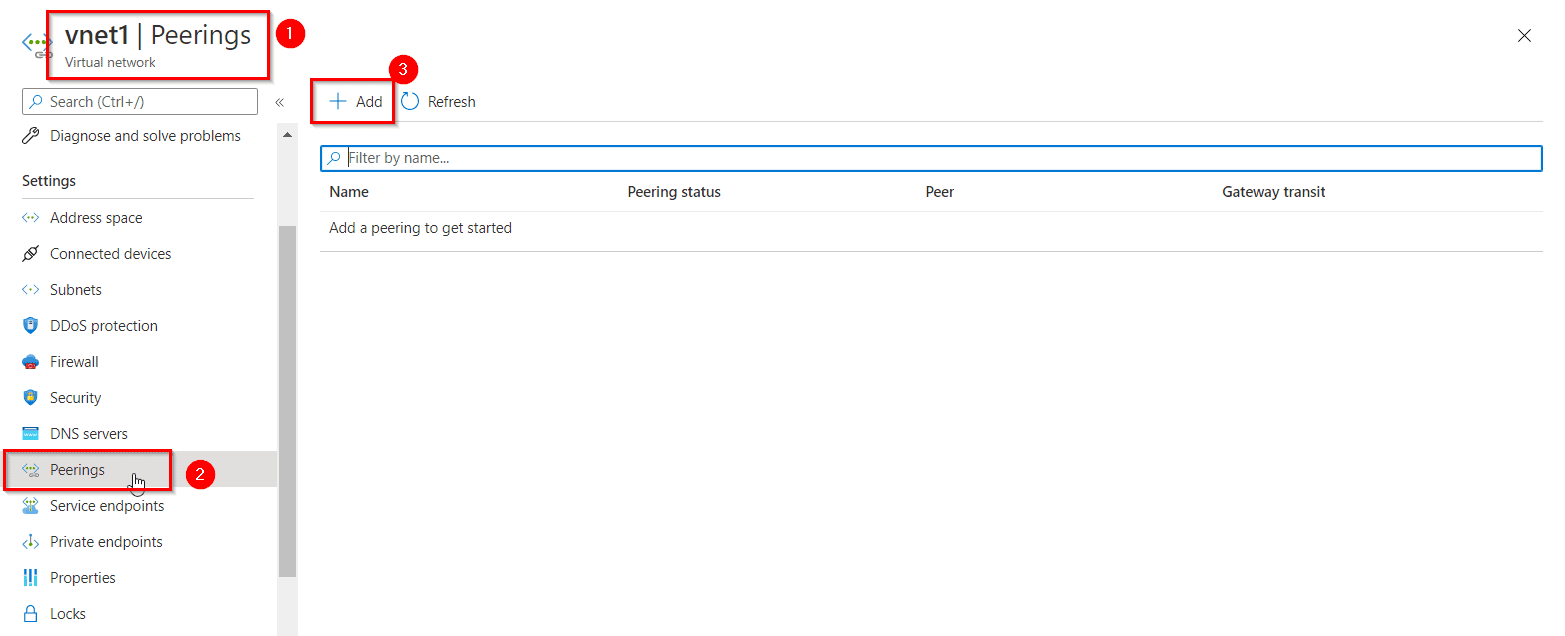
- Now go to any one of the two Virtual Networks and select Peerings, under Settings, and then select Add.
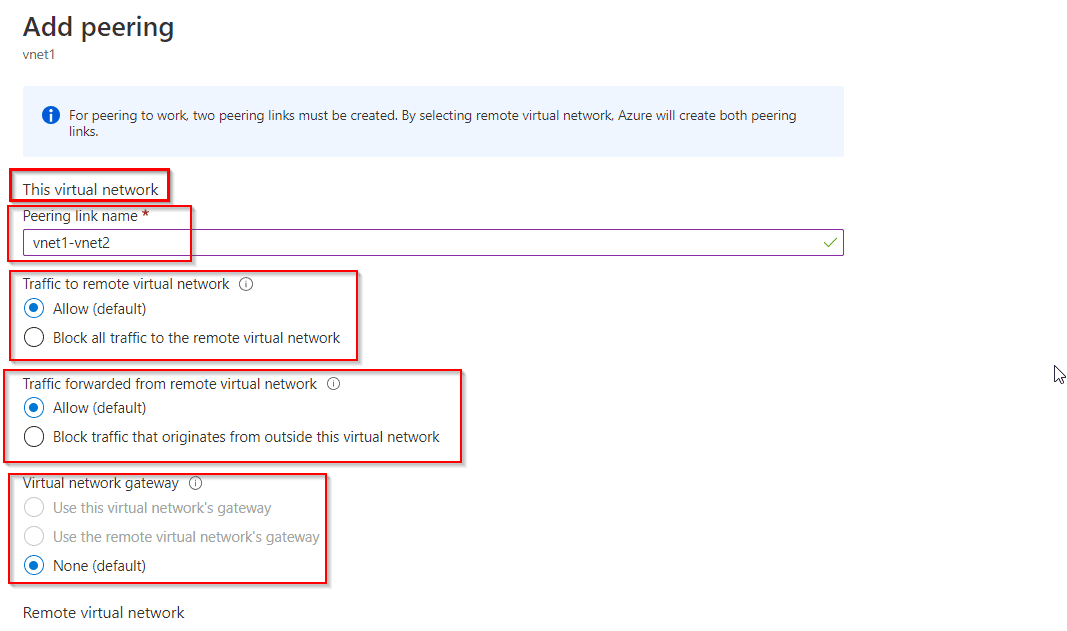
- Configuring the peering for the two virtual networks and select, Add.
This virtual network: means the vnet 1
Remote virtual network: means the vnet (here vnet2) which you want to peer the vnet1 with.
- The PEERING STATUS is Connected, as shown in the following picture:
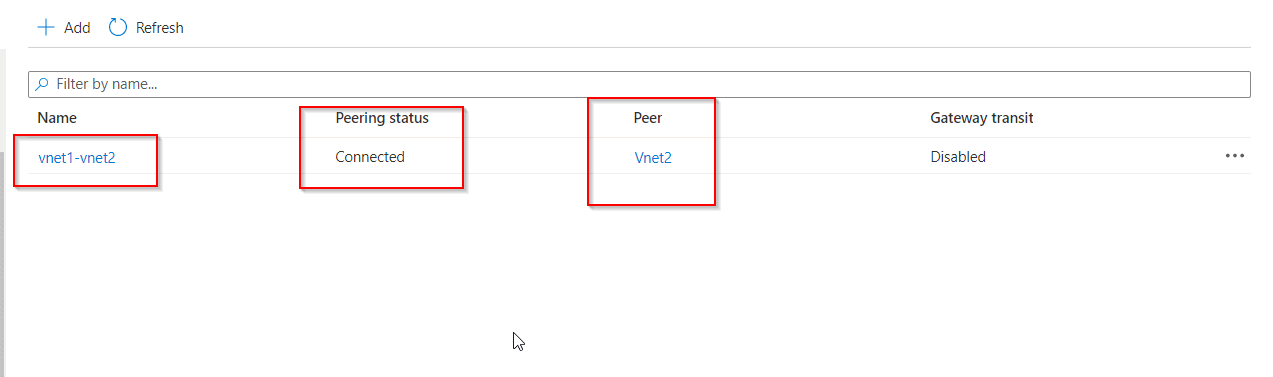 If you don’t see the status, refresh your browser.
Note: Configuring peering on anyone VNet will configure the peering automatically on the other VNet as well. - Now connect anyone of your VM and then try to ping the Public IP of the second Virtual Machine to test the peering.
Note: If you are using a Windows Server VM, the ping will fail, because ping uses the Internet Control Message Protocol (ICMP). By default, ICMP isn’t allowed through the Windows firewall. - To allow VM1 to ping VM2 in a later step, enter this command in the VM2 Powershell.
New-NetFirewallRule –DisplayName “Allow ICMPv4-In” –Protocol ICMPv4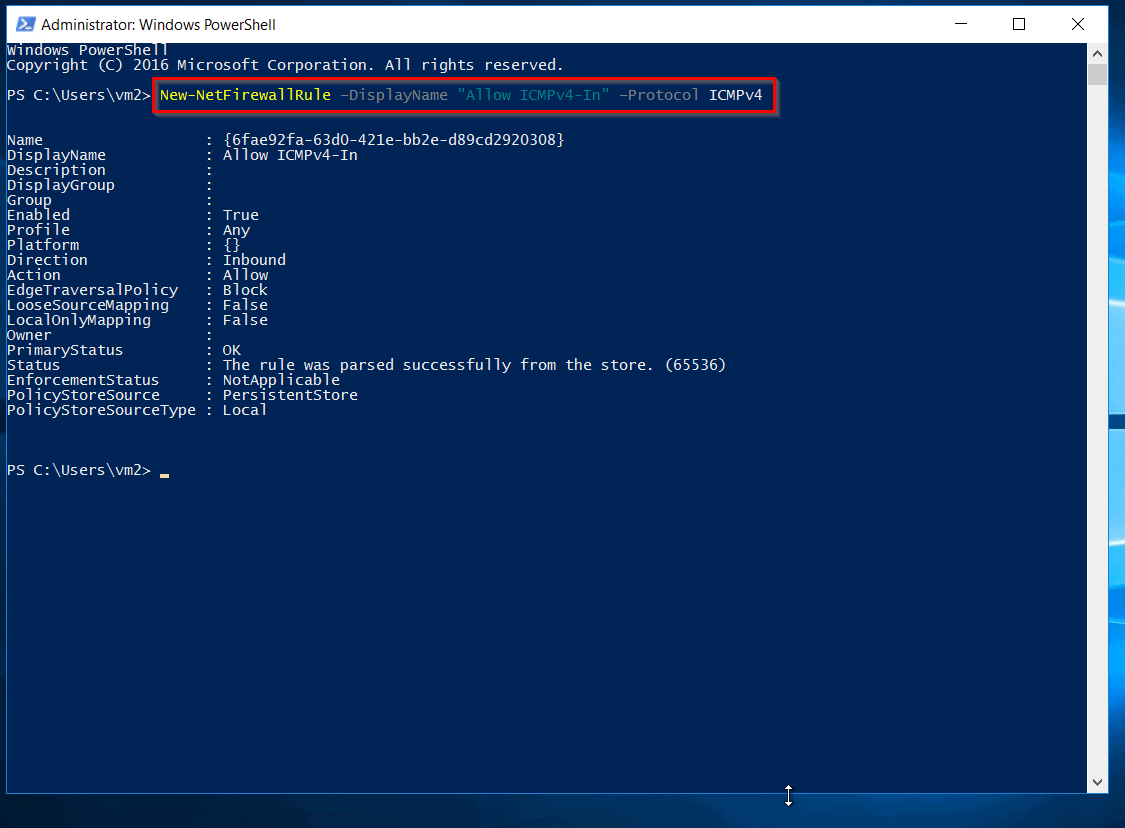
NOTE: You have to enter this command on the other VM. (Here VM2). - Now, close the remote desktop connection to VM2 and connect to the VM1, then again ping the Public IP of the second VM.
Also Check: Azure VPN Gateway vs ExpressRoute, to know the major differences between them
Now you will see that your Virtual Machines is connected as it has 100% packages received on pinging to VM2.
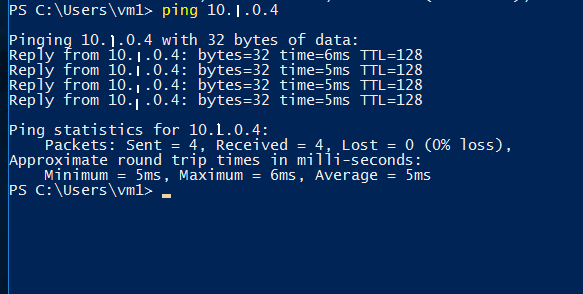
You have successfully configured and tested the VNet Peering, I hope now you have a better understanding of VNet Peering in Azure. The virtual network establishes the connection with VPN gateways and VNet Peering but it depends on the condition and requirement of the scenario.
Read More: About Availability Zones Azure. Click here
Happy learning! Please follow the below links for more information on the virtual network in Microsoft Azure.
References/Related
Next Task For You
Begin your journey towards becoming a Microsoft Azure Solutions Architect Expert. Just click on the register now button below to register for a Free Class on Microsoft Azure Solutions Architect Expert Certification [AZ-305], which will help you to understand better, so you can choose the right path and clear the certification exam.


![Toni Kroos là ai? [ sự thật về tiểu sử đầy đủ Toni Kroos ]](https://evbn.org/wp-content/uploads/New-Project-6635-1671934592.jpg)


