8 Ways To Fix The Hosted Network Couldn’t Be Started In Windows 10 – Technowizah
8 Ways to Fix The Hosted Network Couldn’t Be Started in Windows 10 PC – The error message “ The hosted network couldn’t be started ” can occur when Windows 10 users set up a WiFi hotspot via the command prompt. Usually, the problem is caused by the WiFi network adapter. But don’t worry! Because the admin has the answer to fix it. In this post, I will show you how to solve the hosted network that couldn’t be started on Windows 10.
What is the Error Message The Hosted Network Couldn’t Be Started?
Internet Connection Sharing (ICS) is one way to turn a PC into a mobile hotspot. PC tethering helps to solve your router problem which only has a limit of users that can connect at the same time. The process can be done through settings. However, using the Command Prompt is the most popular way to set up a hosted network.
Read more:
The name itself implies that your computer serves as the “host” of your Wi-Fi network and that other devices can connect to and through it. In Command Prompt, the hosted network is started first by activating the mobile hotspot feature: netsh wlan set hostednetwork mode=allow ssid=”HotspotName” key=”password” .
The words in quotes will be replaced with whatever name you choose for the PC hotspot and the password you choose respectively. After that, you usually proceed by starting the hosted network with the following command: netsh wlan start hostednetwork .
This is where the problem arises for most people. Usually, after executing the above command, the user receives the error message “ The hosted network started ”. However, with this error, the feature does not start and the Command Prompt issues the following error notifications: “ The hosted network couldn’t be started ” and “ The group or resource is not in the correct state to perform the requested operation “.
Sometimes, the error message is slightly different, but basically, the cause remains the same. Here are some other error messages from this nasty network error notification:
- The hosted network couldn’t be started a device attached to the system is not functioning
- Microsoft hosted network virtual adapter missing
- The hosted network couldn’t be started because the wireless local area network interface is powered down
- Can’t find Microsoft-hosted network virtual adapter
- Microsoft hosted network virtual adapter not found in Device Manager
- As they are all the same, the same solution applies to all of them.
Note that this error usually means that the Microsoft Hosted Network Virtual Adapter, which plays an important role in PC network sharing, is missing, corrupted, or disabled. Out-of-date or out-of-date Wi-Fi, drivers can also cause this annoying problem. The wrong driver configuration also does not rule out the possibility. But you don’t need to worry, because the admin will tell you how to solve the hosted network that couldn’t be started on Windows 10.
How to Fix The Hosted Network Couldn’t Be Started
If there is a bug in Windows, of course, there will be a solution. The error message “ The hosted network couldn’t be started ” in Windows 10 is no different in this regard. The admin has collected several solutions that you can use to solve this problem.
#1. Check the WiFi Connection
Obviously, you can’t use the internet through a wireless router, let alone a hosting network, if your WiFi is turned off. Sometimes we unconsciously ignore the fact that there are times when we need to manually set up a WiFi connection on our computer by clicking on the network icon on the right side of the taskbar. Also, check if you turned on airplane mode by mistake. It can also verify that the WiFi network is actually working.
#2. Check PC Supports Sharing
You can’t set up a mobile hotspot if your PC doesn’t support hosted network sharing. To check, follow the instructions below:
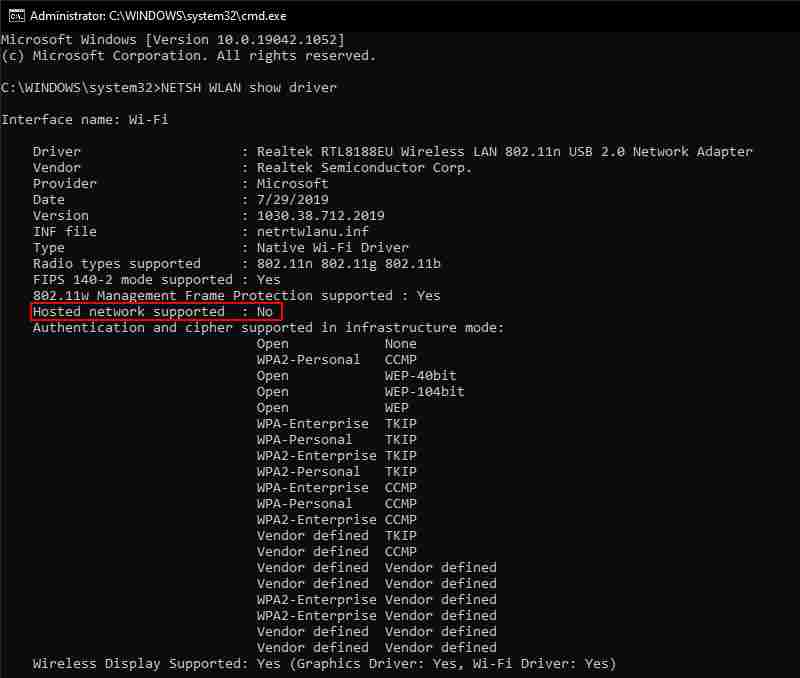
- Press Windows key + R to open the Run dialog box.
- Type ” cmd ” in the dialog box then press CTRL + SHIFT + Enter to open a Command Prompt with admin privileges.
- Enter the command “ NETSH WLAN show driver ” in the Command Prompt window, and press the Enter key. It tells you whether your PC or laptop supports Hosted network supported.
#3. Run Network Adapter Troubleshooter
The Network Adapter Troubleshooter may be able to provide a fix for the “ The hosted network couldn’t be started ” problem. For that, you can try to use the troubleshooter in Windows 10. Follow the steps below to do it:
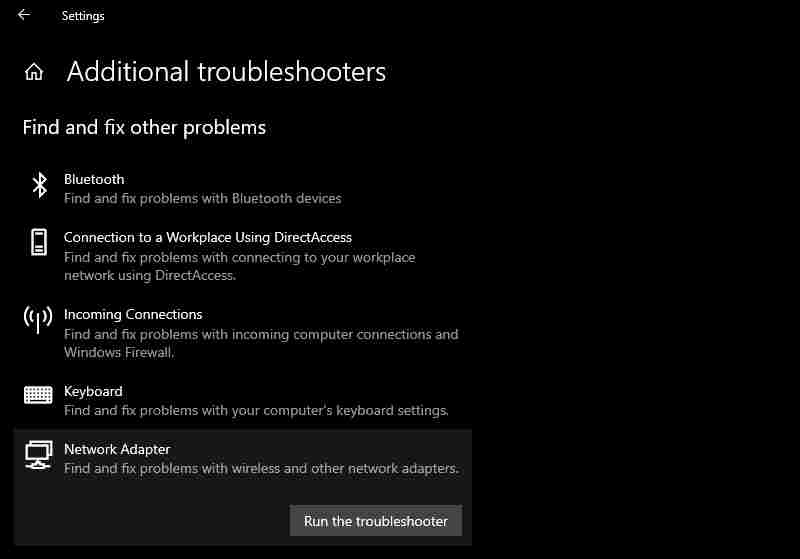
- Type “ troubleshoot ” in the windows search bar and select the most suitable one.
- Then click on the Additional troubleshooter section.
- Go to the Find and fix other problems section then select Network Adapter and click Run the troubleshooter to open the troubleshooter window.
- The troubleshooter then presents a selection of network adapters for repair. Select the All network adapters or WiFi option.
#4. Check WiFi Network Sharing Settings
If you want to enable hosted network on your computer, it means you want to use the machine as a “hub” for other devices to connect to the internet. Of course, that option must be enabled first on your PC, otherwise, it won’t work.
Now, the feature, or rather the network sharing option, is enabled by default. However, if all your attempts to get network sharing up and running proved to be unsuccessful, it’s possible that the feature has somehow been disabled. Re-enabling the option might solve this problem once and for all:
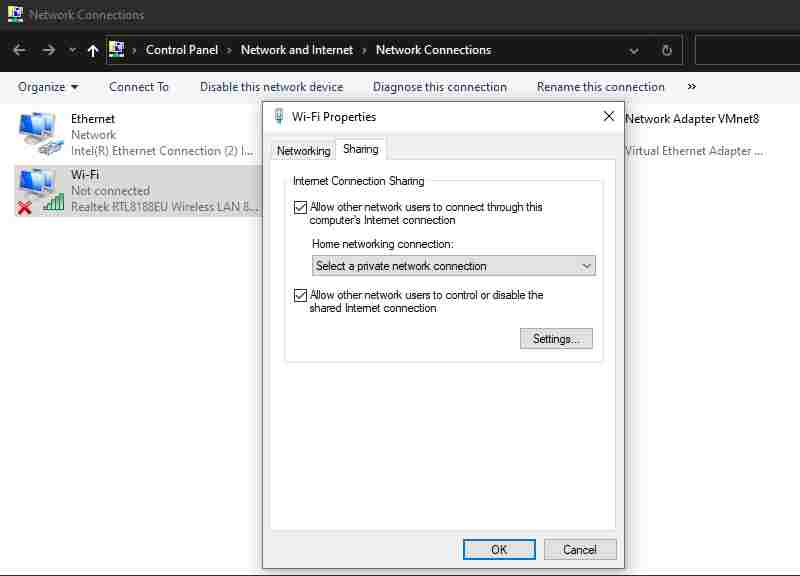
- Press the Windows key + R then enter “ ncpa. CPL ” in the Run dialog box, and press the OK button.
- Right-click the network for which you want to enable sharing and select Properties from the context menu
- Click the Sharing tab and then check the box Allow other users to connect through this computer’s internet connection.
- Also, check the option Establish a dial-up connection whenever a computer on my network attempts to access the internet which is included in the Sharing tab of Windows 8.
- Press the OK button to confirm the setting.
#5. Check Power Management Settings
Some users reported that they fixed the “ The hosted network couldn’t be started ” issue in Windows 10 by enabling the power management feature built into the network adapter. So maybe this method can solve your problem. There’s no harm in trying, at least. Follow the instructions below to try it out:
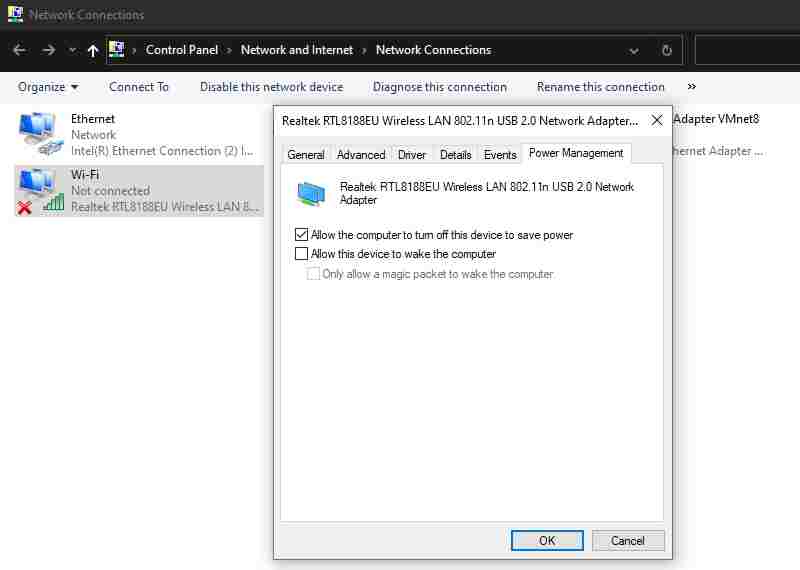
- Open the Run dialog box by pressing Windows Key + R and typing “ devmgr.msc ” (without the quotes). Press the Enter key or click OK.
- When the Device Manager window opens, navigate to the network adapters section and double-click to expand it.
- Right-click the problematic WiFi network adapter and select Properties.
- In Properties, click the Power Management tab.
- Check if the “ Allow the computer to turn off this device to save power ” option is enabled. If it’s disabled, enable it.
- Click OK and exit all windows.
#6. Enable Microsoft Hosted Network Virtual Adapter
To use your PC as a mobile hotspot on Windows 10, you need a Microsoft Hosted Network Virtual Adapter. It must be present and enabled for the hosted network feature to work properly. If disabled, it can give an error message “ The hosted network couldn’t be started ”. You can check if Microsoft Hosted Network Virtual Adapter is enabled or not and turn it on if needed. Follow the steps below:
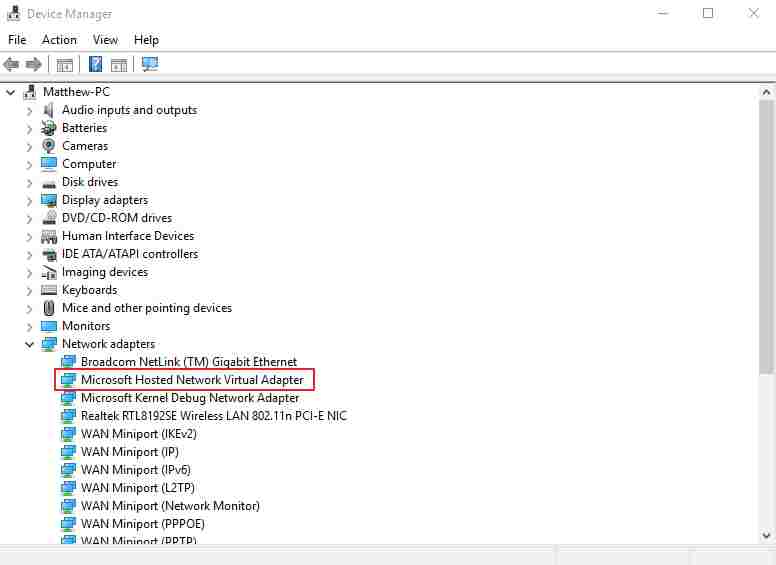
- Press Windows key + R . Type “ devmgmt.msc ” in the Run dialog box and click the OK button.
- Now click View in the Device Manager window.
- Select the Show hidden devices option.
- Double-click Network adapters, which will now include the Microsoft Hosted Network Virtual Adapter.
- Right-click the Microsoft Hosted Network Virtual Adapter and select the Enable device option.
#7. Reset WiFi Network
Most problems with Windows can be solved by doing a simple restart. For the problem “ The hosted network couldn’t be started ” in Windows 10, resetting the WiFi network can work fine. To reset the problematic network, you must first disable it, wait a moment, then reactivate it. Hopefully, this action resolves the issue so you can continue using the sharing feature on your PC. Here’s how to do it:
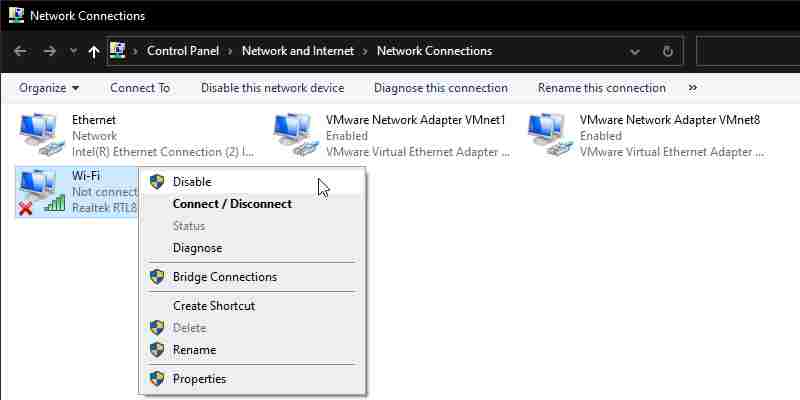
- Press the Windows key + R then enter “ ncpa.cpl ” in the Run dialog box and click OK.
- Right-click your WiFi connection and select Disable.
- Wait a minute or two, then select the Enable option in the WiFi connection context menu.
The error message “ The hosted network couldn’t be started ” may also be caused by an incompatible or corrupted WiFi driver. So updating the WiFi network adapter driver is a way worth trying. You can update drivers with third-party software or use Device Manager’s Search automatically. Here’s how to do it:
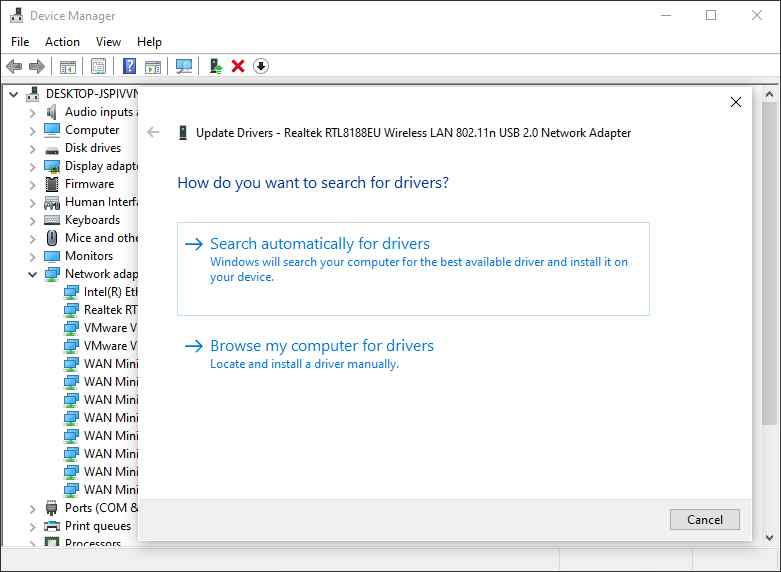
- Press the Windows key + X to open the Quick Access menu and select Device Manager.
- In the Device Manager window, look for Network Adapters and expand it. Right-click the Wi-Fi adapters that are giving you problems and select Update Driver.
- In the next window, select the “ Search automatically for updated driver software ” option.
- Windows will start a search for the required drivers and install them if they are available. Otherwise, it will tell you that the current driver is the latest one.
Read more:
Conclusion:
So those are some ways to fix the hosted network that couldn’t be started on Windows 10. If all the methods above still don’t solve the problem, you can use a third-party application such as Connectify or Free Wi-Fi Hotspot to create a mobile hotspot. But supposedly with the solutions provided in this guide, you can solve that problem and successfully share your network via PC or laptop.
Don’t forget to bookmark and always visit every day Technowizah.com because you can find here the latest Tech Computer Android games How-to Guide Tips&Tricks Software Review etc, Which we update every day.


![Toni Kroos là ai? [ sự thật về tiểu sử đầy đủ Toni Kroos ]](https://evbn.org/wp-content/uploads/New-Project-6635-1671934592.jpg)


