7 Ways to Fix “Enter network credentials” Problem On Windows
Despite entering what seems like the right credentials, users will sometimes encounter error messages like Access Denied or The Username or Password is Incorrect or Enter Network Credentials.
This type of error message usually appears when the credentials used for access do not match the actual credentials. Having one computer signed into a Microsoft Account and the other into a Local Account can also cause this issue.
You should first make sure you’re entering the correct credentials and that Caps Lock isn’t accidentally enabled. These may sound obvious but are often easily overlooked. After ensuring the credentials are accurate, move on to the fixes.
Use Windows / Microsoft Credentials
Before applying any of the technical solutions listed below, we recommend using your Windows login credentials or your Microsoft account credentials instead of the usual Network credentials, as these have solved this issue for a lot of users.
If that doesn’t help, the following steps are also worth trying:
- Enter the full username but with a backslash in between this time as such:
Inspiron\Jack - Enter the username but leave the password field empty.
- Try entering the computer name in all the fields.
Add Network Credentials to Credential Manager
Sometimes the network credentials in the Credential Manager can reset after a computer in the network reboots or logs out. Since the entry is blank now, the credentials don’t match, so you won’t be able to access other computers on the network anymore. In such cases, here’s what you should do:
- Press Win + R, type
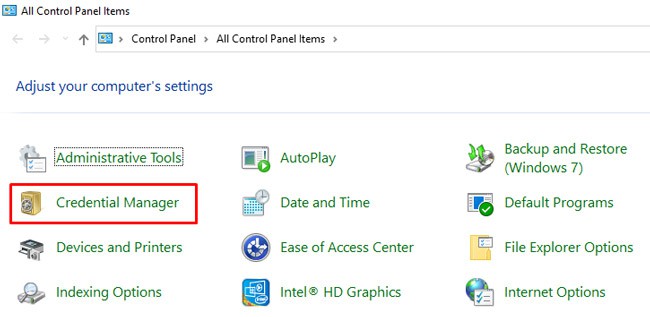
control, and press Enter. - In Icon View, select Credential Manager.
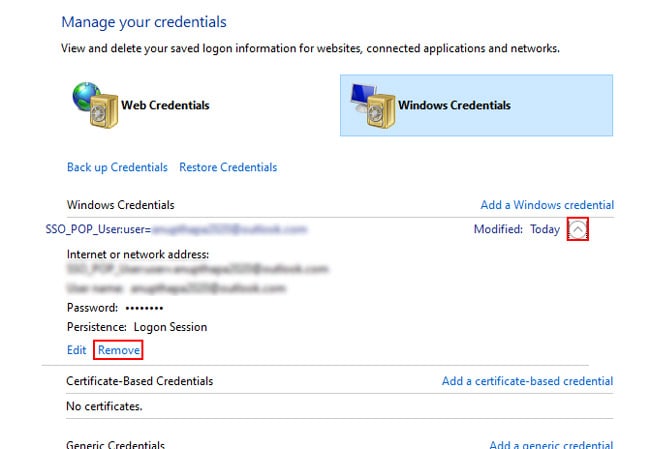
- In the Windows Credentials tab, expand the Network Credential entry and select Remove.
- Check if the network credentials work now.
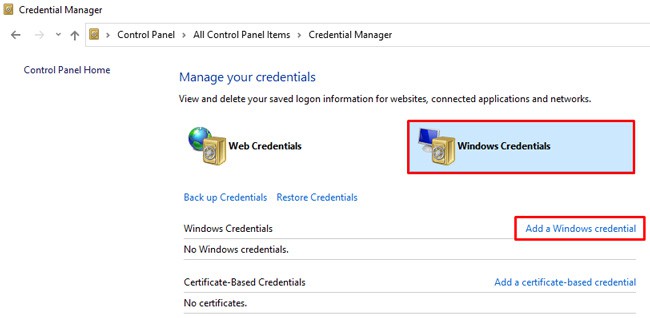
- If removing the old entry didn’t help, you should add a new entry for the credentials instead with the Add a Windows Credential option.
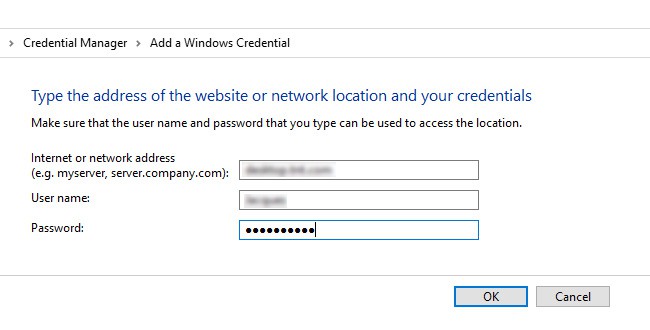
- Enter the network credentials and press OK.
Disable Password Protected Sharing
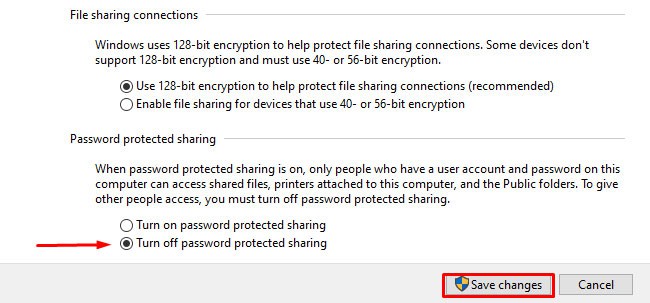
The Password Protected Sharing feature only allows people with user accounts on your PC to access the shared files. You should ensure that this setting is turned off on both your PC and the remote PC with the following steps:
- Press Win + R, type
control, and press Enter. - Select Network and Internet > Network and Sharing Center > Change Advanced Sharing Settings.
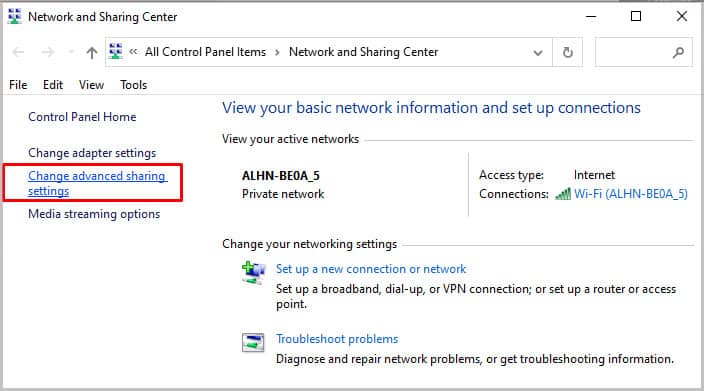
- Expand the All Networks section.
- Select the Turn off Password Protected Sharing option and save the changes.
Change Network Profile to Private
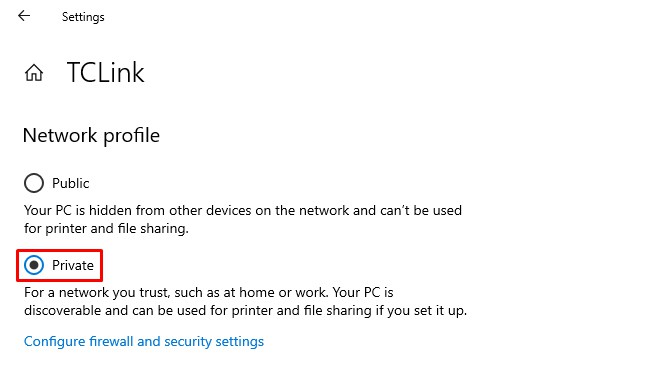
On a public profile, file sharing is disabled and certain connections are restricted by the firewall, whereas this is not the case with a private profile. So, switching to a private profile can help you resolve the network credentials not working issue. Here are the steps to do so:
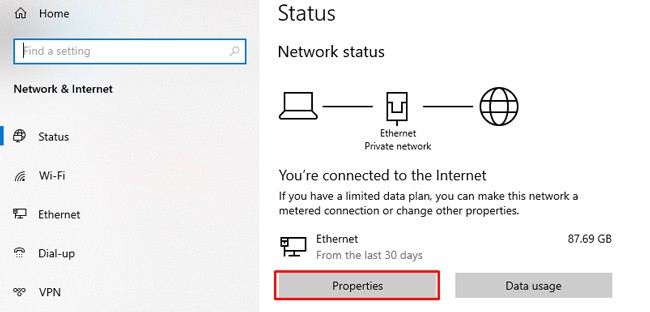
- Press Win + I and open Network & Internet.
- Click on the Properties button under the active connection.
- Under Network Profile, select Private.
Disable Local Account Security Policy
As stated by Microsoft, the limit local account use of blank passwords to console logon only policy “Determines whether local accounts that are not password protected can be used to log on from locations other than the physical computer console.”
By disabling it, you can access local accounts that are not password protected remotely as well. Here are the steps to do so:
- Press Win + R, type
secpol.msc, and press Enter. - Navigate to Local Policies > Security Options.
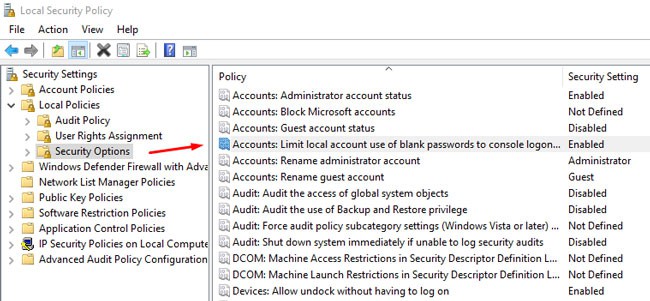
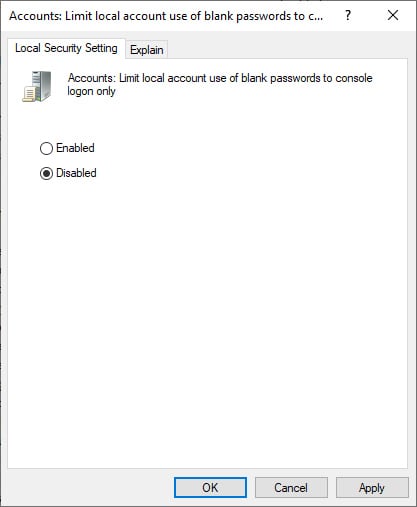
- Double-click the Accounts: Limit local account use of blank passwords to console logon only policy.
- Disable this policy and press OK to save the changes.
Add IP Entry to Hosts File
This solution is a bit more niche as it only applies if you’re using a static IP. The hosts file acts like a local DNS server that your computer checks first, even before your actual network DNS. So, adding a static entry to this file can help resolve the network credentials not working issue. Here are the steps to do so:
- Press Win + E and navigate to
C:\Windows\System32\drivers\etc. - Copy the hosts file and save it elsewhere as a backup.
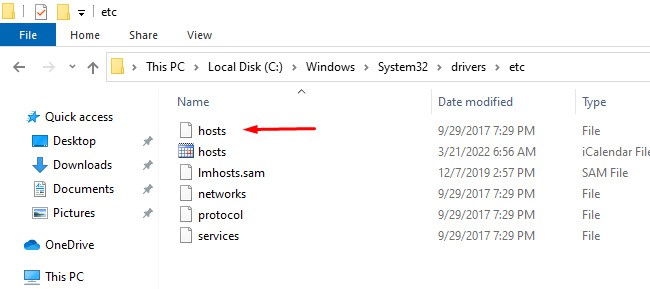
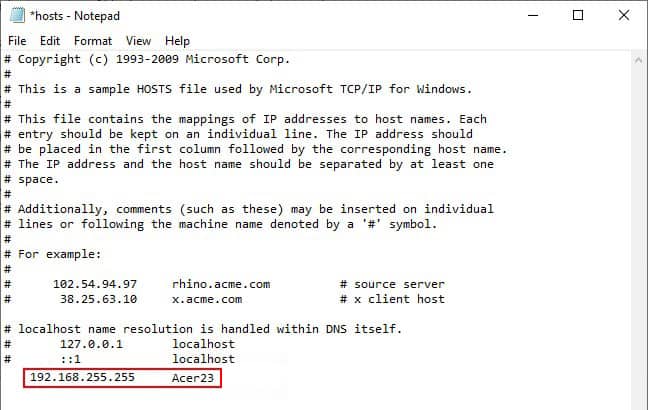
- Open the original file using Notepad.
- Add the IP Address and hostname as shown in the picture.
- Press CTRL + S to save the changes.
User Reported Fixes
Note: These fixes are for niche scenarios, but if you’re still facing the network credentials not working issue despite applying the solutions above, these may be worth checking.
One user on the Microsoft forums had 2FA enabled on his Microsoft account, so he would use a PIN to log in instead of his password. In cases like this, if the password has never been used, the computer can’t validate the credentials.
So, to be able to access a remote desktop, you should first sign in to the remote computer using your Microsoft account credentials. After you’ve done that once, Windows encrypts and stores the password. There will be no more validation issues, so you should be able to access the computer remotely as well.
There have also been cases where one computer used a Microsoft account (with a password), but the other used a Local account (without a password). Even though no password was set up on the second PC, users would be asked to enter the credentials. In this case, you can sign in to the first PC using a local account as well to resolve the issue.
Some users have also found that being connected to both the Wi-Fi and Ethernet simultaneously led to this issue. The fix for this is very simple; just use one connection method at a time.
Finally, this is on unRAID OS specifically, but if you’re having trouble accessing public share folders, you can use ‘guest‘ as the username and ‘1234‘ as the password, and finally tick the Remember My Credentials option. If you still keep getting asked for the credentials, adding these credentials to the Windows Credential Manager should resolve this issue.


![Toni Kroos là ai? [ sự thật về tiểu sử đầy đủ Toni Kroos ]](https://evbn.org/wp-content/uploads/New-Project-6635-1671934592.jpg)


