
7 Critical Things You MUST Do Before You Launch Your Blog (in 2021)
When you start a blog from scratch, you have a ton of things to manage and keep track of. Do you feel like it’s sometimes just a tad confusing and daunting?
What if I said you can use a handful of simple tricks to save you some precious time while having a better overview of your blogging project?
In this post, I’m going to reveal 7 practical tips to make sure you have everything set up properly before you launch your blog.
Each point in this article is easy to take advantage of, but the benefits for you are enormous.
You can focus on more productive things when you don’t have to worry about running into problems later on. This will help you start your blog the right way and make money online faster.
And trust me, I have managed to neglect every single point in this post at some point with my blogs. Mistakes like these cost me tons of time and money so I don’t want you to repeat them. Lesson learned!
Here are a few helpful posts you may want to read, too:
Mục Lục
1: Create a content strategy
First things first! We all know blogging is all about creating amazing content.
That said, the very first thing you must do before you launch your blog is to plan out your content.
What are the benefits of having a content strategy?
The biggest advantages of a content plan are:
- Positive SEO effect – You’ll build authority and improve your SEO rankings for each category separately. It’s better to write 10 posts for one category after one another than to jump back and forth between categories every week.
- Strong reader engagement – Whenever your readers find one post they like, they’ll be able to discover more related content easily.
- Clear blog post ideas – When you have a solid content strategy, you don’t have to waste your time trying to find blog post ideas. You know exactly what you’ll write about and how each post will take you one step closer to your goals.
Sounds good? I thought so 😉
How to create a solid content strategy for my blog?
If you haven’t already, start by finding the perfect blog niche for yourself. That’s the starting point for all bloggers.
Then, know who your target audience is and how your blog can help them and offer them value. After all, your blog is about your readers, not you.
Once you’ve found your niche and figured out who your potential readers are, here’s what you should do next before you launch your blog:
- Decide how many posts you want to publish in the first 12 months.
- Define the number of post categories. How many blog posts will you write for a single category?
- Divide the total number of posts by the number of categories.
- Determine how many posts you have to write a cohesive “story” for each category with the given number of posts.
For each category, make sure your posts are knit together. If you have 6 posts per category, try to address the most crucial problems of your readers in those posts.
Related article: 10 Instant Tips for Writing the Perfect Blog Post

2: Set up an editorial calendar
Once you have created a solid content plan, it is time to set up an editorial calendar. An editorial calendar is the easiest way to make sure you will stick to your plan.
You see, when you start a blog, you will have tons of ideas for blog posts. You enjoy creating new content and you are feeling super excited to hit that Publish button.
But after a couple of months, you will start to feel less driven. And hey, that is perfectly OK, nothing to worry about. Every blogger goes through the same phase.
But that is when you need a tool to keep you going. Because remember: consistency is the only way to become a successful blogger and make money online.
With a content calendar you will create accountability towards yourself and your readers. Seeing your long-term plans in front of you will increase your motivation to keep up the good work.
Recommended post: How to Stay Motivated When You Start Blogging
How to create an editorial calendar for my blog?
At its simplest, a content calendar can simply be a spreadsheet.
What I like to do is use a Trello board to gather all my ideas and organize them into monthly tables.
If you’d like to create and manage your editorial calendar directly in WordPress, I’d suggest you install and try the free Editorial Calendar plugin before you launch your blog. It’ll make blogging much easier and more efficient for you.
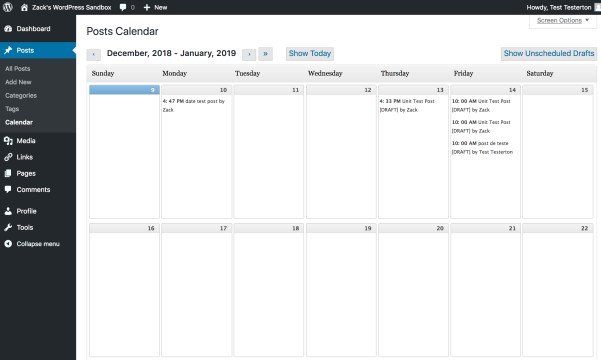 The Editorial Calendar Plugin makes it easier to schedule and plan your blog posts.
With the Editorial Calendar plugin, you don’t have to switch between multiple tools when you have everything built into your WordPress admin area. Pretty neat, eh?
3: Schedule your first blog posts
Before you launch your blog, make sure you have enough content lined up for at least a few weeks.
If you can, try to write enough articles to publish for 2-4 months.
Having a good amount of content ready and waiting is super helpful in the first months. Trust me, you’ll have enough other things on your mind once your blog “goes live” than writing.
Read also: Blogging 101: How to Write a Blog Post in WordPress
How to schedule your blog posts in WordPress
Use your content strategy and editorial calendar to create a steady flow of blog posts to publish.
When you’re done writing a blog post, you can schedule it to be published later in the future. In your Edit Post view, you can find the scheduling option under Document > Publish.
Every post is set to be published right away by default. When you click on the link that says “Immediately”, you’ll see a calendar pop up:
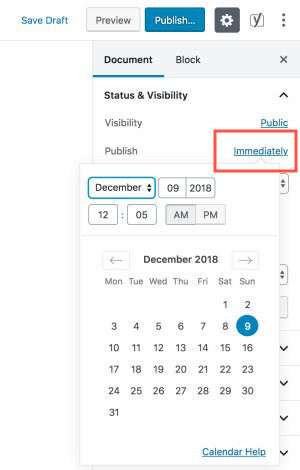
Simply choose the date and time when you’d like to publish the post and you’re done!
Having a bunch of blog posts lined up before you launch your blog will make blogging much more efficient and structured.
When you’re ready to “go live”, you don’t have to worry about running out of blog posts to publish. You can dedicate more time to marketing, generating traffic, and monetizing your brand new blog.
4: Write a stellar “About” page
You “About” page is your best chance for an amazing first impression with your readers.
I know lots of blogs where it is the most visited page on the entire blog. Needless to say, it is a good idea to give it some thought.
Your About page offers your readers the chance to get to know you a bit better. That is why you should give people the opportunity to know the face behind your blog. It just helps you build a connection with your readers.
And if they feel like you are being yourself and they feel a connection with you, you will see them interacting more with your blog. They are more likely to come back to your blog, share your content, and follow you on social networks.
How to create an amazing About Me page for your blog?
First of all, keep it simple. Don’t overthink what you will write and put on the page. Simply let your about page reflect who you are.
Here are a few steps to get you started:
- Include information about both who you are and what your blog is about.
- Have fun with it and let your personality shine through.
- Share your personal inspiration for blogging. What made you start your blog in the first place?
- Tell your readers how you hope you can help them. Why should they read your blog?
- End on a casual note. Share a fun fact about yourself, your life, or your blogging endeavors.
- Include a photo of yourself. No need for fancy portraits, a simple selfie with good lighting will do.
- Check your spelling and grammar. Use Grammarly for a final check-up before you publish your About page.
Good job!
Now, I know writing an About page can feel intimidating at first. And that is perfectly OK.
If you are not comfortable with sharing too much about yourself, don’t worry. Just share as much as you feel OK with. You can always come back and add more details if you feel like something is missing.
5: Build a social media strategy
Traffic is everything if you want to start a successful blog and make money blogging. After all, if there are no visitors on your blog, who’s going to buy your products or click your affiliate links?
That said, make sure you create a thorough marketing strategy before you launch your blog.
Read next: Pinterest Marketing for Blog Traffic: The Ultimate Guide
Why should I create a social media strategy for my blog?
The best tools for growing your blog in the beginning are SEO and social networks.
But, since it usually takes months to see results from SEO, your best friend for short-term traffic are social media.
As with any marketing method, be prepared to invest a lot of time into social media. If you use Pinterest, for example, make sure you can pin at least 10-30 times a day.
Sounds like a lot, I know.
But what if I told you there’s a powerful tool I use to automate up to 200 daily pins – and I only need 30 minutes for it each week?
Sounds too good to be true? I thought so too at first! Let me get back to this in a minute…
Related article: 7 Powerful Traffic Tools for Growing Your Blog
How to build the perfect social media strategy?
Here’s the deal – this is what you should do before you launch your blog:
- Use only 1 social network in the beginning. It’s better to gain traction in a single network instead of having a thin spread across several ones.
- Choose it according to your target audience. Where are they spending their time? Where do they find answers to their questions?
- Create a (business) profile for your blog. Make sure you include a picture, either of yourself or of your logo, and a full description of your blog.
- Write tailor-made social network posts for your chosen network for every blog post you scheduled above.
- Save time by automating your social media updates and posts. The tool I use to automate my pins on Pinterest is called Tailwind. It’s an app that allows you to schedule your pins so that you don’t have to spend hours pinning manually. And the best part is: Tailwind knows when your readers are most active on Pinterest and schedules your pins automatically to be published at the perfect time when your audience is active on the platform. If you’re new to Tailwind, use this link to schedule 100 pins for free.
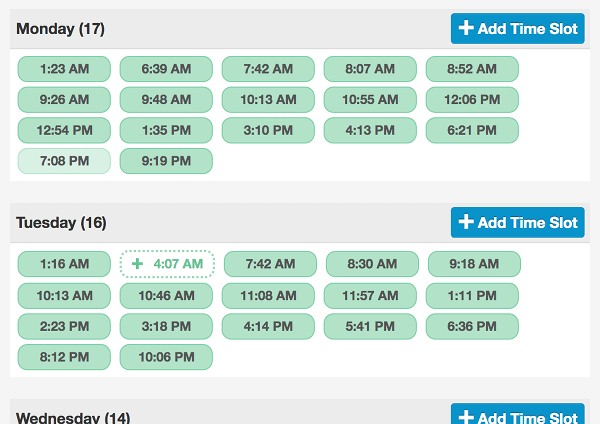 Tailwind automatically finds the best time slots for your pins so that they are seen by as many users as possible.
If you want to learn more about Pinterest marketing with Tailwind, check out my Pinterest strategy for all the juicy details about how I use it to drive traffic to my blogs.
If you get your social media marketing right, you can see traffic from the network of your choice in a matter of minutes.
Read also: What to Blog About? How to Find Blog Post Ideas That Generate Traffic
6: Pick the right WordPress theme
We all love pretty things, right? That goes for blogs, too.
Blogs that are designed for their readers do the best job at attracting traffic and readers. If your visitors don’t feel comfortable navigating through your blog, you can kiss your blogging success goodbye.
But if you’re just starting out and you’ve never had a website before, where do you start?
Designing a user-friendly blog can feel scary and overwhelming. I know – I was you not too long ago!
When you start your blog using WordPress, you’re free to design and customize your blog to your heart’s content. You have thousands of beautiful design templates to choose from, called WordPress Themes.
You can find a selection of free themes directly in your WordPress dashboard under Appearance > Themes.
 You can find and install WordPress Themes under Appearance > Themes. The active theme is displayed on the top left.
Can I use a free WordPress Theme for my blog?
Using a free theme at first is perfectly OK.
However, consider investing a few bucks in a premium paid theme already before you launch your blog.
You can get a pro-level premium theme for just $30 – $40 on Themeforest, for example. If you find the right theme, you can use it for years while making good money with your blog. Choosing one of the most popular premium themes is a safe choice that will pay itself back sooner than you think.
Premium themes come with heaps of valuable advantages that will help you become a more confident and productive blogger, like:
- Better customization options – You can design your blog exactly the way you want.
- Solid support and service – When it comes to customer service and answers to your questions, you get what you pay for!
- Security and stability – Premium themes are created by professional businesses who focus on delivering the best standards of security and stability.
I know the world of WordPress Themes can easily feel difficult to navigate through before you launch your blog. You have so much to choose from and everyone keeps telling you different stories about which theme to use.
To help you get started, use this helpful post to find the perfect WordPress theme for blogging.
Read also: The Best WordPress Themes for Bloggers (Free and Paid)
What is the best WordPress theme for bloggers?
Here’s what I’ll tell you: I’ve been using WordPress for a few years now, designing and building websites and blogs for clients as a professional web designer.
Having tried dozens of themes throughout the years, the one theme that none of the others comes close to is the Divi Theme from Elegant Themes. (And yes, that’s a shameless affiliate link to a product I use and absolutely love.)
 The Divi Theme is the best and most powerful WordPress Theme for beginners.
Divi is perfect for both absolute beginners and for advanced WordPress users, too. You can start using Divi by learning one feature at a time.
Don’t worry about having to know how to code – Divi will do all the hard work for you. All you need is a clear vision of how your blog should look. Divi and the visual drag-and-drop Divi Builder tool will take care of the rest.

Once you feel more comfortable using Divi, you can learn and use some of the more advanced features step by step. Trust me, you’ll never run out of customization options with Divi!
Just head over to Elegant Themes and give Divi a try! They give you a full, no-questions-asked, 30-day money-back guarantee – so there’s really no risk trying it out.
7: Create an opt-in for subscribers
Trust me, it’s never too early to start collecting email addresses from your readers!
An opt-in is a signup form where your readers can enter their email address to subscribe to your mailing list.
You don’t need tons of traffic to create an opt-in for your visitors. It’s better to build one already before you launch your blog.
What’s the point of having an opt-in for subscribers?
When someone signs up via your opt-in, they’re already comfortable with sharing their contact information with you. They trust you enough to let you contact them directly via email.
That means that every subscriber is already interested in what you have to say. They think your content is valuable and they want to hear more from you.
In short: your subscribers are the best bunch of readers you have!
You’ll have their email addresses, meaning that you can contact them anytime.
Speaking of opt-ins… How about opting in to my FREE 7-day Start a Blog Crash Course? 😉
Why is an email list the best possible traffic generation tool?
With other traffic generation methods, you don’t have a direct link like that to your audience.
- Think about SEO, for example. You might be on top of the search results on one day, yes. But in a few months, your rankings could go down and you’ll lose some of the traffic via Google.
- Or with social networks: you have to be constantly active on social media to generate traffic to your blog. And the chances are you’ll face a lot of competition. So, it’s sometimes pure coincidence that your followers happen to see your post and click on it.
All in all, having an email list is the best method to make sure you’ll always have at least some traffic coming to your blog.
How to create an opt-in for subscribers on your blog?
There are tons of tools you can choose from. What you want is a beginner-friendly solution that lets you create multiple email lists to segment your subscribers easily.
The easiest and most powerful FREE email marketing tool is MailerLite. It allows you to quickly create beautiful opt-in forms that you can easily embed in your blog posts and pages.
You can use this link to get started with MailerLite for FREE. I know you’ll love it as much as I do.
To help you set up your email list and create an automated response to your new subscribers, you’ll find a set of helpful step-by-step video tutorials directly in your dashboard.
To start building your list now, follow my beginner’s guide on how to start an email list for free in 7 easy steps.
Final thoughts: What you must do before launching your blog
When you start a blog from scratch, you will have heaps of things to do before you launch your blog.
The points in this article should help you get started the RIGHT way so that you don’t have to worry about anything going wrong.
Trust me, it’s better to spend a lot of time preparing everything properly than rushing it in the beginning.
When you lay a solid foundation for long-term success before you launch your blog, you’ll have a much smoother journey along the way. You don’t have to waste time trying to solve problems that could have been avoided in the first place.
Also, you can cut down the costs of starting your blog when you find the right tools that will pay themselves back.
That said, it’s your turn now!
Whenever you are ready, head over to my Step-by-Step Beginner’s Tutorial on How to Start a WordPress Blog in 15 Minutes. I will walk you through each step you need to take to start a successful blog from scratch. I will see you there!
Here are a couple of related articles you may want to read, too:
If you found this post about things to do before you launch your blog helpful, just drop me a line in the comments section!
P.S. I’d appreciate if you shared this post with others, so that they can find it, too! Thanks so much for your support!
Happy blogging! I’ll see you in the next post!
– Mikke


![Toni Kroos là ai? [ sự thật về tiểu sử đầy đủ Toni Kroos ]](https://evbn.org/wp-content/uploads/New-Project-6635-1671934592.jpg)


