7 Ways to Fix ”Windows Cannot Connect to the Printer”
When your Microsoft Windows PC fails to connect to your printer, you get an error message: ”Windows Cannot Connect to the Printer.” You can’t print your documents or perform printer-related tasks when this happens.
Some common reasons you get this error is that your printer is turned off, you don’t have the correct printer drivers installed, or your PC has a minor glitch. Once you fix these issues, your PC successfully connects to your printer, allowing you to print your documents.
Table of Contents
1.
Turn On Your Printer
One commonly overlooked reason your PC can’t make a connection with your printer is that your printer is turned off. Check that the printer is plugged in and turned on, and if you’re using a power strip, make sure that’s turned on, too.
2.
Use the Windows 10/11 Printer Troubleshooter
Windows includes many troubleshooters to help you find and fix problems. One is a printer troubleshooter that helps identify and resolve any printer-related issues.
This troubleshooter detects and resolves most issues on its own, requiring minimal interaction from you.
- Open
Settings
by pressing
Windows
+
I
at the same time.
- Select
Update & Security
in Settings.
- Choose
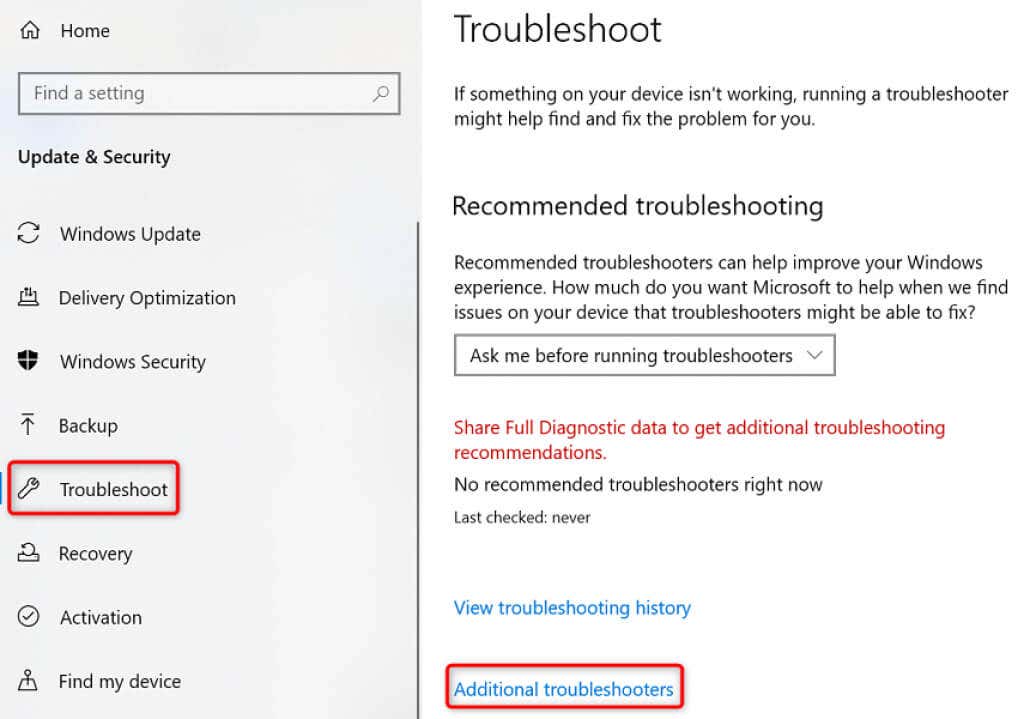
Troubleshoot
in the sidebar on the left.
- Select
Additional troubleshooters
on the right.
- Select
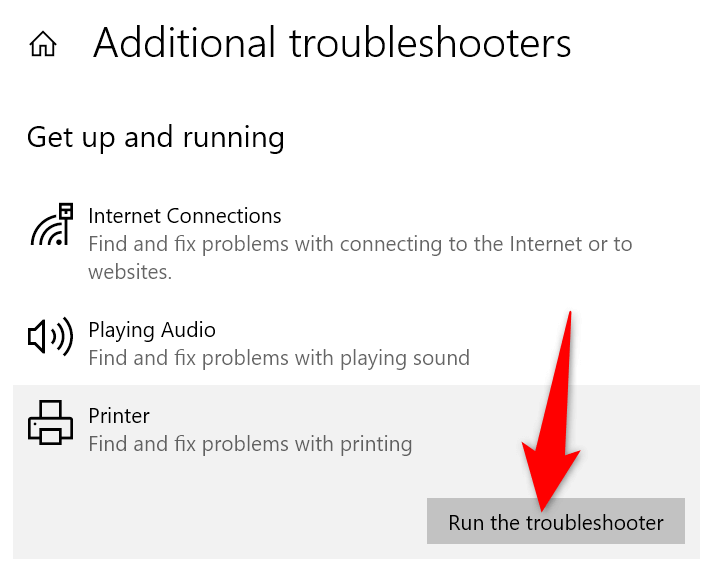
Printer
and choose
Run the troubleshooter
.
- Wait for the troubleshooter to find and fix your printer issues.
3.
Restart the Print Spooler Service
Windows’ print spooler service stores your print jobs until your printer is ready to print them. It’s worth stopping and restarting this service when you experience issues like ”Windows Cannot Connect to the Printer.”
It only takes a minute to turn this service off and back on.
- Launch
Run
by pressing
Windows
+
R
at the same time.
- Type the following in the
Run
box and press
Enter
:
services.msc
- Double-click
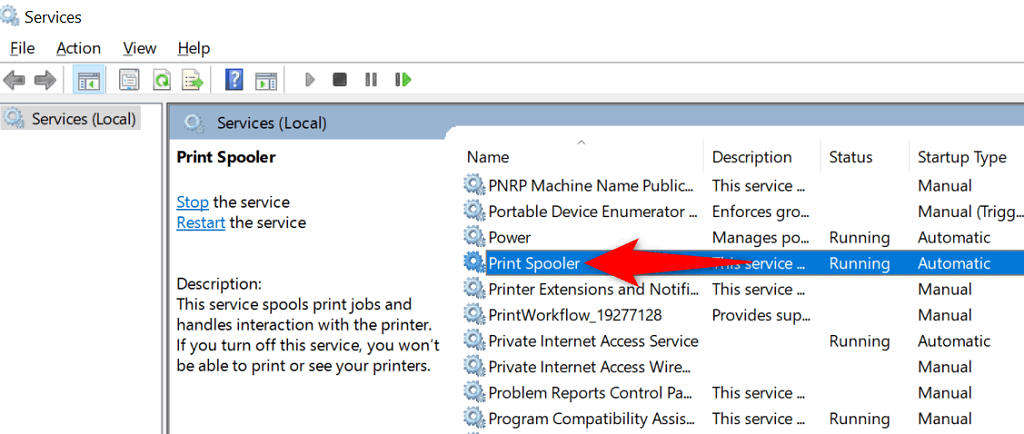
Print Spooler
on the right to open the
Properties
menu.
- Select
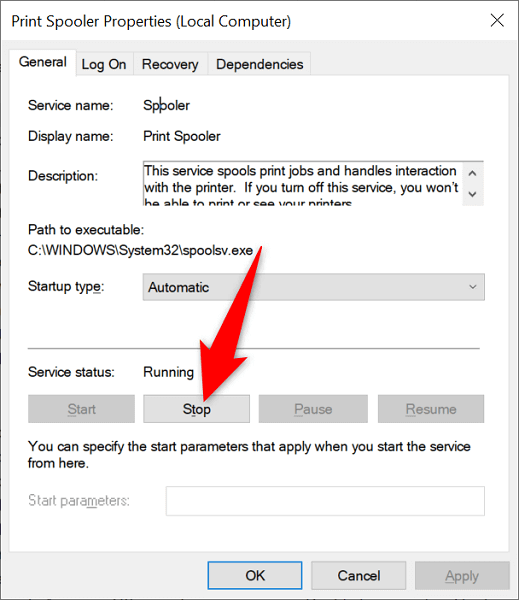
Stop
to temporarily stop the spooler service.
- Wait for about ten seconds.
- Reactivate the service by selecting
Start
.
4.
Update Your Printer’s Drivers
When you install a printer on your PC, Windows installs the required drivers to allow your printer to communicate with your machine. Over time, these drivers become outdated and cause various issues with your printer.
Your ”Windows Cannot Connect to the Printer” error may result from outdated printer drivers. In this case, you can fix the issue by updating the installed drivers. Windows’ Device Manager automates the process, so you don’t have to find and install the latest drivers manually.
- Open
Device Manager
by right-clicking the
Start
menu icon and choosing
Device Manager
.
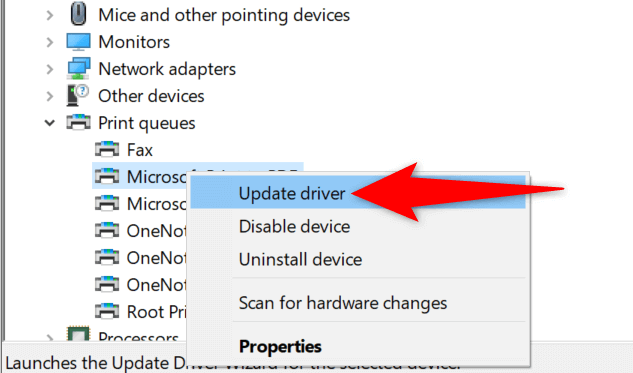
- Expand the
Print queues
section, right-click your printer, and choose
Update driver
.
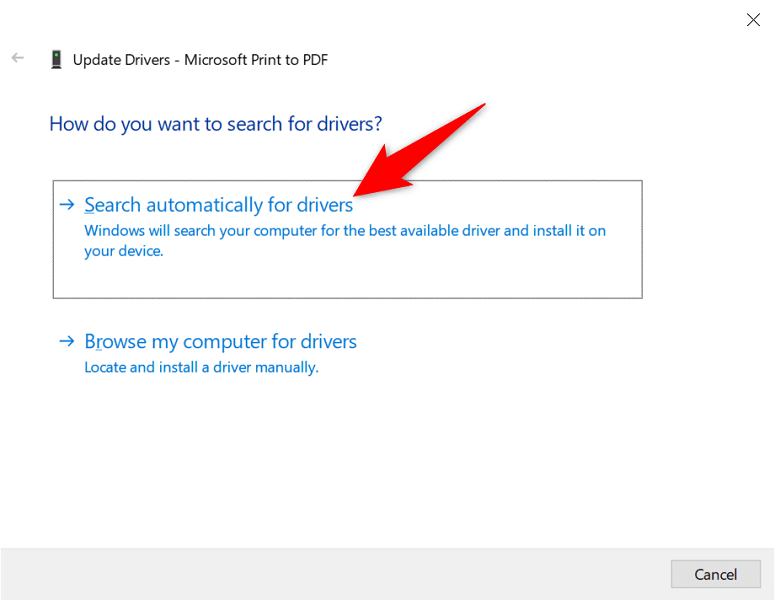
- Select
Search automatically for drivers
to let Windows find the latest printer drivers.
- Wait for Windows to find and install the updated drivers.
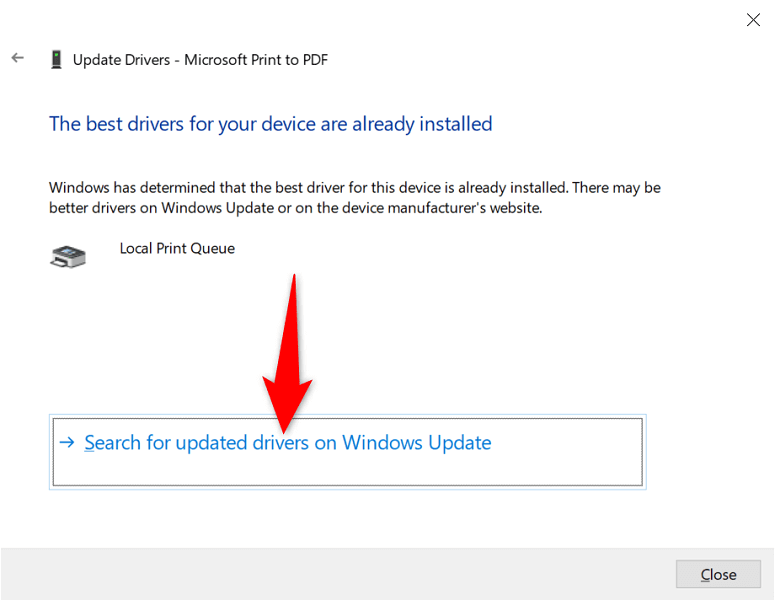
- If newer drivers aren’t available, you’ll see a message saying the best drivers for your device are already installed. In this case, you can still force your system to check for the latest drivers by selecting
Search for updated drivers on Windows Update
.
5.
Remove and Reinstall Your Printer
If you continue to see the ”Windows Cannot Connect to the Printer” error message, your printer may not be properly installed on your PC. This usually happens if you had minor issues when you installed the printer.
You can get around this printer error by removing and reinstalling the printer.
- Access
Settings
by pressing
Windows
+
I
at the same time.
- Select
Devices
on the Settings window.
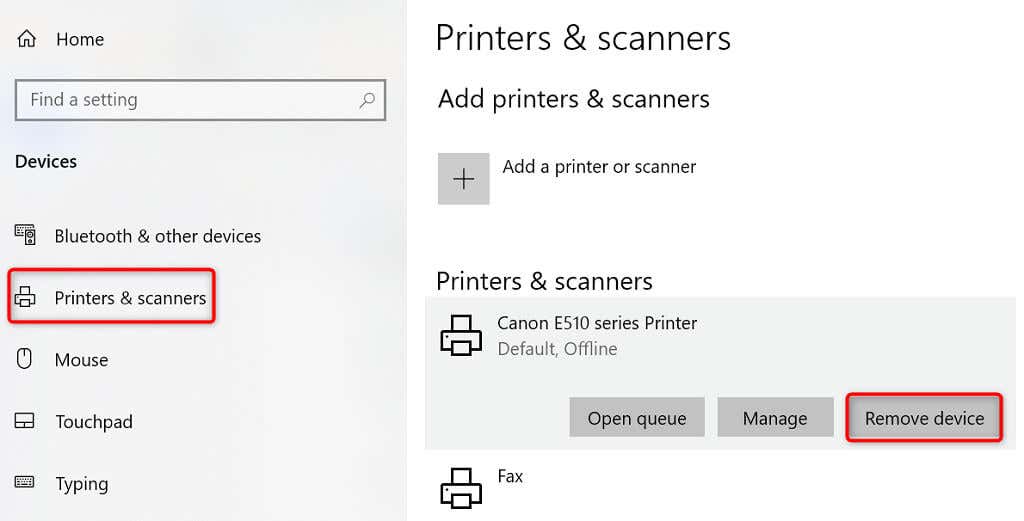
- Choose
Printers & scanners
from the sidebar on the left.
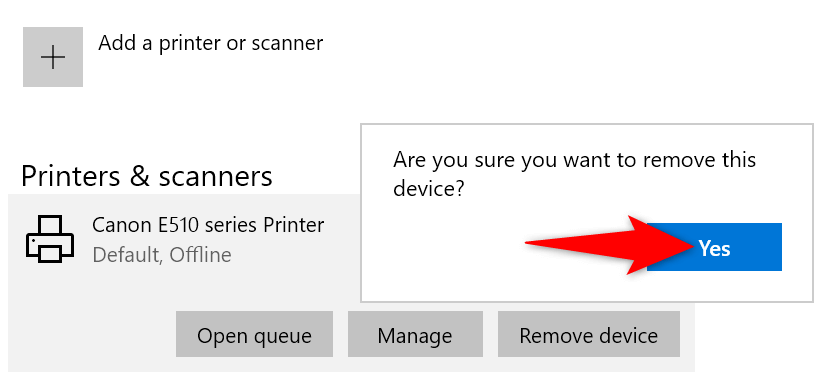
- Select your printer name on the right pane and choose
Remove device
.
- Select
Yes
in the prompt to uninstall your printer.
- Unplug and replug your printer into your PC.
- Follow your printer’s driver installation wizard.
6.
Make Your Problematic Printer the Default Printer
If you’ve installed multiple printers on your PC, make your faulty printer the default and see if that fixes the ”Windows Cannot Connect to the Printer” issue.
Later, you can make any other printer the default if you want.
- Open
Settings
by pressing
Windows
+
I
.
- Select
Devices
.
- Choose
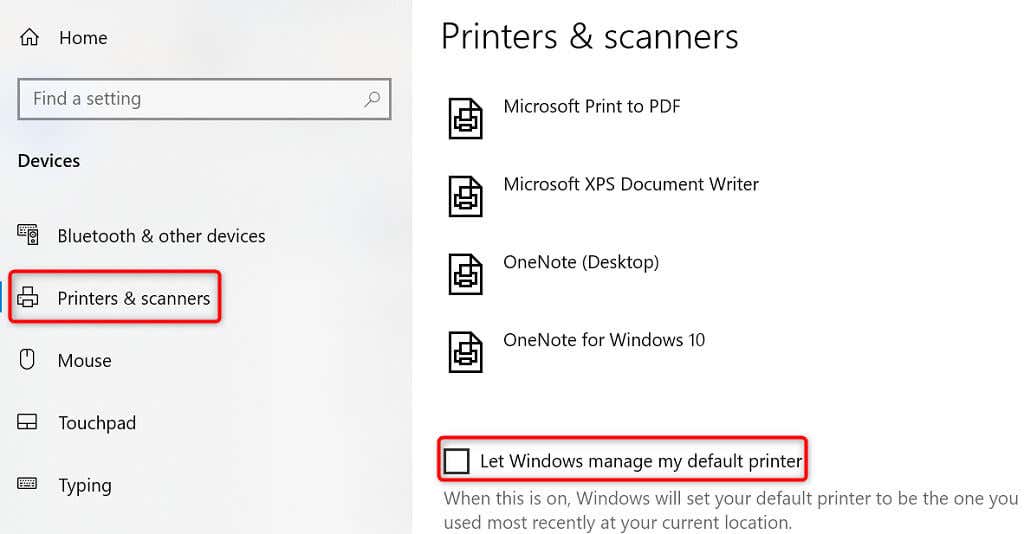
Printers & scanners
on the left.
- Disable the
Let Windows manage my default printer
option on the right.
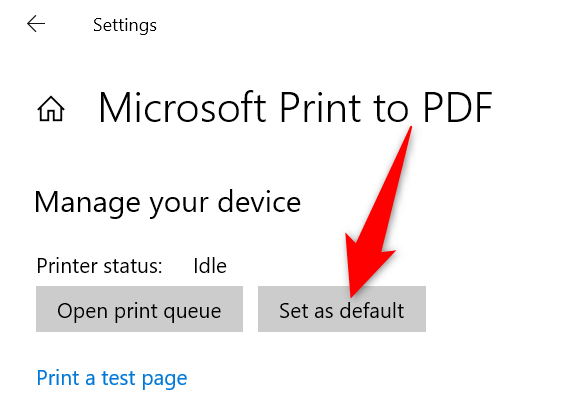
- Select your printer on the list and choose
Manage
.
- Select
Set as default
to set the selected printer as the default.
7. Fix Windows Issues by Installing Software Updates
When you update your Windows PC, you get various bug fixes that help you resolve problems on your computer. Your ”Windows Cannot Connect to the Printer” error may be a system error, and updating Windows should likely fix that for you.
It’s free and easy to install Windows updates, as explained below.
- Launch
Settings
by right-clicking the
Start
button and choosing
Settings
.
- Select
Update & Security
.
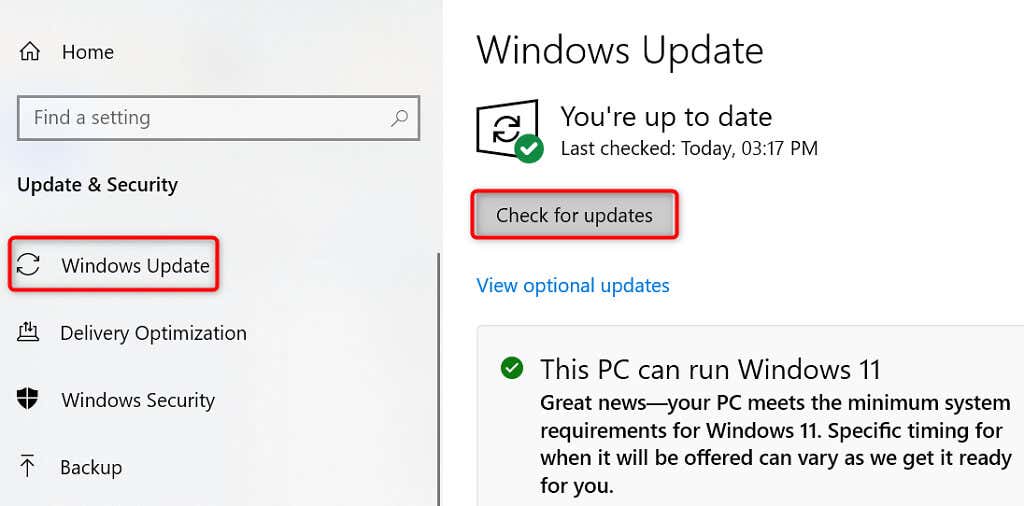
- Choose
Windows Update
in the sidebar on the left.
- Select
Check for updates
in the pane on the right.
- Download and install the latest updates.
- Restart your PC when you’ve installed the updates.
The ”Windows Cannot Connect to the Printer” error is usually the result of a technical glitch, which you can fix by following the methods outlined above. Once you’ve applied those fixes, your printer should work with your PC, allowing you to resume your pending print jobs.


![Toni Kroos là ai? [ sự thật về tiểu sử đầy đủ Toni Kroos ]](https://evbn.org/wp-content/uploads/New-Project-6635-1671934592.jpg)


