
7 Best Waterproof Hiking Shoes, 100+ Shoes Tested in 2023
Mục Lục
Features of waterproof hiking shoes
Waterproof hiking shoes are, as their name suggests, hiking shoes with an additional feature: being waterproof. These features set waterproof shoes apart from the rest:
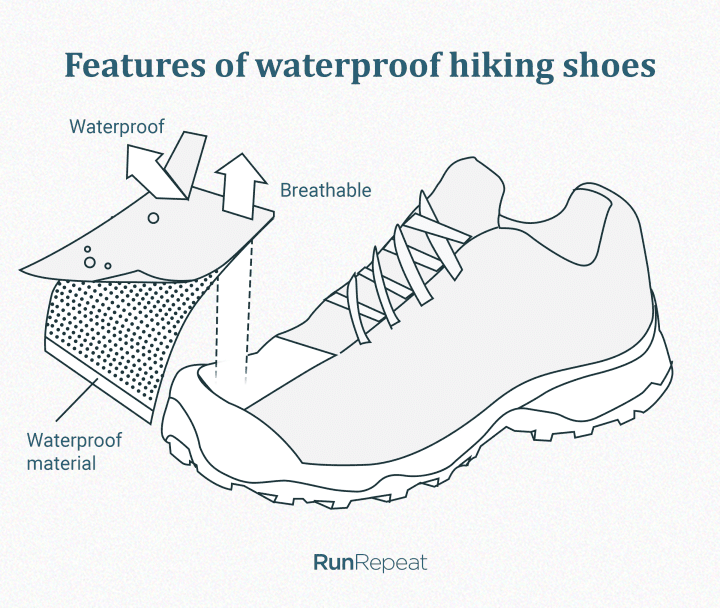
- Waterproof. They should keep your feet dry by keeping water on the outer side. This is accomplished by using special fabrics or membranes that guarantee a certain level of waterproofness. You should always look for a “Waterproof” sign or check online for the waterproof levels of the materials used.
- Breathable. Hiking shoes can be both waterproof and breathable. This is not only a good-to-have, but a must. This is possible because completely waterproof hiking shoes don’t exist. If they did, you wouldn’t want to use them because they would not be breathable AT ALL. This feature helps the sweat to leave the shoe, so you can say goodbye to the wet, sweaty feet.
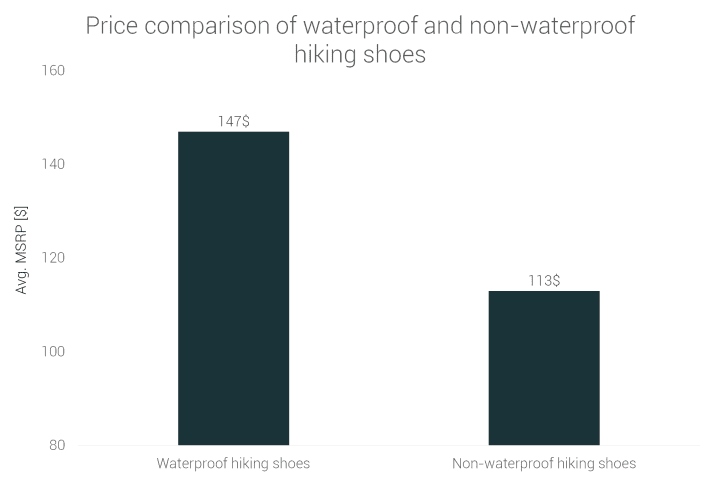
- Waterproof hiking shoes cost and weigh more than the non-waterproof hiking shoes. This is because waterproof technologies are involved. These technologies might add some weight to the shoe, so brands try really hard to make the shoes both waterproof and light as much as possible. It comes with a price, literally.
On average, waterproof hiking shoes cost $34 more and weigh 39g more than non-waterproof hiking shoes.

However, if this is your first time shopping for hiking shoes, there are recommended steps to go through, to ensure you’ve found the best possible fit.
4 things to pay attention to when buying hiking shoes
If you’re looking for your first hiking shoe, this chapter is for you and it will guide you to the process of finding your perfect fit. Also, if you want to learn more about hiking shoes, we’ve covered them in great detail in our guide on hiking shoes.
- Duration of your hiking trip
Water hiking shoes aren’t made for long multi-day hiking trips with heavy backpacks and demanding terrain. However, you can use them on your short hikes – whether it’s a 200meter creek crossing or canyon-exploring that lasts a whole day. Keep in mind that, the longer the water hike, the better support you need. This means you should look for more stability features and cushioning.
- Weight of your backpack
Same rule applies as for the duration of your hiking trip. We bring heavier backpacks on longer hikes. Water hiking shoes aren’t meant to support you in these adventures completely, only up to a degree. That’s why, if possible, change your hiking shoes, use the regular ones while you’re on (dry) land. If you know you’ll be carrying a heavier backpack, look for stability features and cushioning. Read specifications of the midsole and check if they allow for the type of adventure you’ve been planning.
- Your arch type
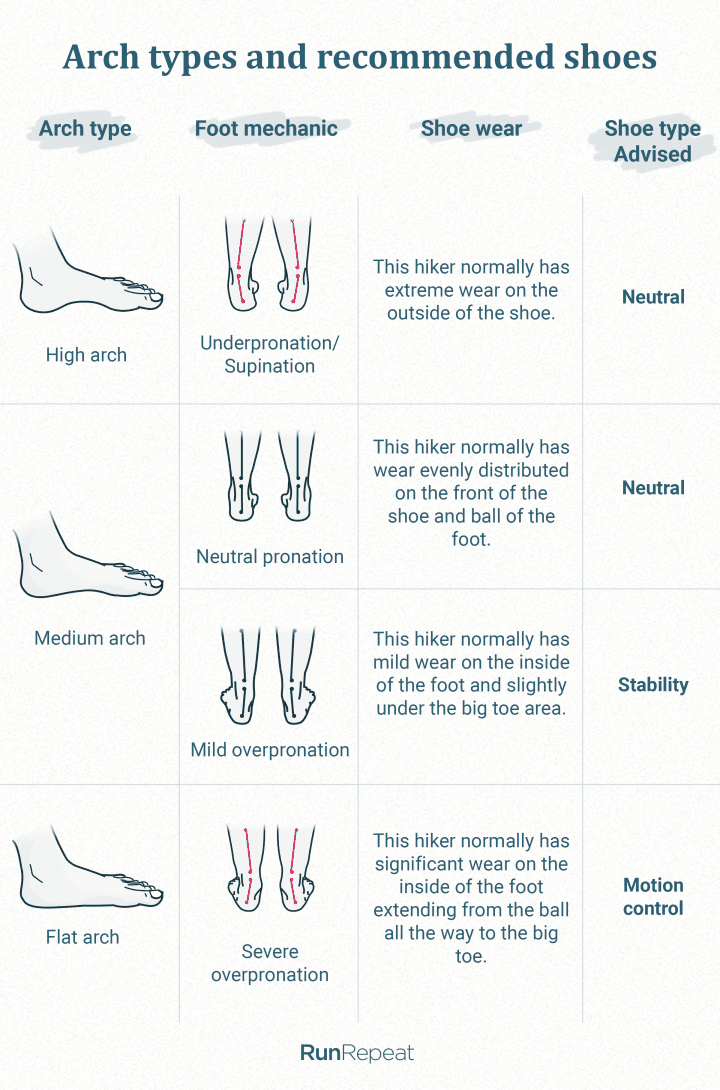
Depending on your arch type, your feet might need different stability features. High arches usually ask for neutral shoes, medium arches ask for neutral or stability shoes, and low arches (flat feet) ask for motion control shoes. We’ve covered this in-depth in the next chapter.
- How the shoe fits
To make sure you choose the good-fitting shoe, follow these steps:
1. Go shopping in the afternoon. Your feet are swollen then, which happens regularly on hikes
2. Try the shoe on and check for pressure points. The shoe should feel snug, but not restricting.
3. Use the ramp and walk up and down. Crossing water is rarely monotonous, usually the terrain is dynamic with a lot of obstacles, ups and downs. Your heel should not rise more than a ¼ of an inch. Your toes should not hit the front of the shoe when going downhill.
Arch type and stability features
The type of your arch matters because it offers guidelines for choosing the adequate shoe type. Whether it’s a neutral, stability, or motion control shoe – they all offer different stability features that your feet need when hiking.
Shoe wear test
Things you can do: look at your used hiking shoes and compare how the outsoles have been worn with the “Shoe wear” section below.
If you’re overpronating, you can look for overpronation hiking shoes. If you’re a neutral pronator or a supinator, browse through the neutral hiking shoes database.
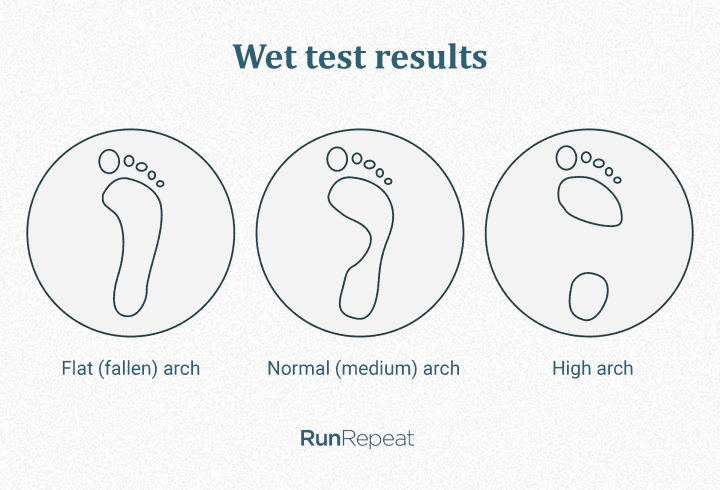
Wet test
There is also another way to discover your arch type and it’s called a wet test.
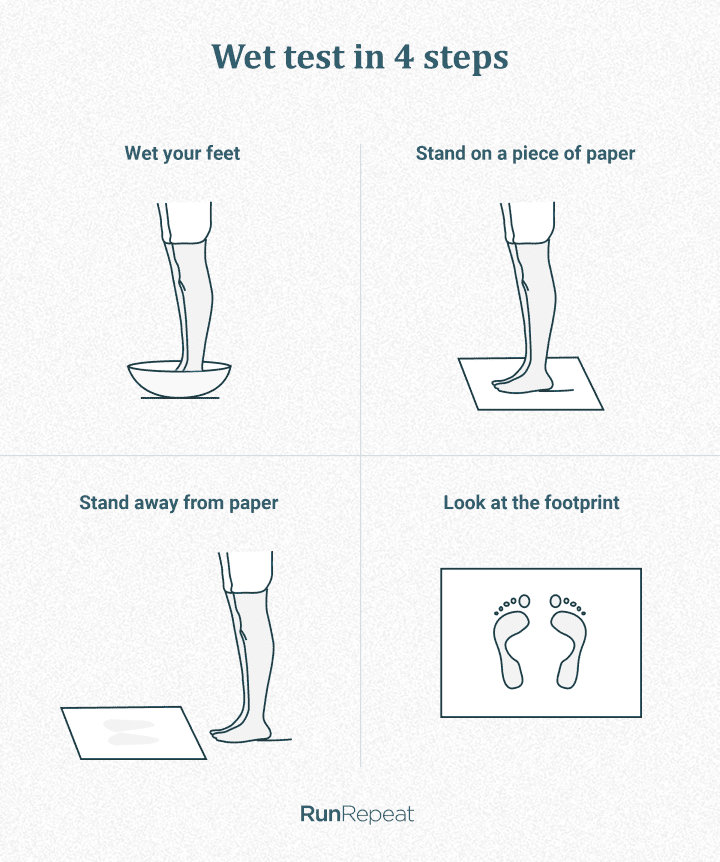
You should: wet the sole of your foot (ideally both of them, one at a time), then stand on a piece of paper while allowing the moisture from your feet to sink into the paper, and step off. Look at your footprint and compare it to the ones shown below.
If you feel your feet need more attention, consult a podiatrist. They look at your barefoot movement, pronation, tibia rotation, and heel deviation to get the complete picture of your feet.
Waterproof membrane limits
When you’re looking for waterproof hiking shoes, you can see which membrane was used to make them waterproof. Every membrane is described with a hydrostatic HEAD, measured in millimeters. It’s a measure of how waterproof a fabric is. Below you can see how the hydrostatic HEAD changes with weather conditions the membrane is made for.
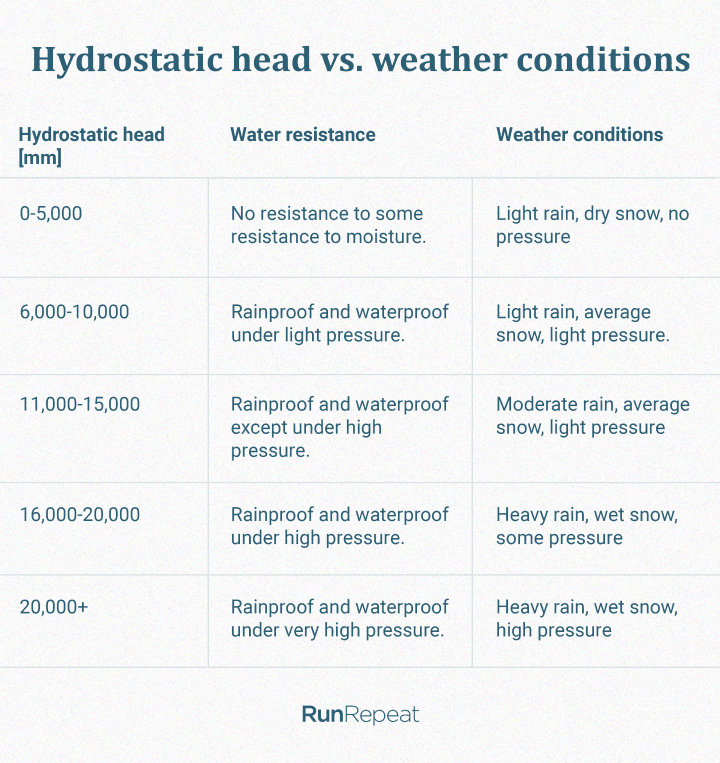
What this number actually tells us is how high you can fill a tube with inner dimensions of 1’’x1’’ with water when put over a piece of certain fabric, before water begins to leak through. The higher the number in mm, the more waterproof the fabric.
Additionally, these fabrics won’t last forever in given conditions. Sometimes it’s minutes before you feel them soaking in, sometimes hours.
Waterproof, water-repellent, and water-resistant: explanation
You decided to buy waterproof hiking shoes. This comparison was created for you to completely understand other notes (water-resistant and water-repellent) you might see in shoe specifications. Maybe you even realize water-repellent hiking shoes will do the job for your planned hiking adventures.
Water-resistant
Water-repellent
Waterproof
General characteristics
a tightly woven fabric that is naturally capable of resisting water upon contact
fabric treated with durable water-repellent (DWR) or hydrophobic chemicals
– fabric treated with DWR
– have waterproofing membranes like Gore-Tex and OutDry
– have seam-sealed construction for extra protection
Water protection level
low water protection
moderate water protection
high water protection
Water pressure resistance
0-5000 mm (no pressure or moisture)
6000-10000 mm (light pressure)
10000-20000 mm (high to very high pressure)
Weather conditions best used in
light rain shower and dry snow
light rain and average snow
moderate to heavy rain and average to wet snow
GORE-TEX membrane testing process
The most commonly used membrane in waterproof hiking shoes is, by far, Gore-Tex membrane. Their hiking-shoe testing seems bulletproof. Only shoes that pass all 4 tests are cleared for production.
1. The walking simulator
Hiking shoes are placed on realistic foot forms and put in a water bath. There, they need to endure for up to hundreds of hundreds of steps. Shoe passes the test if moisture sensors on the foot form don’t register moisture.
2. The centrifugal tester
Waterproof footwear is filled with water and spun at high speeds. This forces water through even the smallest of holes which reveals leaks. Shoe doesn’t pass the test if leaks are discovered.
3. The wicking test
Materials in the upper must be non-wicking so that water can’t be transported into the shoe or boot over the GORE-TEX lining. Everything is tested: from the leather and foam to stitching and laces.
4. The comfort test
This test measures the breathability of the whole hiking shoe construction, from the lining through to the outer material, ensuring that everything works together to deliver climate comfort for all intended activities.
How to clean waterproof hiking shoes
Always check the label for washing instructions. These are general advice:
- If possible, remove the insole. You can wash it separately.
- Shake out rocks, dirt, debris out of your shoe.
- Wash the exterior of your shoe with lukewarm water and a cloth or brush.
- Let the shoe dry naturally.
- If the shoe got wet on the inside, you can use convection-style boot dryers (if approved by the manufacturer) or place old newspapers inside and change them occasionally. They will soak in the moisture.
- Don’t use spray coatings on your hiking shoes, unless advised by the manufacturer. The market is filled with shoe coatings that come in spray cans and offer a protective water repellent coating on the surface of the shoes. Make sure to consult the manufacturer before using these, because they might make your shoes less breathable.
Which shoes will always keep my feet dry?
Even with waterproof hiking shoes, your feet might get wet. You can submerge your shoes into a stream or a river, or rain showers can be so heavy that the waterproof membrane can’t hold the water outside anymore. Additionally, you can also wet your feet when water gets there from the inside: thanks to rain or water sliding down the trouser legs or skin on your legs.
How do I prevent water from entering my shoes?
Gaiters can be a life-saver! The chances of water appearing in your shoe from the inside (rain trickles down your legs) are greater in hiking shoes than hiking boots. That’s why you can buy waterproof gaiters as well – they are lightweight and packable so you won’t feel them in your backpack but will treasure them once they are needed.


![Toni Kroos là ai? [ sự thật về tiểu sử đầy đủ Toni Kroos ]](https://evbn.org/wp-content/uploads/New-Project-6635-1671934592.jpg)


