
33 Cheap And Creative DIY Room Divider Plans
Room dividers are becoming a new trend these days, but they can be expensive. If you don’t have money to buy an already made room divider, you can make it yourself with the DIY Room Divider Plans listed below. There are many ways to divide your room without building a wall. A room divider makes it possible to separate your rooms into two and change the layout of your room whenever you want. It doesn’t matter if you live in a small house and need more privacy or want to create a partition for your ginseng seedlings or decorative plants, or just want a covered area for your pet — a DIY room divider is always a good option.
Mục Lục
DIY Room Divider Ideas
Whatever the situation is, these 33 DIY Room Divider Plans will help you make the most of your space situation. If you opt for an open floor plan, you can use room dividers to delineate space between your living room and kitchen or dining areas. If you don’t want to commit to a full-on renovation, adding a bookcase unit is one easy way to divide up your space without making things feel smaller and more cramped. Lastly, if you’re looking for a way to bring some privacy into an open floor plan without ruining an airy vibe, adding a tall potted plan is a perfect solution. Ahead are 24 nifty, chic, and clever dividers that will make your small space feel so much larger and even more functional.
Other Ideas
How To Make A Geometric Room Divider

This room divider will give your room a more unique interior look because of the extravagant design of the frame. It is simple, strong, sturdy, and inexpensive. Piece together wood boards by screwing them into each other. This will create the frame for the room divider. The size of the frame depends on how big you want your room divider to be.
Cut the plywood sheets to the size of the frame. Screw the plywood sheets into the front and back of the frame. Use a tape measure to mark where you want your geometric cuts to be made on each of the plywood sheets. Make sure they are spaced out evenly across each panel. Draw these marks with a pencil in order to guide you while making these cuts with a jigsaw. Make sure you have protective goggles and gloves on before starting to cut out these shapes with a jigsaw.
Click Here
Twinkling Branches Room Divider DIY

Have you ever wondered why DIY is more fun than buying readymade? It’s because making something with your own hands is not just a hobby, it’s an accomplishment. It’s a new skill that you can be proud of. We hope this room divider will bring you the same joy! The most important part of this project is the zigzag frame. Once the frame is strong and sturdy, attaching the branches and LED light won’t be a problem. It is really a sparkling room divider! You can use this room divider in many ways. For example, you could add some decorations to it for a more festive look, or you could hang other types of lights from it. The possibilities are endless and limited only by your imagination.
Click Here
DIY Room Divider With Fabric

Creating a room divider is a fun project that will add privacy to your home. In this guide, we’ll show you how to make a room divider using canvas, metal frames, and simple tools you can find at home. This project is perfect for anyone who has a small space they want to divide without spending a fortune on materials.
The materials and tools required for this project include drill, drill bits, screw hooks, screw anchors, staple gun, hammer, tape measure, safety glasses, adjustable connectors, and tape. It’s pretty easy once you follow the instructions in the guide! Once you have all of these things ready, it’s time to get started with our step-by-step tutorial on how to make a DIY room divider with fabric!
Click Here
DIY Room Divider Wall
There are many ways to divide a room, and with so many styles out there, you’re sure to find something that fits your taste. This project is one of the most simple and affordable ways to divide a room. And, it serves as both a wall and a decoration! This is made from three pieces of MDF boards, River metallic paint, and blue metallic paint. The first step is to prepare the MDF boards and then paint the upper half in silver metallic paint. Allow the boards to dry and attach them together with glues and nails.
DIY Room Divider
The first step in this project is to gather the materials needed. In this video, the creator started by selecting the stable materials room divider walk. After gathering the materials, she cut the wooden boards into pieces and then started assembly. This was a simple project that can be done in a short amount of time. The only thing you need is to have all of the materials on hand before starting so you don’t have to stop once you get started. After assembling, she painted the room divider. The room divider is ready to use and can provide more privacy in any room.
DIY Glass Room Divider

If you’re looking for a way to brighten up a space, a glass room divider is a great option. However, traditional sliding glass doors can cost hundreds of dollars. This DIY room divider is an easy and inexpensive way to make a great-looking sliding glass door. It’s made from IKEA’s PAX sliding cupboard door. The PAX is foldable, cheap, and easy to set up. If you’re a beginner, this is a simple room divider project for you.
Click Here
DIY Sliding Room Divider
You can make a DIY sliding room divider with an inexpensive hardware kit and basic tools. This simple project adds architectural interest to your home, making it an especially great choice for rentals that you’d like to personalize. The guide provides a detailed explanation of each process of the materials and this makes this suitable for beginners as well.
DIY Japanese Divider
The first step in making this Japanese room is dividing us to make the frame assembly. Use glue and stick to assemble the frame then spray paint the frame and allow it to dry. The video tutorial makes building the four dividers easier and faster. The cost of making is very economical as well.
This DIY room divider idea is great for those that have an open floor plan apartment or those that want to create more privacy in a small living space. It’s easy to make and can change how you use your living space, just by moving it around. This one features white curtains attached to a wooden frame, but you can also use fabric if you’d rather not have curtains. If you’re really handy, you could build this whole thing using wooden boards so that it looks more like a wall than a curtain!
Cheap Office Divider DIY

The materials needed for this room divider included PVC pipes, PVC corner pieces, PVC end cap, PVC glue, black plastic spray paint, easy drop canvas, saw drill, grommets, and hooks. The first step is to make a blueprint of the PVC assembly, then start by creating the base with canvas hooks. After this, attach one grommet to the corner of one canvas and buckle it to the frame. Then attach the second grommets to the canvas and you’re good to go. Spray paint the door divider in your desired color.
Click Here
DIY Room Divider Screen With Laser

The guide started by analyzing the importance and uses of door dividers then went ahead with the list of materials needed. After the materials, the first step is to create a sketchy design for the four dividers that will serve as a template for the project. The next step is to cut out the sheets of plywood according to the template and set them aside. Then, using a laser engraver, the creator then engraved his desired designs into each of the dividers. This was followed by mounting a backboard on each of the dividers, painting them, and finally setting up an LED strip on each divider as well. The end product is great and can be used in lighting a room or even as a decorative piece.
Click Here
IKEA Hack Room Divider

The IKEA Expedit bookshelf is a wonderful piece of furniture and is very useful for holding your book collection, but it’s also great for a lot of other things. Its simple, minimalist design makes it fit in just about any room and location. And it can be used as a room divider. The Expedia shelves are so versatile that they allow you to create dozens of different configurations using just one set. You can combine them with each other or with other furniture pieces to create the perfect system for your home.
Click Here
DIY Hula Hoop Divider
This will be a great project for people to do during the current lockdowns. Hula hoops are so easy to find at home, and it is super easy to make this divider. The creator of this video made his room divider 6ft tall so that it would be a perfect height for a room partition. The materials needed for this include 13 Hula hoops, 7ft pieces of wood, 4 brackets, good spray paint, and zip ties. In this video, the creator started by making the door assembly using brackets to join the wood pieces together, then he used zip ties to buckle the hula hoops to the frame, and just like that you have the room divider. The last step is to paint the divider.
DIY Folding Screen Room Divider
The video is structured into different sections. The first section states the materials and tools needed for the project, then it proceeds to provide instructions on how to make the screen room divider. In the middle of the video, there are links to where you can get some of the items listed as needed and a link to where you can download instructions for free if you want to follow along with the video.
DIY Photo Room Divider Screen

This is made from a steel rod, welding rod, a sheet of plywood, hollow rid, binder clip, chop saw, tire rim, and paint. With a detailed explanation, you will be able to make this yourself within a few weeks.
The first step was to cut the plywood into two pieces using the chop saw. Then the creator cut two pieces of hollow rod in order to make the stand for it. The hollow rod needed to be bent in order to fit the plywood and it was done by using a tire rim as a template. The welding rod helped to hold the structure in place. Finally, he painted it black and used binder clips to hang my photos and other things on the wall. This project isn’t difficult at all and can be done over one weekend. It only took about 2 hours to put together and paint it.
Click Here
How To Divide A Room With Floor Mats
Who said that the floor mats can only be placed in a room? You can also use them to separate a room or a space. The creator of this beautiful DIY project made it from an IKEA floor cover. The floor was very sturdy and sturdy, so it was easy to assemble. Once the creator finished assembling the floor mat, she then stood the long spread mat unsightly and installed it to the desired location. This is a very simple idea and can be done quickly. You can paint your floor mats with different colours if you wish, or leave them as they are. This will make your home look more unique and original!
DIY Wood Pallet Room Divider
This DIY wood pallet room divider was made from recycled pallets. It is a good project because it uses industrial materials and turns them into something that can be placed anywhere in the house. Pallets have proven to be very good material in the woodworking space. It is very easy to disassemble into various things. This room divider was made from pallet boards. The creator started by disassembling the pallets then removing every nail or hardware on them. Then, he prepares the wood pieces and stains them before reassembling them into a room divider.
Click Here
DIY 6ft Room Divider
This DIY 6ft room divider is ideal for renters as it can be easily removed with no damage to the walls. When living in an apartment, a room divider can help you make the most of your space by creating separate areas in a shared room. When you have guests over at your home, it can also be used as a temporary wall to block off a section of the room for privacy purposes. A 6ft room divider is ideal for small spaces and can easily be made using simple materials that are available at most hardware stores.
How To Make Your Room Divider
This guide is great! The creator in the video uses a nail to mark the holes on the wood, then uses a drill to make holes through the wood. He then places three-pocket jokes on each piece of lumber, which makes this amazing room divider. This room divider can be used to divide rooms, or as a decoration for your house. It’s very nice and practical! Follow the step-by-step instructions in the video to make one for yourself.
DIY Cardboard Room Divider

If you’re looking to add a bit of extra privacy to your home, don’t want to block out all the light, and are trying to save money, then you may want to try this DIY cardboard room divider. This DIY project is cost-effective and a great way to give your home that extra layer of privacy without breaking the bank. The materials needed for this DIY room divider include a pencil, utility knife, ruler, and cardboard. The first step after gathering the materials is to cut the cardboard into parts, the parts that will later be joined together to form the segment of the room divider.
Click Here
Steampunk Tri-Fold Room Divider

The room divider is a wall or screen that separates one big room into two small rooms or divides a large open area into smaller areas. If you want to make your own room divider, this tutorial will be helpful for you. The main material we used for the room divider is MDF because it’s a cheap and easy material to work with CNC machines. The MDF board has three layers of different colors: red, light brown, and dark brown. The outer layer has different patterns cut out by the CNC router. The center layer is plain, and the bottom layer is covered with copper paint.
Click Here
DIY Rope Wall Room Divider
It is always a good idea to invest in dividers for your house, it is a very simple way to divide your room and give yourself more privacy. Having a divider in your room will also add value to your home. If you are looking for something that is easy, cheap, and does not take much time to make, then this DIY Rope Wall Room Divider project is perfect for you. You can make this in less than an hour if you have all the material needed.
Room Divider DIY
If you have a large space that you need to divide, it can be very expensive to do so. The best solution is to make a room divider. It will take about 30 minutes to make and cost less than $40.00, which is much less than buying one from the store. In this video, you will see how to make a room divider out of a bamboo ladder and some canvas fabric. The instructions are very easy to follow that enable you to make one for your home.
DIY Simple Rope Divider
This video tutorial started by cutting the lumber to size and making grooves in some of the wood pieces. The next step is to start assembling the wood pieces to form the room divider. After that, the next step is to add the rope. The rope has been cut in advance and now it is being screwed into the middle of each slat. Now it’s time for a test fitting before adding a finish. The finish chosen was a black enamel paint which was applied with a roller and then wiped off to bring out more of the grain. After it dried, the room divider was ready for use.
Building A Room Divider

This DIY guide will show you a step-by-step process of building a room divider using wood and metal. The divider will be sturdy enough to stand on its own and also be lightweight so you can move it around. The guide started by listing the materials and tools needed for the project and a detailed explanation of the uses of each material and tool. Then the guide went on to describe the process of making the room divider with maximum details. You should check it out.
Click Here
DIY Room Divider Under $20
Room dividers can be a great way to break up large spaces or create a bit of privacy in a shared room. But many of them are pretty pricey. If you’re looking for an inexpensive way to create the illusion of more space or a little privacy, try your hand at this easy DIY project. This DIY room divider is a great solution for small homes that need a temporary wall to create a separate room or just something to give you more privacy in your space. It’s versatile, easy to make, and very inexpensive.
DIY Room Divider
In this video, the creator started by Identifying the materials required for the project, then she measured and marked the entryway where the curtain will be. After this, she drilled a hole big enough to accommodate the hooks to the marked wall and screw close the hooks. The next step is to cut out fabric for the curtain, sew them together and install them in hooks. She also made a curtain rod using PVC pipes and installed it on top of the hooks. The last step was to hang up the curtain.
Sheet Music Decoupage Pax Room Divider DIY

This is made from boards, screws, primer, white glue, paper, foam brush, wood or metal trim, and adhesive. The first thing you do is to decide on the size of the room divider you want. How tall would it be? How wide would it be? And how many panels would it have? You can answer these questions after taking measurements of your space. Consider also how much space would be left when the divider is in place. Once you have decided on the size and number of panels for your room divider, it is time to buy the materials needed for this DIY project. And then you are good to go!
Click Here
DIY Room Divider
Room dividers are a great way to organize a room and make it look better. This video will show you how to use electrical conduits and fabric to create a room divider that is both decorative and functional. This is a great DIY project for anyone who wants to add some privacy to their home or office. It can also be used as an accent piece in any space.
DIY Bi-Fold Room Divider

A Bi-Fold room divider is a great tool for creating new spaces in a large room, hiding storage, or dividing up a studio apartment. They are available in a wide variety of styles and can be custom-made to fit your space. The cost can be prohibitively expensive, however, costing hundreds of dollars. You can save money by making your own out of existing doors. In this guide, you’ll learn how to make one yourself.
Click Here
DIY Room Divider For Small Rooms
This video will teach you how to make a unique room divider that can be used in small apartments and studios. The materials needed for this DIY room divider include tent material, gold reflective paper, chrome pipe, chrome pipe holder, pipe corner, gold handle, and wood.
The video started by cutting the gold reflective paper into strips and reducing the size of the tent material to the length of the room. Then he glued the reflective strips on both sides of the tent material using an adhesive spray. Next, he attached the two pipes using a pipe corner. He then drilled two holes on each side of the divider and inserted a handle on each hole. Lastly, he drilled two holes at the bottom of both pipes and added a wooden platform below it to hold it up.
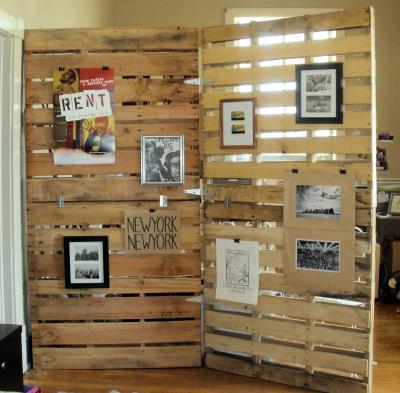
DIY Multifunctional Room Divider

A room divider is a great way to separate your living space into two different areas. For example, you can separate the kitchen and the dining area by using a divider. In this case, it can be used as a partition or an open wall. The DIY room divider is multipurpose. You can set them up anywhere in your home to divide your space and use them for noticeboards, a place to hang photos and pin messages on it, or just as a decorative item to add some drama to any wall.
If you are looking for privacy in some areas of your home, you can use these dividers with curtains that act as private spaces in the room. You can also add wheels to the base of the DIY room divider so that it becomes mobile. The divider can then be moved around easily without much effort.
Click Here
How To Build A Room Divider Closet
This video is a tutorial to teach you how to build a room divider closet. Here the instructor explains the uses of the room divider and the materials needed for the project. After this, she describes the process of making the frame and joining the whole room divider together. After the joining, she then painted the room divider. In the description box of this video, you will find the link to the cutting list and plan for the room divider.
DIY Macrame Room Divider

Macrame is a craft form that involves using knots to create beautiful pieces of art. A room divider is an item you can use in your home or office to optimize your space and improve the interior design. It’s a great idea to create it yourself because you have full control over the design and size of the project. Today we’re going to show you how to make a macrame room divider, using some simple knots that you can learn easily. We’ll also include some tips on how to customize it. If you’ve been wishing to overtake in a macrame project before but you don’t know where to start from or where to learn from. This is a very great macrame project that will teach you the basics of macrame craft and the process of using it to make a room divider.
myfrenchtwist


![Toni Kroos là ai? [ sự thật về tiểu sử đầy đủ Toni Kroos ]](https://evbn.org/wp-content/uploads/New-Project-6635-1671934592.jpg)


