
19 Easy Wildlife Photography Tips For Beginners • Passport & Pixels
19 Easy Wildlife Photography Tips For Beginners
Give it a share!
Wildlife photography is my favourite thing in the world. There’s nothing quite like the feeling of getting up close and personal with a beautiful creature, and when all the stars align and the animal is in the right place, at the right time, and you get the dream shot, it gives me a buzz like nothing else on earth.
If you’re an amateur wildlife photographer and you’ve come here looking for easy wildlife photography tips for beginners, chances are you feel the same – or you want to.
Why I think animal photography is so great
What’s great about photographing wildlife is that, unlike people, animals don’t get bored or annoyed, and you don’t have to ask their permission! But taking great photos of animals can also be extremely challenging, because you can’t ask them to move or pose for you. You have to work with what you’ve got, and learn how to make the best of any given situation.
If you’re a beginner wildlife photographer, or intermediate, that can all seem a bit daunting. But don’t worry, you’ve come to the right place!
Over time, and mostly through trial and error, with a bit of looking at the pros and seeing what they do, I’ve picked up a few tricks which have really improved the way I photograph wildlife. And the best part is, almost all of these apply whether you’re in your back garden or on an African safari, and whether you’re using a smartphone or a DSLR (though if you do want to know about gear, scroll down to the bottom).
So here, in no particular order, are my top Wildlife Photography Tips for Beginners

 Pin this animal photography tips post for later!
How to photograph wildlife
1/ Use the Rule of Thirds
This is a classic photography technique which you may well already be familiar with even if you’re a beginner because it works for all types of photography, not just wildlife. The Rule of Thirds says that if you imagine your frame divided into a 3×3 grid, you’ll get the most pleasing composition if you put the subject of the image off-centre, on one of the points where the grid lines intersect. Try it, it really works!
Below: Elephant, Kazinga Channel, Uganda.
 Wildlife Photography tip #1: The Rule of Thirds
2/ But don’t be afraid to break it
Once you’ve mastered the Rule of Thirds, you don’t need to slavishly stick to it. There are loads of occasions when framing the subject dead centre, for example, can work really well. I’m a huge fan of symmetry, so while putting the animal in the middle can sometimes make for quite a boring photo, when the symmetry works it can be very pleasing indeed. Like here, where the leopard is perfectly positioned between the two branches.
Below: Leopard, Queen Elizabeth National Park, Uganda.
 Photographing wildlife tip #2: breaking the rule of thirds
3/ Unusual cropping
One easy wildlife photography tip to remember is that you don’t need to show the entire animal. If you can get close enough, or have a big enough zoom, then try focusing on just one part of it to create a really striking image.
Below: Shoebill Stork, Uganda Wildlife Education Centre.
 Wildlife photography tip #3: Unusual Cropping
And sometimes being a little bit surprising with your framing can turn a fairly standard image into one that really makes people stop and look again.
 Baboon family, Uganda
4/ Use backlight
It might be your natural instinct to position yourself with the sun behind you, so the light is fully on the subject. But don’t underestimate the beauty of a backlit glow. This can work especially well if the animal is particularly hairy, and the sun lights up every strand.
Below: Icelandic Horse, Iceland.
 Photographing wildlife tip #4: Using backlight
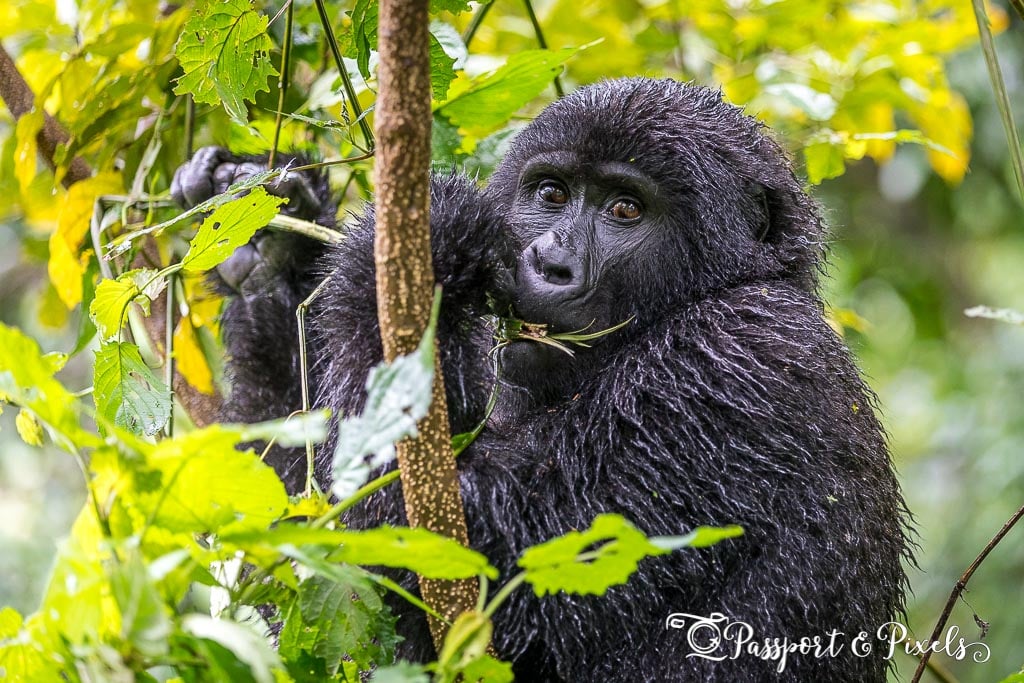
5/ Use foliage to frame the subject
If the animal is in a leafy environment then make a virtue of it by using the leaves and branches to create a natural frame.
Below: Mountain Gorilla, Uganda.
 Wildlife photography tip #5: Use foliage to frame the subject
6/ Show the animals in their environment
It’s very easy to fall into the trap of seeing an animal and immediately wanting to take ALL the closeups. But stop and take a look around. What else is in the scene? This approach can really help you if you’re a beginner and you don’t have a very powerful zoom on your camera – or you’re just using a smartphone. What CAN you excel at with your wide angle lens?
Below: Flamingos, Ngorongoro Crater, Tanzania.
 Photographing wildlife tip #6: Show the environment
Often by taking a step back and looking at the whole picture, rather than just the animal itself, you can capture something more meaningful, and a little bit different from the images everyone else is taking. Both the photo above and the one below were even shortlisted for the Wildlife Photographer of the Year Awards!
 Chimpanzee, Uganda
7/ Think about what’s in the background
This can be tricky, because often you’re at the mercy of where the animal is sitting and where it’s safe or permitted to stand. But it’s important not just to look at the animal itself, but also at what’s in the background: if there’s something messy or distracting behind your subject, it will draw the eye away and confuse the viewer.
So if you can reposition yourself just a little, you’ll often get a much better image. Here the stork is framed quite nicely by the dark curve of the tree behind. If the tree was directly behind his head, it wouldn’t be such a nice photo.
Being able to control your aperture will massively help here too – if you can use a wide aperture to create a shorter depth of field and a nice blurry background, the animal will stand out much better. I talk about gear in more detail below.
Below: Marabou Stork, Uganda.
 Wildlife photography tip #7: Strive for a clean background
If you’re with a group, or in a vehicle, don’t be afraid to move away from the group or ask the driver to move the car to where you want it to be. If you really want to get the best shots it does pay to be a little bit determined, and you may well find that other members of the group are happy for you to take the lead. Though obviously if there’s another photographer, with different ideas, you may need to learn to compromise!
Read more: 60+ Awesome Antarctica Photography Tips
8/ Get low
If you’re struggling with what’s in the background, one great trick can be to get low to the ground. A bit of grass in the foreground can add an interesting texture, and the lower you get the more sky you’ll see, which can solve problems with messy bushes or even people ruining your shot.
This deer was lying in the grass. If I’d stayed standing I’d have been higher than him, and the background would have been the messy grass around him. But by squatting down to his level, I got the lovely soft greens in the foreground, and the autumnal trees behind.
Below: Stag, Richmond Park, UK.
 Photographing wildlife tip #8: Get low
9/ Think about timing
Timing is everything. Animals rarely sit still for long, and if they’re moving, when you press the shutter can make all the difference. In this image the two elephants were walking towards each other; the baby is about to pass behind the mother. By timing it right, I managed to freeze the action so they look as though they’re face to face.
Below: Elephants, Queen Elizabeth National Park, Uganda.
 Wildlife photography tip #9: Timing is everything
10/ Look for character
Animals can be hilarious. Just look at all those endless clip shows on TV of animals doing crazy and stupid things. They can be silly and brilliant and full of humour, and often seem almost human in their actions.
Below: Baboon, Uganda.
 Photographing wildlife tip #10: Look for character
If you can look for those moments when the animal’s doing something a little out-of-the ordinary, or funny, you’ll have a winning shot.
 Posing chimpanzee, Uganda
11 / Try black and white wildlife photography
These days we all shoot in colour – it’s automatic. But have you considered using black and white? Whether you do it in camera, or on the computer later, taking the colour out can really make an image stand out. Here, using black and white really draws the eye to the contrast between the leopard’s spots and the texture of the tree bark.
Below: Leopard, Tanzania.
 Black and white wildlife photography can be really striking
While here, desaturating the image makes the hyena more menacing, and brings out the drool on her lip. In colour, you wouldn’t notice that so much.
 Hyena, Tanzania
12 / Don’t worry about the weather
It poured with rain the day I took this next photo. We had to trek through the jungle for about two hours to reach the gorillas, and I wasn’t at all sure I was even going to be able to get my camera out of the bag (you can read more about this adventure here). But in the end the rain turned out to be a Good Thing.
Look at the brightness in the leaves and the wetness of his fur: this image is so much more interesting than it would be if it’d been dry.
Below: Young male gorilla, Uganda.
 Wildlife photography tip #12: Make bad weather a feature
Remember too that if it’s too warm and sunny, most animals go off to sleep in the shade. So bright sunshine isn’t actually your friend when it comes to wildlife photography.
Read more: Gorilla Safaris In Uganda – The Real Inside Story
13/ Approach carefully
Obviously if there’s a chance the animal is dangerous and might attack you, it’s a good idea to keep a safe distance away. But there’s another reason to approach your subject with caution – you don’t want to scare it off. If you’re on foot and you see the animal some distance away, the temptation is to get as close as you can before you start taking photos.
But if you do that and it runs away, you’ve got nothing. So take a photo, then move a little closer, and take another one. Keep doing that until you get as close as you’d like to be, or as close as you can get without disturbing your subject. That way, you’ve got the best image you can, and you can always delete or crop the first ones later.
 Photographing wildlife tip #13: Approach carefully
14/ You don’t need to go on an expensive safari
I’ll admit, I’ve been extremely lucky to be able to go to some amazing places to shoot wildlife. But if you can’t do that, all is not lost. There are animals everywhere, and your back garden or local park can provide some incredible opportunities if you know where to look. And remember, insects are wildlife too!
Below: Spider in its web, Richmond Park, UK.
 Photographing wildlife tip #14: Look in your backyard
15/ Look for animals interacting with the human world
It might seem counter-intuitive, but towns and cities provide another great opportunity for beginners to take wildlife photos.
 Barbary ape, Gibraltar
I actually really like photos taken in urban environments because it’s fascinating to see wildlife interacting with humans.
 Seagulls, Sydney, Australia
Read more: 13 Top Tips For Photographing Markets
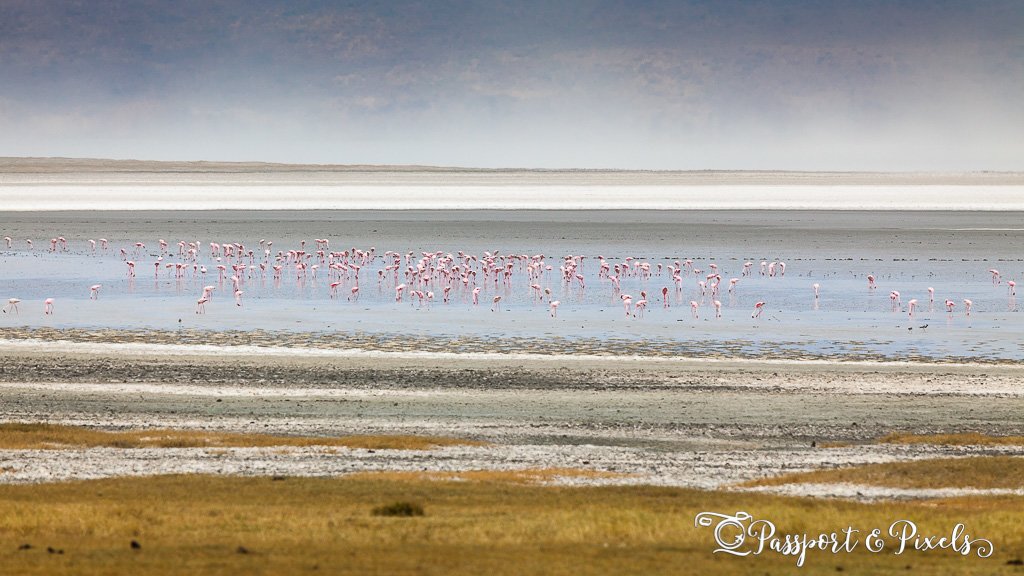
16/ Look for patterns
Sometimes creating a great wildlife image is not just about photographing the animal or its behaviour, and more about seeing the patterns they create when loads of them come together.
Below: Flamingos, Tanzania.
 Wildlife photography tip #16: Look for patterns
17/ What is the best camera for nature photography?
Note: Some of the links below are affiliate links. This means that if you click through and make a purchase, I will earn a small commission at no additional cost to you.
If you follow my wildlife photography tips for beginners above, even with a fairly basic camera or even a smartphone, your images will improve dramatically. But there’s no getting away from it – if you really want to take the best photos, you’re going to need to invest in your gear.
So if you’re serious about taking your wildlife photography to the next level, here’s the minimum I think you’ll need.
- A decent DSLR or mirrorless camera. This doesn’t need to be the top of the range, but you’ll need to be able to stick a big zoom lens on it and control your aperture and shutter speed. But you don’t need to splurge on a professional full-frame camera – in fact many wildlife photographers prefer a crop sensor because the 1.6x crop factor means you get an immediate zoom effect. For example, if you put a 400 mm lens on a full-frame camera, you’ll get a 400 mm zoom. Put the same lens on a crop sensor camera, and you’ll get 640 mm. Win!
- As big a zoom lens as you can carry. I think the minimum you’ll want is 400 mm, and the more the merrier. Remember to factor in having to lug it around though; there’s no point in taking a gigantic lens with you and then never using it because it’s too heavy to carry.
- A standard lens that goes fairly wide, for all those environment shots.
- Some form of stabilisation. With a big, heavy lens, you’ll get camera shake if you don’t take either a travel tripod, a monopod, or beanbag.
 In my happiest of happy places
So here’s what’s currently in my kit bag for wildlife photography:
I usually take either a tripod or a monopod, and I always take an empty beanbag, which I fill with beans from the market when I arrive.
Plus plenty of batteries, memory cards, charger, polarising filter, lens cloths, dust blower.
18/ Rent, buy and resell, or buy second hand
So you want to upgrade your gear, but it’s too expensive? Well why not buy second hand? I buy all my gear used from either Wex Photographic or MPB.com. Their prices are as good as any on the market, their service is great, and both companies have a really good range of second-hand gear in good condition, most of which comes with a warranty for peace of mind.
Another great trick if you don’t think you can afford expensive gear, or you won’t use it much, is to either rent it, or buy it and then resell it afterwards. When I went on safari in Tanzania I bought a Tamron 150-600 f/5-6.3 lens in mint condition off a seller on eBay. With its 600mm maximum zoom there were very few things I couldn’t capture and I loved it – and when I got home again, I then resold it on eBay for more than I’d paid for it!
 Wildlife photography tip for beginners #18: Buy second hand
19 / The best settings for amazing wildlife photos
So you’ve got your gear, you’ve sorted your framing, now how do you make sure those beautiful shots are nice and sharp and correctly exposed?
Well obviously what settings you use will vary depending on the subject, the situation, and what camera you’re using. But here, very simply, is what I do.
- Use auto focus. The auto focus on most modern cameras is brilliant, and personally I think it’s far more reliable than anything I could achieve, especially with a fast-moving animal.
- If you use the multi-point focus setting on your camera, effectively allowing the camera to choose what to focus on, it will often get it wrong. So I’d suggest using a single point or a small cluster of points, focus on the subject, half press the shutter, and then reframe – or use the back button focus method (which is what I recently switched to).
- Keep your shutter speed fast. At the 400 mm end of your zoom, you’ll need a relatively fast speed to overcome camera shake. Plus animals can move fast too! So the minimum shutter speed I use is 1/400 to ensure nice, crisp shots – and I set it much faster if the animal is likely to run or fly off.
- If you want a nice soft background, you’ll need a wide aperture. Don’t go crazy though – if you’re on the long end of the zoom you’ll still get lovely bokeh at about f/5.6 or f/8 – and having a bit more leeway in your depth of field will allow you to get more of the animal in focus, and is more forgiving if you get it slightly wrong or the animal suddenly moves.
- You can then use auto ISO or adjust your ISO to fit the above.
- If you don’t have full manual control on your camera, or you don’t know how to use it, I’d suggest using your camera’s sports mode if the animal is moving, or portrait mode if it can be relied upon to sit quite still.
 Keep practising and you too can take amazing wildlife photos
That’s it! I hope you’ve found these tips helpful – and if you have any more, please leave them in the comments below! Happy shooting!
Further reading
And finally, here are some other photography and wildlife posts you might like:
How To Take Great Photos Of The Northern Lights
60+ Awesome Antarctica Photography Tips
Behind The Scenes On A Tanzanian Safari
Mountain Gorilla Tracking in the Rain, Uganda
Chimpanzee Tracking in Kibale, Uganda
Liked these tips for wildlife photography? Please support my blog and Pin it!
Give it a share!


![Toni Kroos là ai? [ sự thật về tiểu sử đầy đủ Toni Kroos ]](https://evbn.org/wp-content/uploads/New-Project-6635-1671934592.jpg)


