
16 Best WordPress Plugins for Blogs – 2022 Edition
We partner with bada$$ companies that offer products that help our readers achieve their goals! If you purchase through our partner links, we get paid for the referral at no additional cost to you! Read our disclosure for more info.
There are literally thousands of WordPress plugins on the market and they can be a huge help when it comes to the customization and optimization of your blog.
Plugins can help to improve all kinds of different elements of your blog, including design, site speed, traffic, monetization, and more. BUT it’s important to have only the essential plugins installed on your blog.
Before I dive into the list of favorite and recommended WordPress plugins, I want to issue a small warning.
Having too many plugins or poorly designed plugins installed on your website can negatively impact your site speed.
You should avoid downloading plugins for easy and quick fixes and instead only utilize the ones that provide major changes or improvements that otherwise wouldn’t be possible without the plugin. If you come across a problem and you find a solution via a WordPress plugin, make sure you have thoroughly searched for alternative solutions before deciding that downloading the plugin is the way to go.
That being said…
All of the WordPress plugins on the list below are absolutely essential, helpful, and pro-blogger verified as we’ve used almost all of them here at Create and Go at some point or another!
Many of them were actually recommended to us by web developers that have helped us design our website and improve our site speed and performance.
At the end of this article, there is also a section on how to add and upload plugins to WordPress!
The plugins in this article have been organized by function.
Mục Lục
Blog Design
This first set of plugins relates specifically to the design of your blog and improving the look of some of the standard WordPress features. These plugins include customizations for the comment section, author box, contact forms, and widget area of your blog.
1. wpDiscuz (Comments)
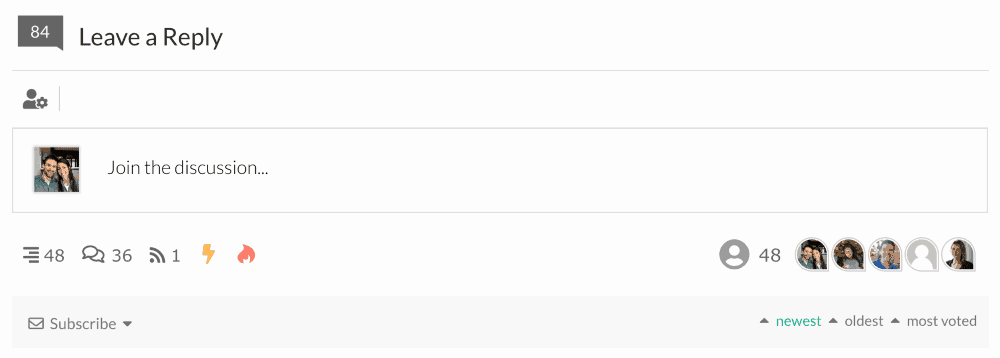
wpDiscuz is a simple plugin that gives you more customization over the comment section of your blog.
It has a much cleaner and more professional design than the bare-bones comment area that comes with WordPress, and it also has all kinds of settings that you can customize.

Comments are an incredibly useful feedback tool on your blog. You can ask questions and have your readers provide answers and feedback in the comment section below your posts.
This feedback can help in a variety of ways, including…
- Getting ideas for new articles
- Learning what people think of your current articles and how they are written
- Helping you figure out what types of products your audience is interested
Not only that, but comments are a sign of engagement and popularity and can help you rank better for Google SEO.
AND they can serve as positive social proof when people say nice things about your article and/or your products:

Because of all of that, it’s important to make your blog as comment-friendly as possible. This is why you want a professional-looking and easy-to-use comment form.
With wpDiscuz, you can customize your comment forms in a number of ways, including:
- Requiring a login to comment
- Changing what fields of information must be provided (name, email, etc.)
- Profile pictures
- Colors
- Comment notifications
- Other display features
The bottom line is that there is just a lot more customizability with this form than with the native WordPress comment form.
To Do:
- Download the wpDiscuz
- Post at least one question at the bottom of each one of your articles to start the conversation!
Now, the one scenario in which you don’t need an additional plugin for comments is when your theme already has a nice and professional design. Take a look before downloading this plugin.
2. Fancier Author Box (Author Box)
Similar to the comment form above, the native author box that comes with WordPress looks a little clunky and has very few customizations.
Fancier Author Box has a more professional look and allows you to customize the colors, social buttons, and more.


If you have trouble getting the author box to show up after you’ve installed the plugin, make sure to check that you’ve filled in your bio on your WordPress admin profile.
To do this, navigate to Users from your WordPress dashboard and scroll down to the “Biographical Information” section of your profile.
To Do:
- Download Fancier Author Box for free.
- Add a bio to your profile and consider adding a link to your
About Me page
for anyone that wants to learn more about you!
Now, the one scenario in which you don’t need an additional plugin for your author bio is when your theme already has a nice and professional design. Take a look before downloading this plugin.
3. WPForms (Contact Forms)
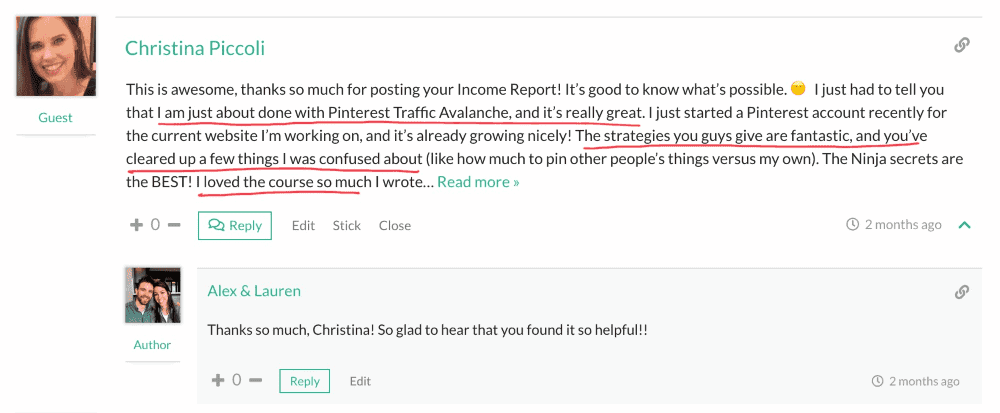
The biggest benefit of having a contact form plugin on your website is that it will keep your email address private.
Some of the better contact form plugins, like WPForms, also have more and better ways to combat spam:

WPForms is a paid plugin, but it has more features than the free versions and you can get it for as low as $3/month. It was recommended by a web developer friend who was helping with page speed.
Best Free Alternative: Contact Form 7
To Do:
- Create a “Contact” page on your blog if you don’t have one already.
- Download WPForms Contact Form 7create your first contact form.
- Make sure to include mandatory fields for name, email, and message.
4. Q2W3 Fixed Widget (Sticky Widget)
Are you selling products on your blog yet?
If not, I have a whole host of other monetization things to discuss with you that don’t involve plugins. But really, if you’re selling ANYTHING on your blog, this is a really handy plugin. It allows you to add a fixed widget to your sidebar, which can be really effective for marketing products or services.
I’ve used this plugin in the past to advertise a banner for a weight loss program that I sold on my health blog.

Q2W3 Fixed Widget just creates a “sticky” widget area that makes content stay with the user when they scroll down the page. This makes them more likely to click the image and engage with it.
You can also use it for a banner for an affiliate product or even just for a banner ad if you haven’t started selling products yet. You can also add an email opt-in if you haven’t started monetizing yet.
Many more popular (and paid) themes already allow for a “sticky” or “fixed” widget option. If yours does, you don’t need this plugin. If it doesn’t, you can download this plugin for the sticky feature.
To Do:
- Check in your widget area to make sure your theme doesn’t already include this setting.
- If it doesn’t, downloadQ2W3 Fixed Widget
- Add a new widget to your sidebar and click the “Fixed widget” box within the widget settings.
- Search for a banner ad for one of your top affiliates, use an ad banner if you’re monetizing with ads, or include one for your own product.
- If you aren’t monetizing through the above methods yet, use it for an email opt-in!
Site Speed and Performance
Okay, we’re going to try not to get too technical in this next section.
When you start looking into site speed, you’ll start reading a lot about hosting, databases, servers PHP files, HTML, MYSQL tables, and a whole lot of other tech language. The only thing you really need to know is that all of these blogging plugins help manage these files and can help improve your site speed.
5. Cache Enabler (Site Speed)
Without getting too technical, caching is a way of storing frequently accessed files in a cache so that they take less time to load. When you land on a website, that page has to request the web host to download all of the files and coding on the website from the database.
The longer it takes your pages to load, the higher the likelihood that your readers will bounce (called bounce rate).
In a nutshell, you need a good cache plugin for site speed. There are a ton of cache plugins out there, but Cache Enabler was recommended to us by a web developer.
Some of the settings for the plugin are a little technical, so if you need some help with the recommended settings, check out this article:


W3 Total Cache and WP Fastest Cache are also great, but they have both caused conflicts with other plugins in the past. Make sure to check on this if you decide to use these (or any plugins, really).
To Do:
- Download Cache Enablerimprove your site speed!
- Check out
this article
for the recommended settings.
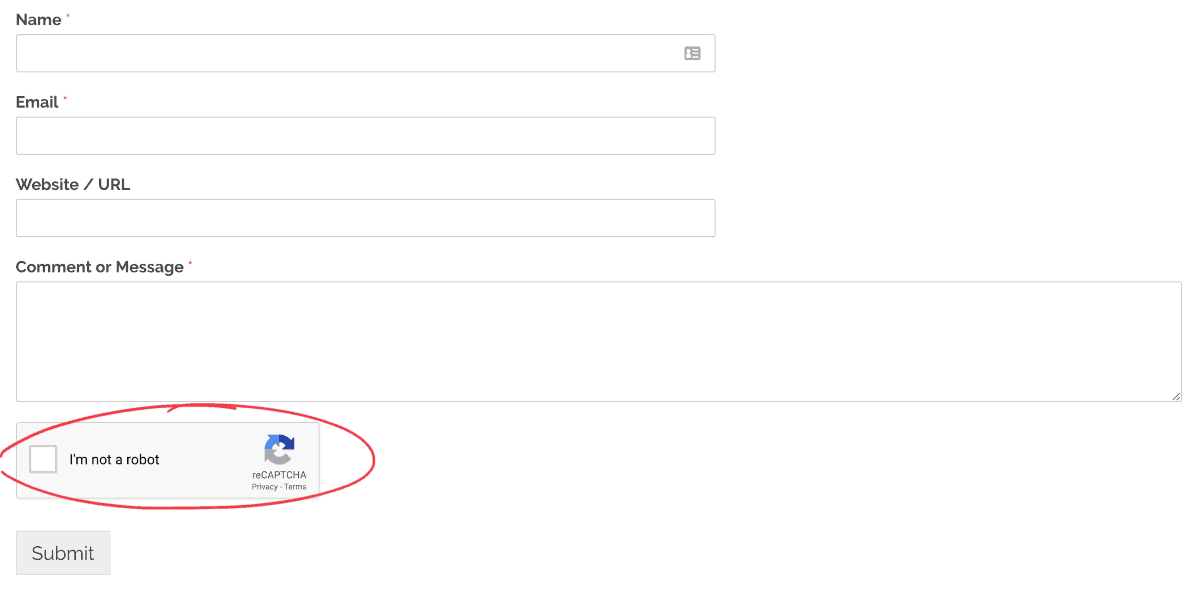
6. WP-Optimize (Image Optimization)
As your blog grows, you will constantly be creating new files and editing and deleting old files. This can be related to posts, images, comments, plugins, or anything else on your blog. All of these files, even the ones that are deleted, are stored (and take up space) somewhere on your database.
A good optimization plugin will help you clean out these old files so that your database (and your blog) will run more efficiently – and faster.
WP-Optimize is yet another that was recommended by a web developer. It helps you optimize your database by showing you what can be cleared out and then performing the optimization process to clear out the old files:

It’s probably a good idea to run these optimizations every few months (at least) or so depending on how active your blog is.
To Do:
- Before downloading this plugin, make sure to also look into a good plugin for generating backups of your site (discussed later in this article).
- Download WP-Optimize and start clearing out those old files!
7. Resize Image After Upload (Image Optimization)
Did you know that one of the biggest drags on site speed is not properly optimizing your images?
The crazy thing is… You can use all the blogging tools you can think of to resize and compress your images before uploading, but they often STILL bring down your page speed.
If you run a couple of your blog pages through a page speed test, you’ll likely see some notifications like this:

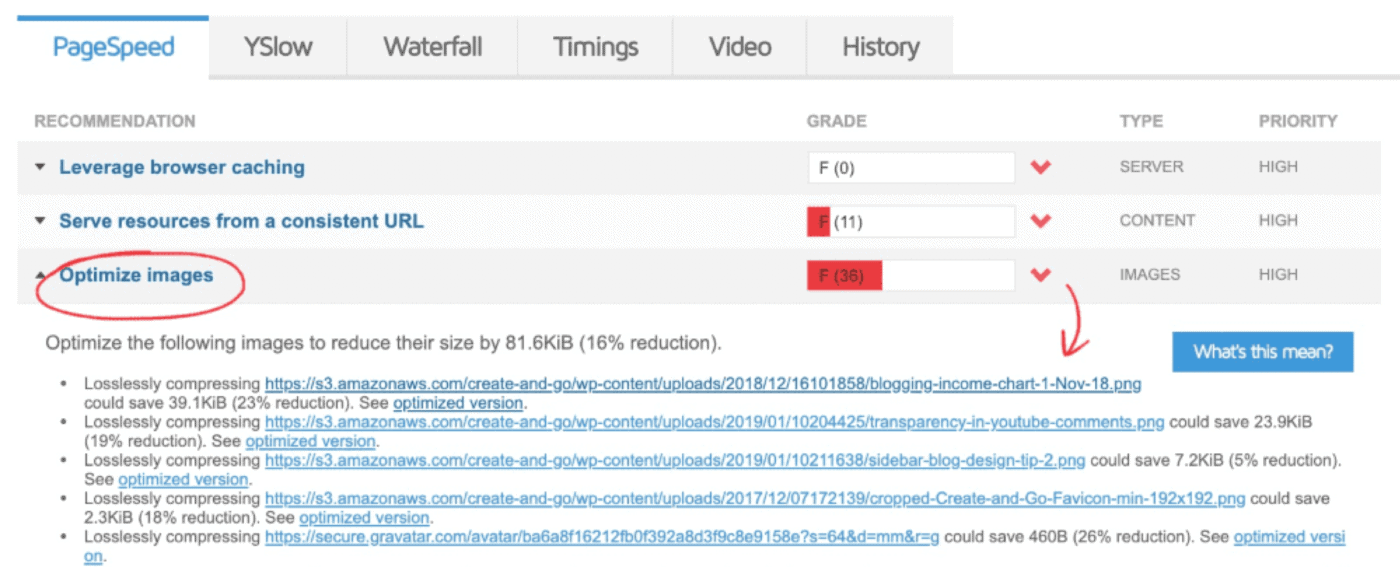
This means that you have some images on your page that aren’t optimized as much as they could be for maximum site speed and performance.
Generally, images shouldn’t be sized any larger than the size that they display at on your blog. In other words, it’s not good practice to upload a really large image and then resize it a lot smaller for a post or other purpose.
But this can be a difficult feat because you don’t always know exactly what size you need for a certain post or other use of every image on your blog.
Resize Image After Upload does literally what its name describes: it resizes images after they are uploaded to WordPress. You can specify a maximum width and height so that no images are displayed at more than that (making your pages load faster).

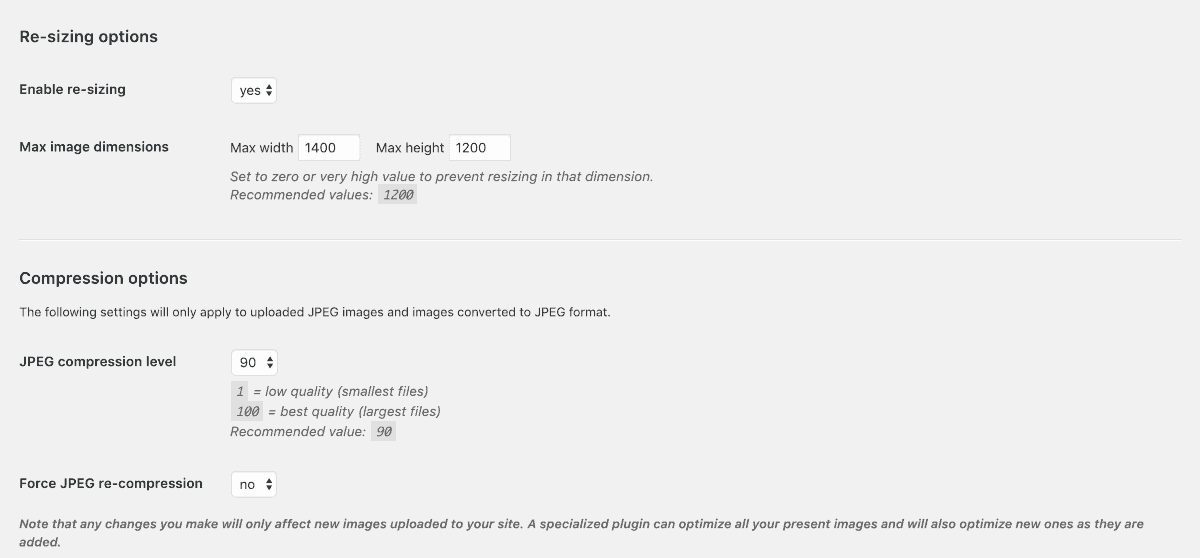
You can also adjust the other settings for compression to further reduce file sizes and improve page speed.
To Do:
- Use a tool like BeFunky to resize images to the smallest possible size before uploading to WordPress.
- Use Resize Image After Upload to resize images after uploading to WordPress.
8. Optimus (Image Optimization)
Let’s talk a little more about image compression. Resizing changes the actual size of an image but compression reduces the quality of a photo, which also reduces the file size of an image.
The key is to balance quality with file size. The goal is to get the lowest file size possible without sacrificing too much quality.
You can use tools like Optimizilla to compress images before you upload them to WordPress, but they can often be compressed even further after uploading.
This is where a plugin like Optimus comes in, because you can use it to compress images AFTER they have been uploaded to WordPress. This is yet another plugin that was recommended by a web developer when he was performing page speed tests.
You can adjust the various settings on specific images:

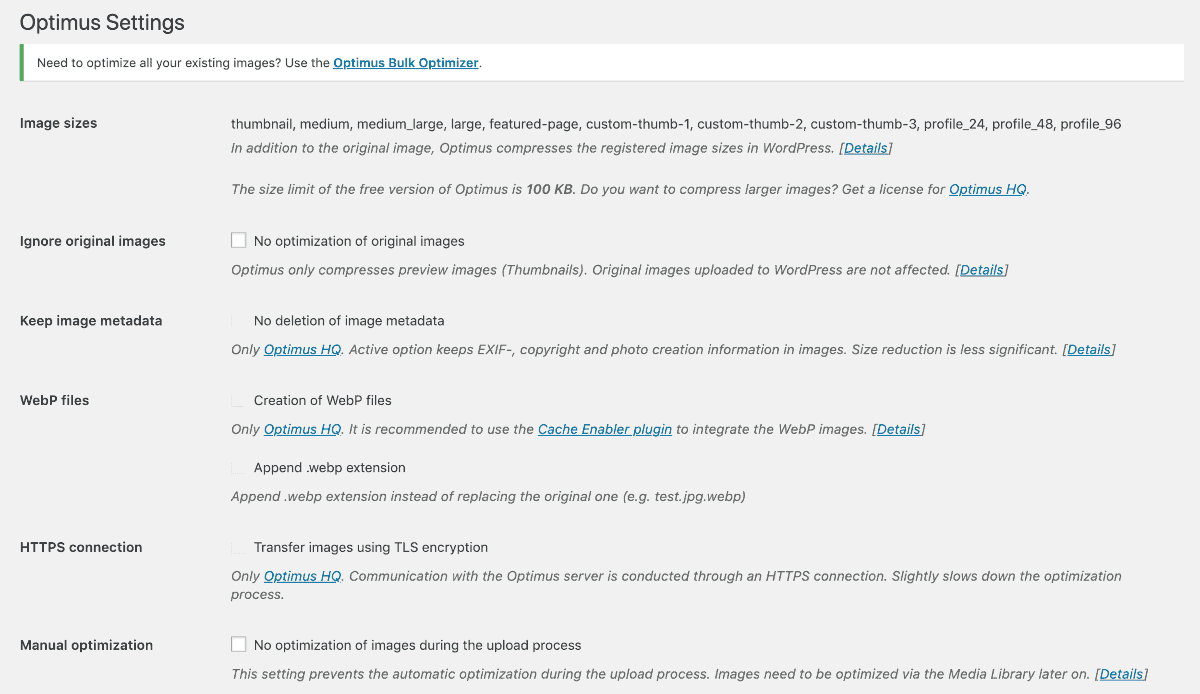
And you can also use the ‘bulk optimizer’ to optimize all of your images at once:


Make sure to run the bulk optimizer at least once every month or two to optimize all new images you have uploaded.
To Do:
- Make sure to use a tool like Optimizilla or TinyPNG before uploading to WordPress.
- Optimize images further with Optimus after uploading to WordPress.
Blog Traffic
This next set of plugins relates to your blog traffic: increasing it, monitoring it, and improving it.
These WordPress plugins will help you improve your search engine optimization, monitor your traffic stats, set up redirects, and help boost your social media presence.
9. Rank Math (Search Engine Optimization)
Yoast SEO used to be our go-to, but then we switched to Rank Math when discovered the alternative.
SEO stands for search engine optimization, and it basically just means optimizing your content to make it more visible in search engines like Google. Here’s the thing…
Google traffic is VERY difficult to get, depending on what your blog is about, and it takes a lot of time before it starts paying off.
Mastering SEO can be difficult, especially at first, and it can be months or more before you see a return on your efforts. But one of the best things that you can do is to take even the basic steps to optimize your content for Google search.
I call this “passively” going after Google traffic. Because over time, if you’re doing some of the main things right, you will gradually get more and more Google traffic over time.
Rank Math scores your blog writing on how well you have it optimized for Google search, including your use of…
- target keywords
- internal and external links
- image tags
- meta descriptions
- readability
…and other factors that affect your page ranking with Google.
It has a red/yellow/green light system that tells you what you’re doing right and what you need to work on:
![]()
For this post above, I have an overall green light, but I have a few red error messages on my “Additional” and “Title Readability” sections, which lets me know what I have more to work on in that area.
If I expand those sections, I can see more details about what the recommended fixes are:
![]()
In the screenshot above, it shows me that the biggest offender is that my title doesn’t contain a positive or a negative sentiment, a power word, or a number, all of which can improve the chances someone will click on my title or headline.
It also shows me that my keyword density is low (meaning I didn’t use the keyword enough times in comparison to how many total words my article contains), but that’s only one error in the whole “additional” section, so it’s not as much of a concern.
As you can see from the example above, it’s possible to have a green light on your total SEO score, but still have “errors” of red x’s for certain metrics of those measures.
You don’t have to stress about getting a green light or checkmark on everything, but you should try to get an overall green light on all of your posts. Even if you don’t plan on paying much attention to Google SEO, the Rank Math plugin is a great way to make sure your content is optimized in a fairly passive way.
There is a free version and a paid version, but you shouldn’t need any more than the free version!
To Do:
- Download the Rank Math plugin.
- Make sure to add a target keyword and meta description for every post on your blog.
- Try to make some edits to get green lights on all of your posts.
10. Google Analytics (Traffic Stats and Analytics)
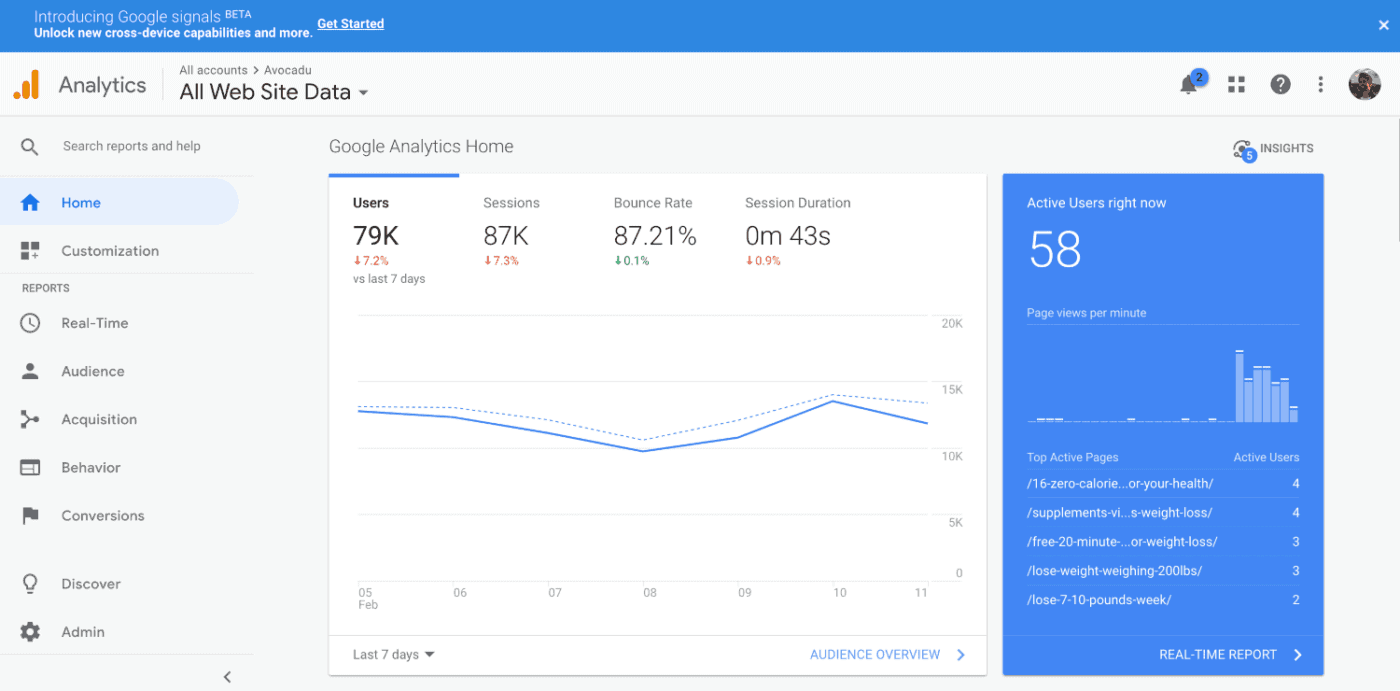
You’ve probably heard of Google Analytics before, but if you’re unfamiliar with the features, here is a 30,000-foot overview of what kind of information it can show you:
- How many views your blog is getting per day
- What social media platforms or search engines those visitors are coming from
- Where in the world they are viewing your website from
- What time they are accessing your website as well
- How long they are spending on your pages
- And more!
This is what the Google Analytics dashboard looks like:

You can access it anytime by going to their website, but there is also a WordPress plugin by MonsterInsights that lets you view the data right in your WordPress dashboard:

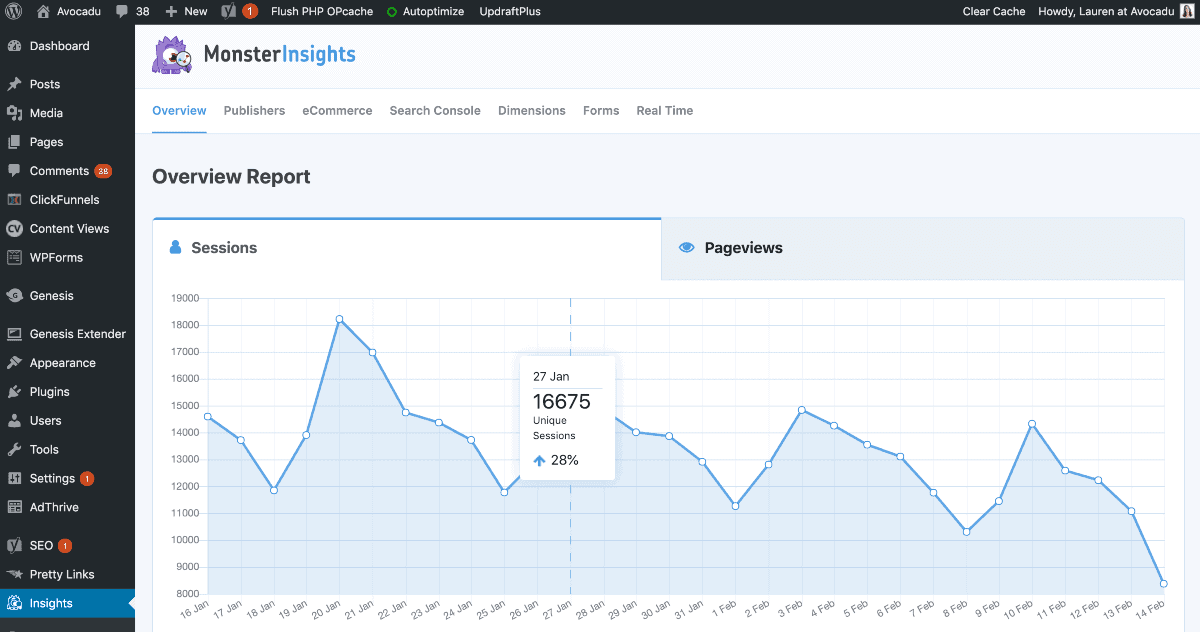
And there are even more details if you scroll down:

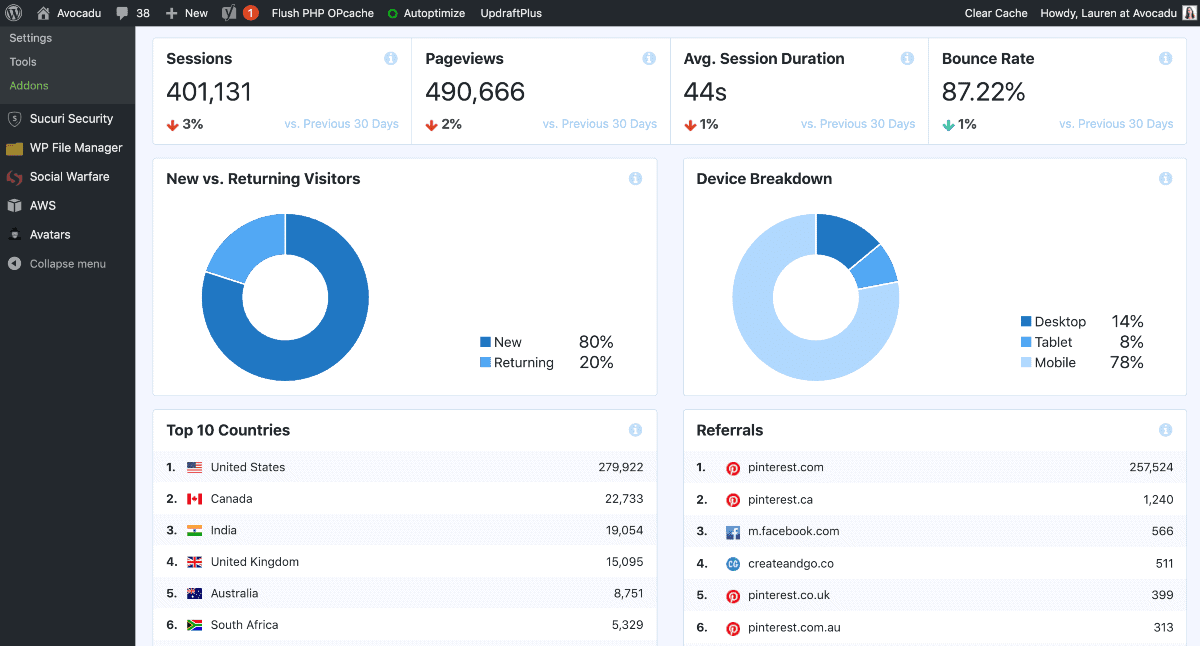
Google Analytics is the most accurate way to track your blog traffic and it should be the ONLY metric you are using.
Other plugins like JetPack are bloated and can slow down your site. Some bloggers also pay too much attention to Pinterest Analytics, and these are often not as accurate as GA.
To Do:
- Sign up for Google Analytics, if you haven’t already.
- During the process of setting it up with your blog, save your Tracking ID. You’ll need it in the next step.
- Install the MonsterInsights plugin and connect your GA account (insert the Tracking ID when prompted).
- You can now view your traffic stats anytime you log in to WordPress!
11. Redirection (Redirects)
If you’re relatively new to blogging, you may not need this plugin just yet, but I can guarantee you that you WILL need it at some point.
And if you run your website through a broken link checker and it tells you that you’ve got some broken links, then you definitely need this plugin!
Broken links occur when you delete posts or mistype your URLs, and they can hurt your ranking in search engines like Google and Pinterest.
When you delete a post, there’s a good chance that the old URL still exists somewhere out there on the internet – either linked on your blog or someone else’s or on social media. When someone clicks on it, they’re brought to a 404-error page telling them that the page no longer exists (similar to this one):


This is bad for user experience and will cause you to get penalized in search engine algorithms. To keep this from happening, you need to set up a redirect that redirects the visitor from the old URL to a new one that isn’t broken.
The Redirection plugin allows you to set up 301 redirects and manage 404 errors on your blog.
For example, I changed one of the URLs on my health blog because I originally put the year “2017” in the URL. This was obviously a bad idea because it makes people think that the content is outdated after the year 2017.
I changed the URL for the post and set up a redirect so that anyone that clicked on a link to the original URL would now be redirected to the new URL where the post is:

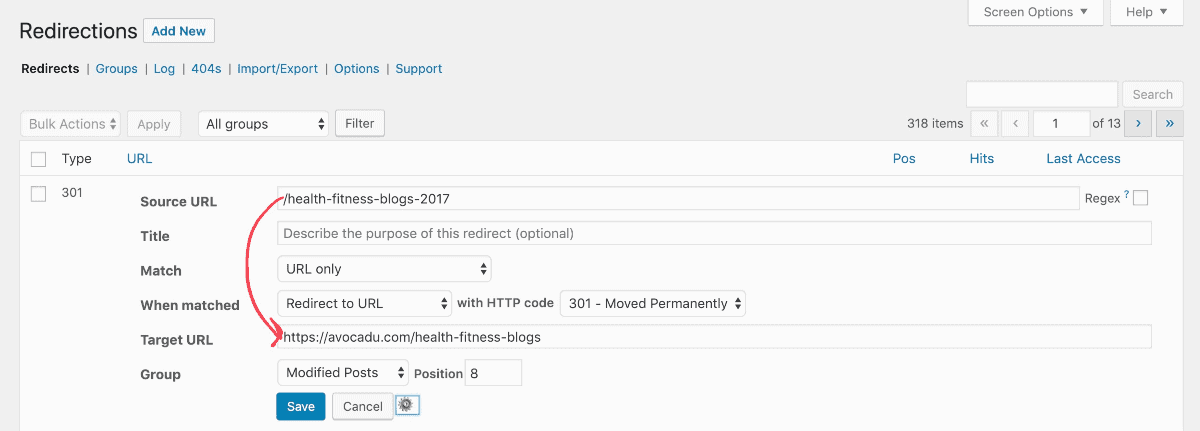
This is especially important if you are driving traffic on Pinterest because all of your old pins will contain links to the old URL and will cause 404 errors if you don’t set up a redirect.
Lastly, make sure to set up all redirects as 301 permanent redirects:

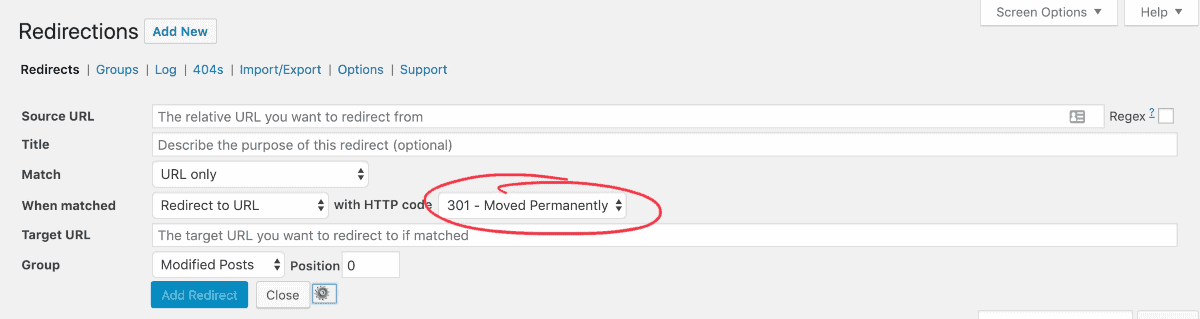
This signals to Google that they should ignore the old content for ranking purposes and only pay attention to the new URL.
To Do:
- Check your blog for broken links using a free broken link checker.
- If the links are broken because of a misspelling, view the source and manually change the link.
- If the links are broken because of another reason, set up a 301 redirect to redirect the post to a new URL (either to an existing post or your homepage).
Monetization (Plugins for Making Money)
This next set of plugins can help you make money with your blog if you use them right! They will help you collect more emails, which can help you make more sales, and customize your affiliate links, which can help with your affiliate sales.
12. ConvertKit (Email Collection)
Okay, so this one is only necessary if you have and use ConvertKit, which is our #1 recommendation to collect and send emails on your blog. The ConvertKit plugin for WordPress allows you to embed simple opt-in forms that capture leads with a simple shortcode.
What does this mean?
Here’s an example of a form for our free blogging bootcamp course:
These forms are created within the ConvertKit software, and then you use the plugin to easily add them to your website. If you use a different email marketing service, you might want to check if they have a similar plugin.
ConvertKit, like most email marketing services, does cost a fee, but the plugin is free. You just need an active ConvertKit subscription to use it. If you don’t have ConvertKit and want to try them out, you can get your first month free through our affiliate link: Get your first month of ConvertKit free.
To Do:
- Sign up for your first free month of ConvertKit and create an account (they also have tools for importing subscribers from other platforms).
- Create your first form in ConvertKit.
- Install the ConvertKit plugin and add the form to the bottom of your posts as well as within the content of your posts where relevant.
13. Pretty Links (Affiliate Links)
If you have affiliate links anywhere on your blog, you need this plugin.
Before I downloaded this plugin, I would have to look up my affiliate links in a spreadsheet every time I needed one of them. Most affiliate links have random strings of letters and numbers behind them that make it impossible to remember.
Now, I remember 99% of my affiliate links because I use a plugin to create links that look “prettier” and are easier to remember.
The Pretty Link plugin allows you to create clean domain links to redirect or cloak other links (like affiliate links) rather than using TinyURL or bitly, which look spammy and are sometimes not allowed.
Here’s an example:

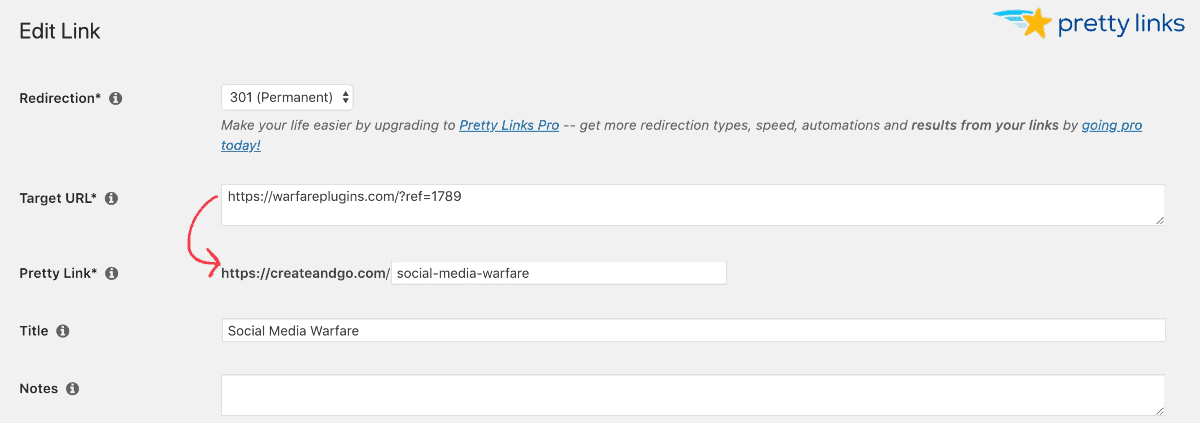
My pretty links are generally pretty simple and easy to remember, like these:
There are also advanced options to add “No follow” tags to your pretty links.


Using “No follow” tells Google to essentially ignore your affiliate links.
This is important because too many affiliate links can come off as spammy and signal to Google that your content may not be authentic and trustworthy. It also gives your other internal links to your site more “link juice,” which helps with SEO.
Pretty Links is essential if affiliate marketing is a big part of your monetization strategy!
To Do:
- Download the Pretty Links
- Create unique, customized links for all of your affiliate links.
- You can also use it to create customized and easy-to-remember links for other links like social media, sales pages, etc.
Security and Protection
Running an online business has a LOT of upsides compared to traditional brick-and-mortar start-ups:
- A lot less upfront capital investment required
- No inventory required (if you sell digital products)
- A lot less risk
But there are still some risks, and some of those include your exposure to spammers, hackers, and other people looking to steal your information (and your money).
14. Akismet Anti-Spam (Combat Spam Comments)
If comment spam is a problem on your blog, congratulations! Your blog is popular enough that people are targeting it for spam.
Okay yeah, that sucks. But it’s not the worst problem to have, right? This isn’t generally a problem for new bloggers because no one knows that their blog exists yet and it isn’t worth spammers’ time to target it.
The worst part is that spammers use bots to automatically send comments to your website. So they can send hundreds of them in seconds.
After weeks of sorting through spam comments to find the real ones from actual people, I wrote to our web developer to ask for some recommendations. I was tired of wasting my time deleting comments from spambots.
This plugin detects automatic spam comments that are left by bots and computers and puts them in the spam folder so you don’t ever have to see them (but you can if you need to.

It definitely doesn’t detect all spam, but it catches most of the biggest offenders (aka the bots that can leave hundreds at once).
It’s a free plugin, but a Pro version also exists if the free version isn’t providing you with enough coverage.
To Do:
- Download Akismet Anti-Spam and activate it on your blog to start blocking spam comments.
- Consider upgrading to the Pro version if spam continues to be a big problem.
15. UpdraftPlus (Content Backups)
As I explained above regarding the cache plugin, websites are FULL of files and coding. That coding can also break.
When you update plugins, theme files, or other software, it can cause conflicts in the coding of your website that can cause it to shut down.
Poof. Gone.
That’s IF you don’t have a backup of your files. Some hosting companies perform backups for you but you are generally limited for space and can’t rely 100% on these ‘routine’ backups.
UpdraftPlus is a plugin that automatically performs backups of your website, so you can go to sleep at night with the peace of mind that your business won’t implode overnight.
You can set the backups to occur as frequently or as infrequently as you want and where you want to store the backups:

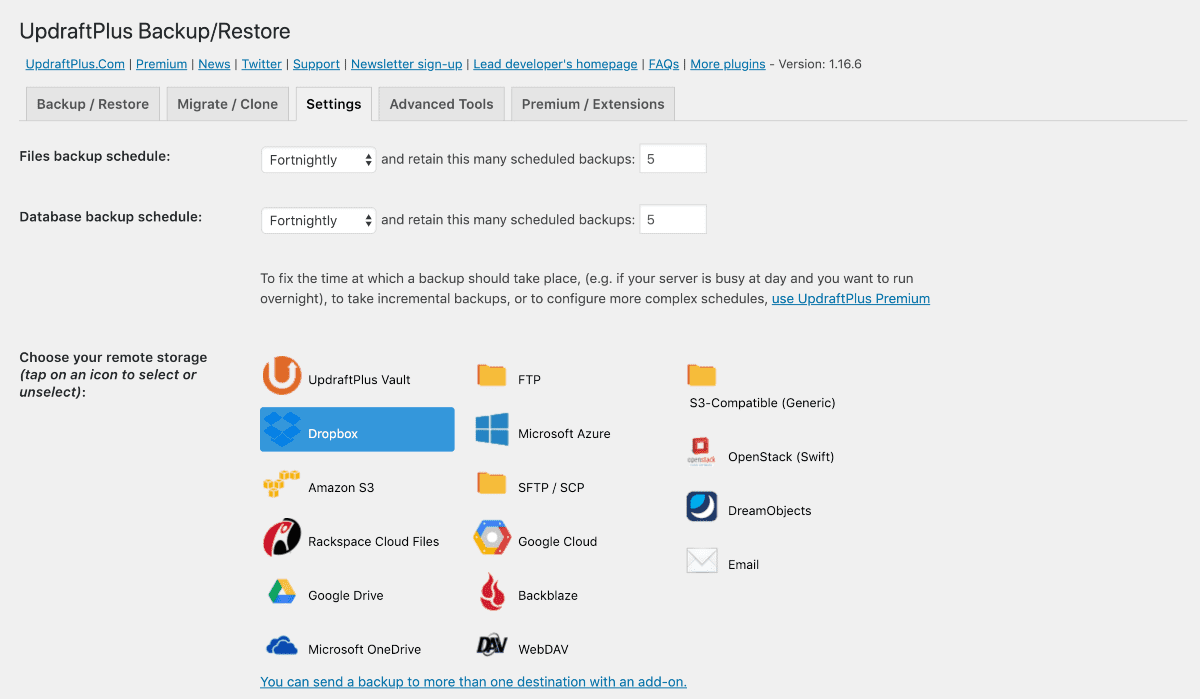
I am personally partial to Google Drive because I already pay for their email service anyway, which includes Drive space. But Dropbox and Amazon S3 are also great options.
UpdraftPlus has both a free version and a premium version, so you can decide what you need for your blog, but this plugin is absolutely essential!
To Do:
- Download UpdraftPlus and decide on a storage option.
- Make sure your settings are set to store 2-3 backups of your website and database at a time.
- Run your first backup now so you know that you have at least one backup in place!
16. Wordfence Security (Security)
Steering the conversation back to spammers… The bigger your blog becomes, the bigger the target on your back for spammers, hackers, you name it.
Your blog is a business, which makes it valuable, which makes people want to steal from you. You’ve worked hard for it but some others [sadly] don’t want to.
If someone gains access to your blog, they can steal your information, delete it, and wreak havoc on your hard-earned success.
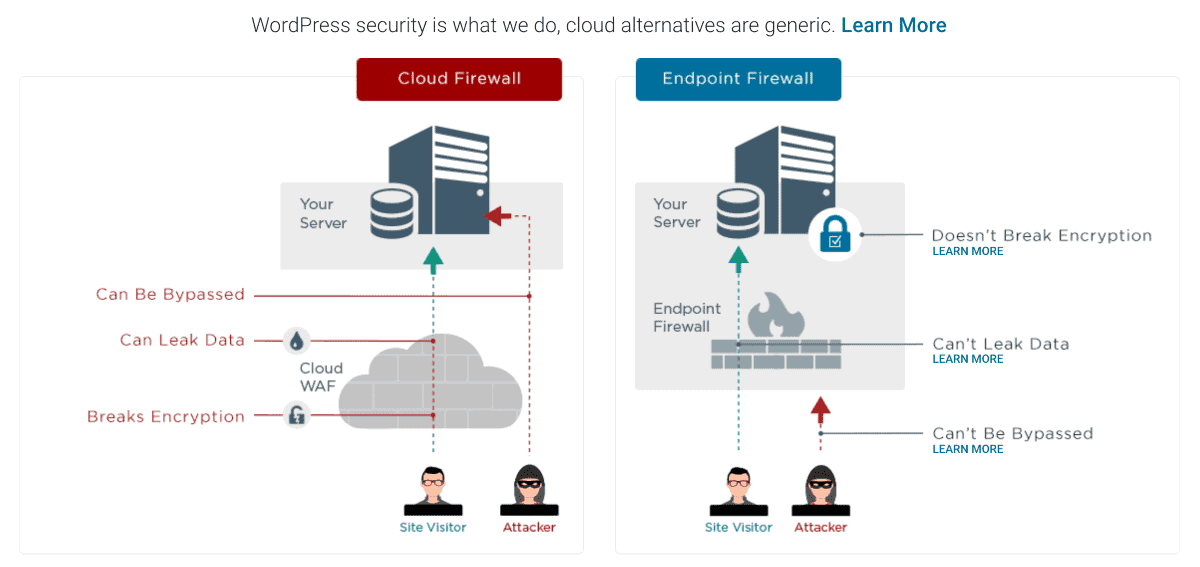
Wordfence Security is a security plugin that includes a firewall and malware scanner to protect your WordPress blog from external threats.

It will block malicious attempts to log in to your site, and even show you where the IP addresses are coming from and what credentials people are using to try to log in.
The security of your blog is something you should never take too lightly. Make sure that you are also using a secure password to log in to your WordPress site. Using a password manager like LastPass can also help to keep your passwords more secure.
To Do:
- Download Wordfence Security to start protecting your blog from malicious login attempts!
How to Install WordPress Plugins
There are two ways to install a WordPress plugin:
- Using the search feature
- Uploading the plugin directly
Both methods only take a minute but note that not all plugins are found and able to be installed via search.
Installing Plugins Using the Search Feature
You can use the search feature in the WordPress plugin area to search for popular plugins or specific plugins based on keywords.
To get to the plugins area, simply click on the “Plugins” link on the left menu of the WordPress dashboard. Then click the “Add New” button.
You can type in the name of a known plugin (i.e. Fancier Author Box) or something generic like “author box.”

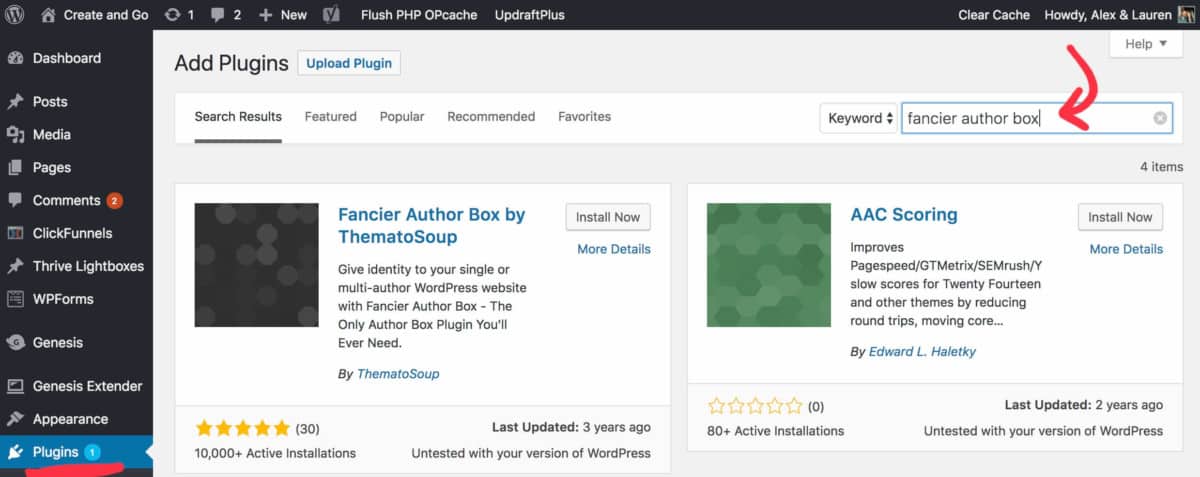
To install a plugin, click the “Install Now” button next to the plugin. Make sure to activate the plugin after installing.
If the WordPress plugin you are looking for isn’t turning up in your search results, you’ll probably have to upload it manually.
Uploading Plugins to WordPress
Some plugins must be manually uploaded to WordPress. This is more common with paid plugins.
Before uploading a plugin to WordPress, you must first download it from the website (after purchasing, if it’s a paid plugin). The download should be in a zip file.
Make sure to leave the downloaded plugin file as a zip file because that is the required format for uploading it to WordPress.

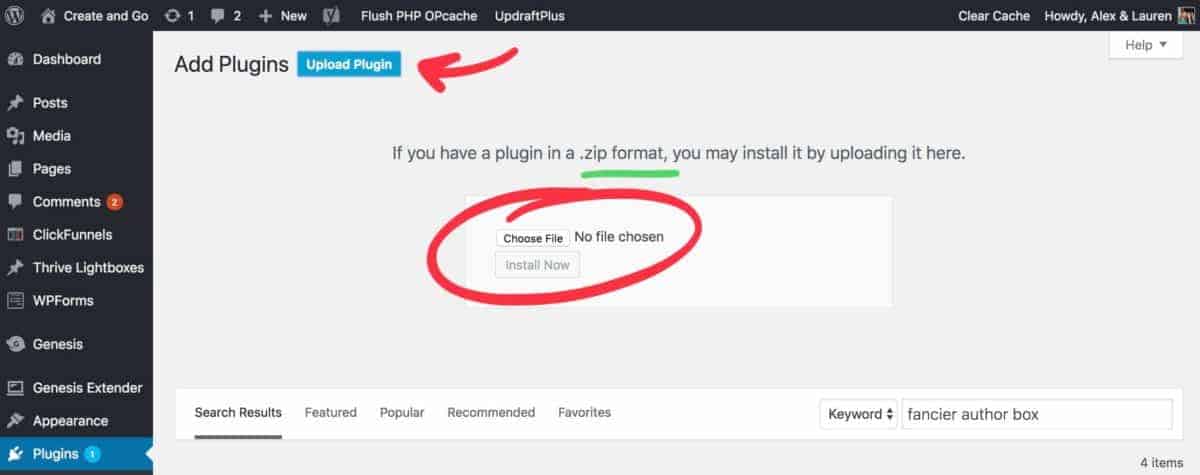
After uploading, click to install and activate the plugin.
What plugins do you feel were the most helpful on this list? Which ones are you going to install right away and why?
Please let us know your thoughts in the comment section below! We’d love to hear from you!


![Toni Kroos là ai? [ sự thật về tiểu sử đầy đủ Toni Kroos ]](https://evbn.org/wp-content/uploads/New-Project-6635-1671934592.jpg)


