
FIX: Wi-Fi Connected But No Internet Access in Windows 10 (Solved)
This tutorial contains instructions to fix the “Wi-Fi Connected but no Internet Access” problem in Windows 10, 8 or 7 OS. So, if your device is connected to a Wireless network and can access other devices on your local network, but cannot be able to reach the Internet, then continue reading below to find out how to resolve the problem.
Mục Lục
How to FIX: WiFi is Connected But No Internet access.
The “WiFi connected with no Internet access” problem, can be caused for several reasons, but before you continue to the methods below to fix the problem, perform these steps:
- Step 1. Verify that other Wi-Fi devices can connect to the same wireless network and access the Internet.
- Step 2 . Turn off the Router/Access point for at least one (1) minute. Then start the router and after one (1) minute restart the computer and see if you have Internet access.
- Step 3. If you ‘re using a third-party Security/Firewall software, temporarily disable it and check if Internet access has been restored.
- Step 4. Check if you can fix the problem, with the Network Troubleshooter wizard. To do that:
1. From Start
menu, select Settings
and select Network and Internet.
2. Select Status on the left pane, and then click Troubleshoot. At next, select to diagnose the Wi-Fi network adapter, click Next, and then follow the onscreen instructions to fix the problem.

Method 1. Forget and re-Add the Wireless Network.
1. Click Start ![]() > Settings
> Settings ![]() and select Network and Internet.
and select Network and Internet.

2. Select Wi-Fi on the left side and click Manage known networks.

3. Select the Wireless network and click Forget.

4. Connect to the Wireless network again and check if you have Internet access.
Method 2. Reset DNS Address settings.
1. Open Command Prompt as Administrator. to do that:
-
- In the Search box type: cmd or command prompt
- Right-click on Command Prompt and select Run as Administrator.
2. In the command prompt window, type the following command & press Enter:
- ipconfig /flushdns

3. Restart your PC and check the Internet connection.
Method 3. Change Advanced DNS Settings.
1. Navigate to Control Panel > Network and Sharing Center.
2. Click Change adapter settings on the left.

3. Right-click at the Wi-Fi Network Connection and choose Properties

4. Then select the Internet Protocol Version 4 (TCP/IPv4) and click Properties again.

5. Click Advanced.

6. Uncheck the Register this connection’s addresses in DNS checkbox and click OK twice and Close to close all windows.

7. Restart your computer.
8. Forget and re-add the wireless network. (see Method-1 above)
Method 4: Reset TCP/IP parameters.
The “Wi-Fi Connected but no Internet access” issue may appear if the TCP/IP settings have improperly configured. To reset the TCP/IP settings:
1. Open Command Prompt as Administrator.
2. At command prompt, type the following command and press Enter.
- netsh winsock reset
3. Then type the following command and press Enter.
- netsh int ip reset

4. Close the command prompt window and restart your computer.
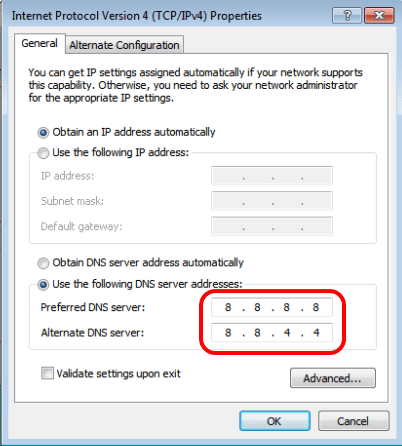
Method 5. Set Custom DNS Server Addresses.
1. Navigate to Control Panel > Network and Sharing Center.
2. Click Change adapter settings on the left.
3. Right-click at the Wi-Fi Network Connection and choose Properties

4. Then select the Internet Protocol Version 4 (TCP/IPv4) and click Properties again.
5. Select “Use the following DNS server addresses” and type the following Google DNS Server addresses:
- 8.8.8.8
- 8.8.4.4
6. Press OK (twice) to close network properties.
7. Restart you computer.
Method 6. Uninstall and Reinstall the Wireless Adapter Driver.
The error “Wireless is Connected but no Internet access” problem” can be caused by faulty network driver. So, proceed to uninstall the wireless adapter driver and then let the Windows to reinstall it automatically the next time you restart your system. To uninstall your Wi-Fi network driver, follow the steps below:
1. Navigate to Device Manager. To do that:
-
- Press Windows
 + “R” keys to load the Run dialog box.
 - Type devmgmt.msc and press Enter to open the device manager.
- Press Windows
![image_thumb[22]](https://www.wintips.org/wp-content/uploads/2019/05/image_thumb22_thumb-2.png "image_thumb[22]")
2. In device manager, expand the Network adapters.
3. Right click on the Wireless adapter and choose Uninstall.

4. Mark the checkbox “Delete the driver software for this device” (if it appears) and click OK on the confirmation window.

5. Restart your PC.
6. After restart let Windows to reinstall the WiFi driver and then try to connect to Internet. *
* Note: If Windows doesn’t install the drivers automatically, continue to next method.
Method 7. Update Wireless adapter drivers from Manufacturer’s site.
1. Download the latest driver for the Wi-Fi adapter from manufacturer’s support site. To download the driver, use one of the following options:
a. Connect your PC to Internet via the Ethernet Adapter (LAN Cable), or…
b. Download the driver, from another working computer and use a USB drive to transfer the Wi-Fi driver on the PC with the Wi-Fi connection error.
2. If the driver, comes on an “.exe” file, then run it to install the driver, otherwise use the device manager to install the driver. To install the driver for Device Manager:
1. Navigate to Device Manager.
2. Right click on the Wireless adapter and choose Update Driver Software.

3. Choose Browse my computer for driver software.

4. Click Browse and choose the location (folder) of the downloaded driver.

5. If Windows can found an updated version of the driver, click Next to install it.

6. When the driver installation is completed. restart your computer.
That’s it! Which method worked for you?
Let me know if this guide has helped you by leaving your comment about your experience. Please like and share this guide to help others.
Even $1 can a make a huge difference for us in our effort to continue to help others while keeping this site free:

If this article was useful for you, please consider supporting us by making a donation.in our effort to continue to help others while keeping this site free:
We’re hiring
We’re looking for part-time or full-time technical writers to join our team! It’s about a remote position that qualified tech writers from anywhere in the world can apply. Click here for more details.
constantly protected from malware threats, existing and future ones, we recommend that you install Malwarebytes Anti-Malware PRO by clicking below (we
do earn a commision from sales generated from this link, but at no additional cost to you. We have experience with this software and we recommend it because it is helpful and useful):
Full household PC Protection – Protect up to 3 PCs with NEW Malwarebytes Anti-Malware Premium!
If you want to stayfrom malware threats,, we recommend that you installby clicking below (we do earn a commision from sales generated from this link, but at no additional cost to you. We have experience with this software and we recommend it because it is helpful and useful):


![Toni Kroos là ai? [ sự thật về tiểu sử đầy đủ Toni Kroos ]](https://evbn.org/wp-content/uploads/New-Project-6635-1671934592.jpg)


