
How to Use WordPress: Ultimate Guide to Building a WordPress Website
The thought of creating your own website may seem overwhelming.
You might even think this task is impossible for anyone but a developer or a person with a background in web design.
Well, I have good news for you — there’s a software out there that’s so easy to use, virtually anyone can successfully create a unique and professional-looking website for their business, blog, or portfolio. It’s called WordPress.
WordPress is a content management system (CMS) that allows you to host and build websites. WordPress contains plugin architecture and a template system, so you can customize any website to fit your business, blog, portfolio, or online store.
But how?
This ultimate guide will cover a basic step-by-step process of creating your own WordPress website as well as a list of tips and tricks to remember while working with WordPress.
For even more resources, we’ve also compiled some of the best websites for learning about WordPress — these can be incredibly valuable sources of information as you start you journey.
There are a number of ways for you to create your dream website with WordPress. Users generally find the software easy to use , but getting started can be understandably intimidating if you’re completely new to the process. That’s why we have built this “WordPress for Beginners” guide. Want a quick introduction before you dive deep? Check out this helpful video:
WordPress.com has a free and paid version. If you stick with the free version, you can’t upload any custom themes or plugins, and you will have a WordPress subdomain. However, there is always the option to pay for premium upgrades and other plans that provide you with even more features and control, as well as the option to buy a custom domain through a third-party site.
WordPress.com is preferable if you’re looking for an all-in-one option that has most of the hard work done for you. You’ll never need to manage your server, pay for your hosting, or buy a domain. There are also a number of customization options that come with a WordPress.com plan to help you make your website look the way you want it to.
WordPress.org is ideal if you want full power over customizing and controlling your website. However, there is a lot more responsibility that comes with managing a WordPress.org website. You have to purchase and set up your own domain name, upload and install plugins and a theme, edit your website’s code, and manage your website’s security. WordPress.org is free to use, but you have to pay for everything else that goes into having a website.
You may be wondering whether WordPress.org or WordPress.com would be a better fit. Let’s review a few more of the pros and cons that come with both options, so you can make an informed decision.
WordPress.com offers to host your website for you. You also don’t need to download any software or manage a server. If you choose WordPress.com, your website’s URL will look like this: www.mywebsite.wordpress.com. However, you have the option to also upgrade your WordPress.com account and buy a custom domain from a third-party provider (meaning your URL will look like this: www.mywebsite.com).
You host your own website or blog on WordPress.org , through a third-party hosting provider. You also have to download your WordPress software, buy a domain name on a third-party site, and manage your server. It’s a much more hands-on experience than with WordPress.com.
The difference between WordPress.org and WordPress.com has to do with who is actually hosting your website.
But first, let’s answer the question most people have when they begin thinking about their new WordPress website: What is the difference between WordPress.org and WordPress.com?
When considering hosting providers for your WordPress site, make sure they meet all of the above criteria.
Your hosting provider is important because it impacts your website’s speed, security, and reliability. There are hundreds of providers to choose from, which is why we put together a list of 22 of the best WordPress hosting providers to help you decide what will work best for you. All of these providers meet WordPress’ three hosting requirements :
Again, WordPress.org requires you to create your own domain and find a third-party hosting provider for your website. WordPress.com allows you to decide whether or not you want a custom domain depending on the plan you choose, but it takes care of the hosting for you.
Your hosting provider is like your house — it’s where your website files are actually stored. Without a hosting provider, your site wouldn’t have space on a server to “live.” Some of the best WordPressing hosting providers include WP Engine , Bluehost , and Kinsta .
Think about your domain name as your home address — it’s how your visitors are able to locate your website on the Internet. You domain name will look something like this: www.example.com.
Before we talk about how to complete those tasks, let’s discuss the difference between your domain name and hosting provider.
Setting up your domain name and choosing your hosting provider for WordPress typically happen around the same time in the website creation process.
The main differences between these plans are the monthly fee, types of site customization, and the access you get to marketing tools.
With WordPress.com, you’ll have to choose between the five plans they offer.
To begin creating your website, select a WordPress plan. As stated earlier, with WordPress.org you only have one (free) plan option — but it requires you to buy your domain, hosting provider, plugins, themes, and everything else related to your WordPress site.
WordPress is by far the most popular CMS today . Its ease of use and versatility enable the majority of users and business owners to create a website that works for their needs. Here’s how you can do the same.
Below, we will take a closer look at how to start creating your website.
For domain names, getting one is as easy as searching and purchasing one through your domain registrar of choice. If you are new to WordPress.com but have already purchased and created a domain name elsewhere, no problem — you’ll have the option to transfer or map it to your WordPress website.
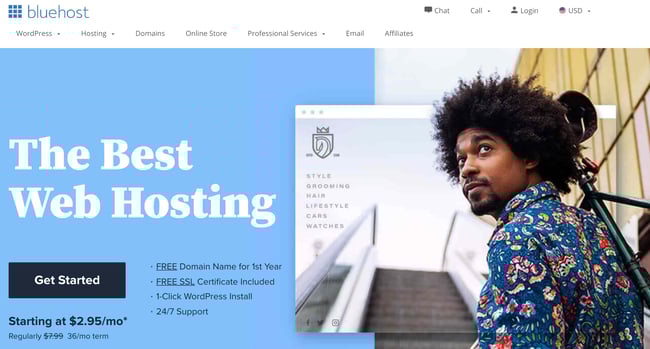
For the sake of this guide, let’s assume you do not yet have a domain or hosting provider. Here’s how to start creating your website with the popular hosting service Bluehost.
First, head to Bluehost’s website and click Get Started.
From here, you’ll be taken to Bluehost’s pricing page to choose from four plans.
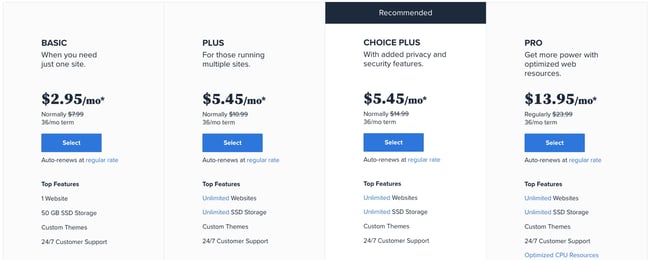
Once you choose your plan and click Select, you’ll be taken to another page to sign up with a domain name.
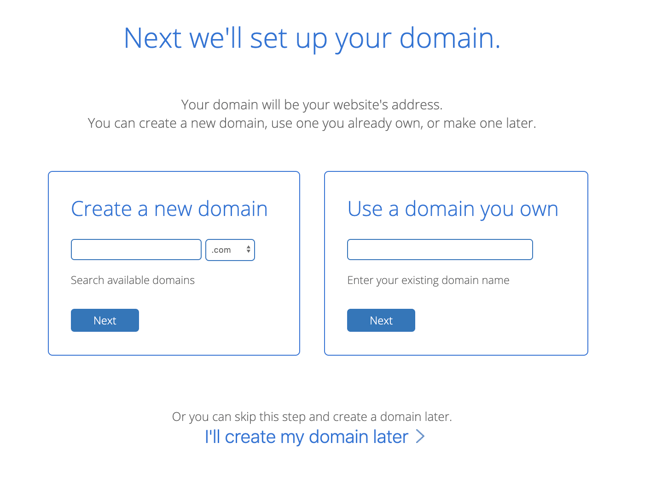
Image Source
Once you select your domain name, you’ll be brought to a page to complete your account and billing information for your purchase.
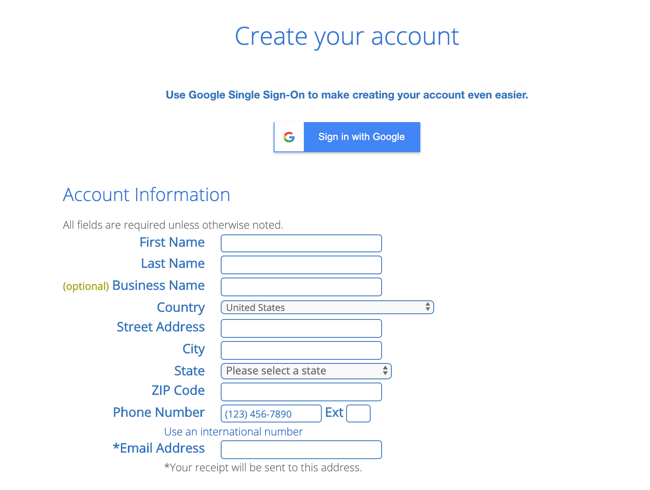
After confirming your account and purchasing your domain, you will gain access to your hosting dashboard where you’ll be able to install the WordPress CMS.
If you are using a hosting provider outside of WordPress, you’ll need to install the CMS to connect your new domain to your website.
This time, let’s use GoDaddy as an example. (Don’t worry, no matter the hosting provider you choose, this process looks similar.)
Note: If you choose to use a managed WordPress hosting service like WP Engine or Kinsta, you won’t need to go through this process, as those services were built specifically for WordPress and will have WordPress installed for you.
To start, log into your GoDaddy account, click Web Hosting, and then Manage. You will be brought to a screen with your account details.
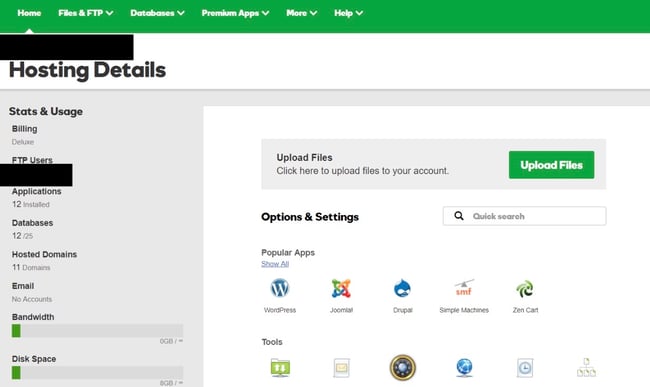
Image Source
Scroll down and under Options & Settings, you will see an area titled Popular Apps. Click on the WordPress app to begin the installation.
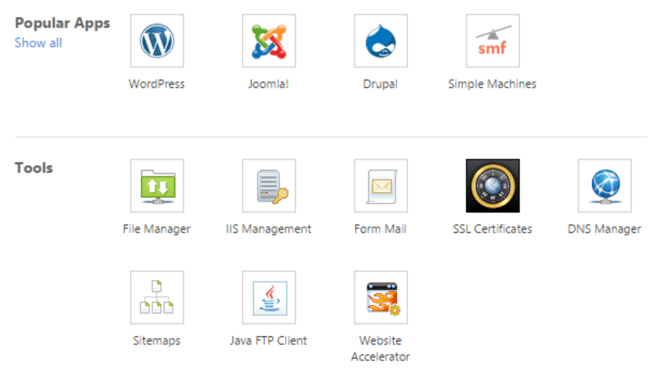
Image Source
After installing WordPress, you’ll need to answer a few questions about the domain you want to use, the directory where you want to install WordPress, and your admin information.
After about 24 hours, your website will be installed to your hosting account, and GoDaddy will send you an email confirmation.
Now that you have your domain set up and WordPress installed, you’ll next need to set up your “Primary Domain” within WordPress, so your visitors see your website when they search your domain.
In WordPress, go to My Site and click Domains. Select the custom domain you want to make your primary domain.
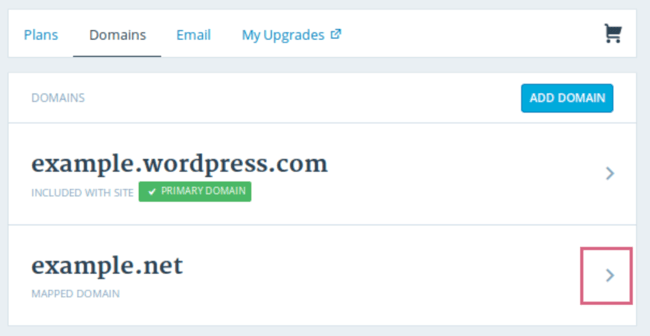
Image Source
Then, click Make Primary.
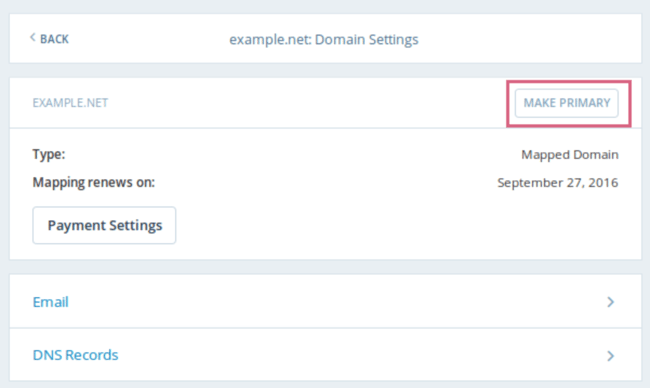
Image Source
Confirm you meant to make this change by clicking Update Primary Domain.
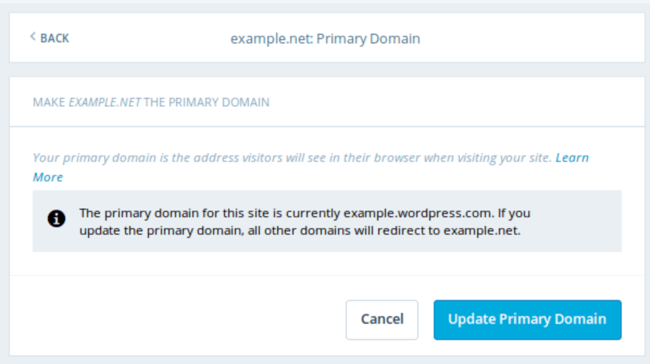
Image Source
Verify the update was successful by looking for a green box with a checkmark that says Primary Domain.
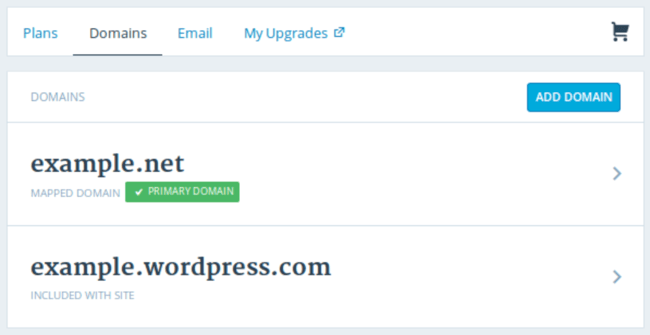
Image Source
Now, on to step four: making your website look nice.
4. Choose your theme.
You can customize your WordPress website using WordPress’ many themes and templates, each of which contains a multitude of layouts, formatting styles, colors, fonts, and other visual options.
WordPress automatically applies a default theme that looks rather plain. You can keep it, but your website visitors may not be so impressed. A custom WordPress theme, whether it’s paid or free, will make your website look appealing and professional to your buyer personas.
Similar to the wide range of hosting providers available, there are also hundreds of themes and templates to choose from. To help you out, we’ve put together a guide to 20 of our favorite themes and templates and categorized them by purpose. Whether you’re looking for a theme versatile enough for multiple different business types, or one suitable for your ecommerce site, portfolio, blog, or business, there’s a theme that will work for your specific needs. On top of your theme, you can further customize your pages with a builder tool like Elementor.
To find a theme that works best for you in WordPress.org, head to your admin dashboard. Click Appearance, then Themes. You’ll be brought to another screen where you can browse available themes or search for a specific one you have in mind.
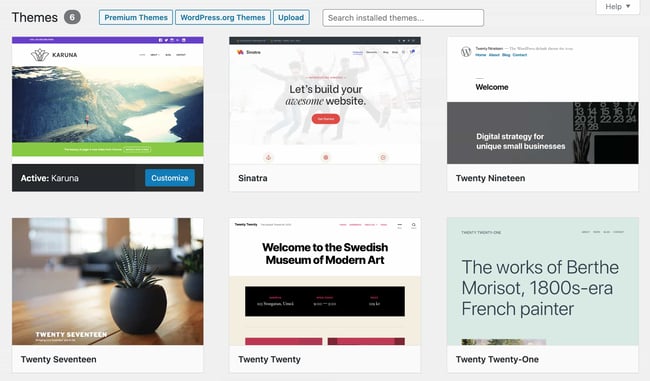
Once you find the perfect theme, simply install it to begin customizing. Each theme has different steps required during the customization process, so be sure to follow them closely. If a theme has a website (often accessible through the WordPress theme and template library), check for documentation as you work through the customization process.
5. Add posts and pages to your website.
When you add content to your WordPress website, it’s usually displayed in the form of posts and pages.
Posts (or “dynamic pages”) are typically used for blogs and portfolios because they automatically place your newest website content at the top of your featured content. Pages are static, which is why they appeal more to business owners — the added content stays in the same place.
Posts and pages are the main post types in WordPress. Additionally, there are other native post types, as well as custom post types. For now, we can just stick to pages and posts.
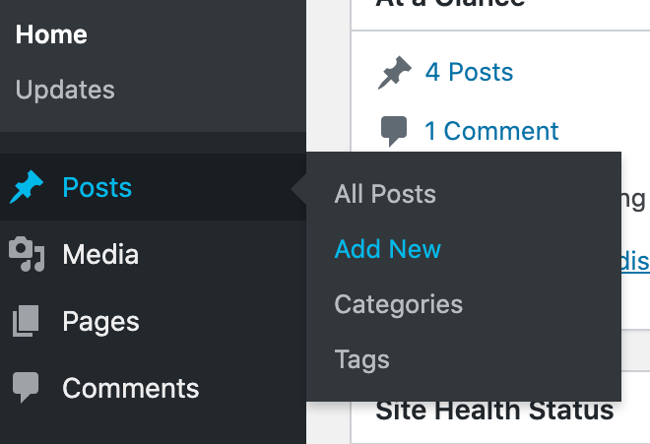
Start by deciding whether you want a post or page to serve as the homepage (or any page) of your website. To add a post to your website, go to the admin dashboard, click Posts and then Add New.
You can add a title for your post, place photos, change the format, and insert page elements via blocks and shortcodes. Click Save Draft to save your changes as a draft, or click Publish to immediately take the post live.
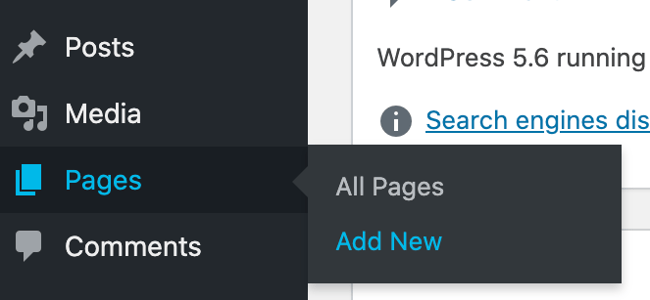
Adding a page to your website is a similar process. In your admin area, click Pages, then Add New.


![Toni Kroos là ai? [ sự thật về tiểu sử đầy đủ Toni Kroos ]](https://evbn.org/wp-content/uploads/New-Project-6635-1671934592.jpg)


